Every Shopify Flow automation starts with a single decision: which trigger do I use?
Choose the wrong trigger, and your workflow never runs. You'll spend hours debugging why orders aren't getting tagged, why inventory alerts aren't firing, why customers aren't entering your campaigns. Choose the right trigger, and you automate hours of manual work with a single workflow that runs perfectly every time.
The problem isn't that Flow lacks triggers—there are over 100 available. The problem is knowing which one to use. Should you trigger on "Order created" or "Order paid"? Does "Product variant inventory quantity changed" fire when you adjust inventory manually? When exactly does "Order risk analyzed" run versus "Order created"?
This is the definitive guide to every Shopify Flow trigger available in 2026.
What you'll find in this guide:
- Complete trigger catalog: All 100+ triggers organized by category (Order, Customer, Product, Fulfillment, Inventory, Returns, B2B, and more)
- Real use cases: Practical examples showing when to use each trigger
- Timing clarity: Understanding which triggers fire instantly vs which have delays
- Data availability: What information each trigger provides for conditions and actions
- Trigger selection guidance: How to choose the right trigger for your workflow
- Common mistakes: Pitfalls to avoid when selecting triggers
- Limitations overview: Brief look at what triggers DON'T exist (and what to do about it)
How to use this guide:
Think of this as your trigger reference manual. You don't need to read it cover-to-cover. Instead:
- Browse by category to explore triggers in your area of focus (orders, inventory, customers, etc.)
- Use search (Ctrl+F) to find specific triggers when building workflows
- Read use case examples to spark automation ideas you hadn't considered
- Bookmark this page and reference it every time you create a new workflow
Who this is for:
This guide serves store operators building automation workflows, developers understanding Flow's capabilities, and operations teams scoping automation projects. Whether you're creating your first workflow or your fiftieth, this reference helps you select the right trigger every time.
Ready to master Flow triggers? Let's start with the fundamentals.
Understanding Flow triggers
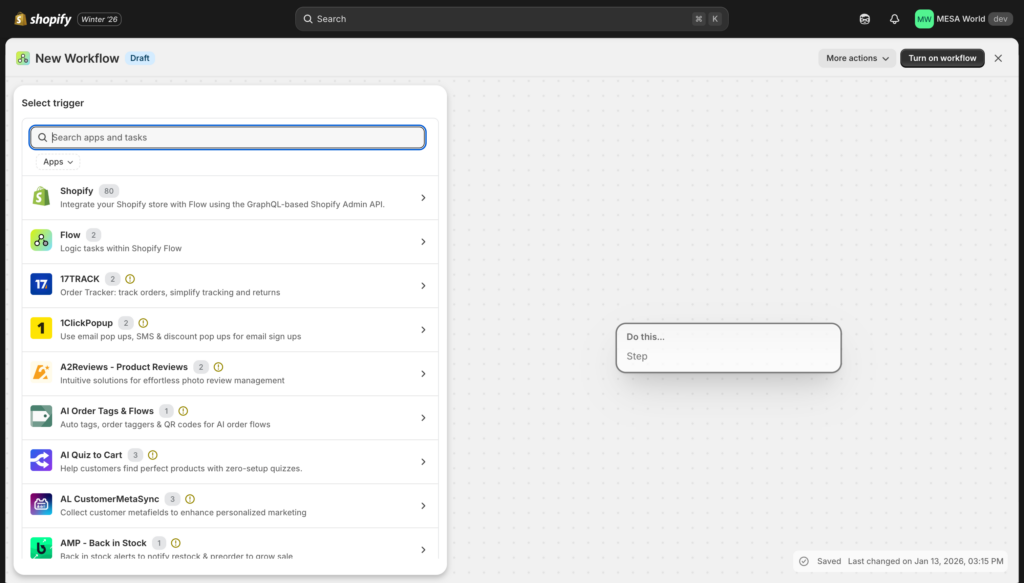
What is a trigger?
A trigger is the specific event that starts a Shopify Flow workflow. Think of it as the "when" that kicks off your automation. Every workflow has exactly one trigger—it's the starting gun that tells Flow, "something happened, start running."
Examples:
- Trigger: Order created → Then: Tag high-value orders over $500
- Trigger: Product variant out of stock → Then: Send email alert to inventory team
- Trigger: Customer joined VIP segment → Then: Add to exclusive email campaign
Without the trigger event occurring, your workflow never runs—no matter how well-designed your conditions and actions are.
Types of triggers available
Flow offers four categories of triggers:
Event-based triggers (most common) fire when specific actions happen in Shopify. These include order created, customer deleted, product added, inventory changed—immediate responses to merchant or customer actions. Most workflows use event-based triggers because they respond in real-time to store activity.
Scheduled triggers fire at specific dates and times you configure. Examples include daily inventory reports, weekly sales summaries, or monthly customer segmentation updates. These are essential for recurring tasks and batch operations that don't need real-time responses.
State change triggers fire when status or conditions change. These track transitions like product status updated (active to archived), customer account enabled (inactive to active), or order fulfilled (unfulfilled to complete). They capture the moment something shifts from one state to another.
Relationship triggers fire when objects connect or disconnect. Examples include customer joined segment, tags added/removed, or company contact assigned permission. These track changes in how different data relates to each other.
How triggers differ from conditions
This is the most common point of confusion: "Should this be my trigger or a condition?"
Trigger = WHEN the workflow starts
- Determines which events make the workflow run
- One per workflow
- Cannot be changed after workflow starts running
Condition = IF the workflow continues
- Filters which workflows complete their actions
- Unlimited conditions per workflow
- Controls the path workflow takes
Practical example:
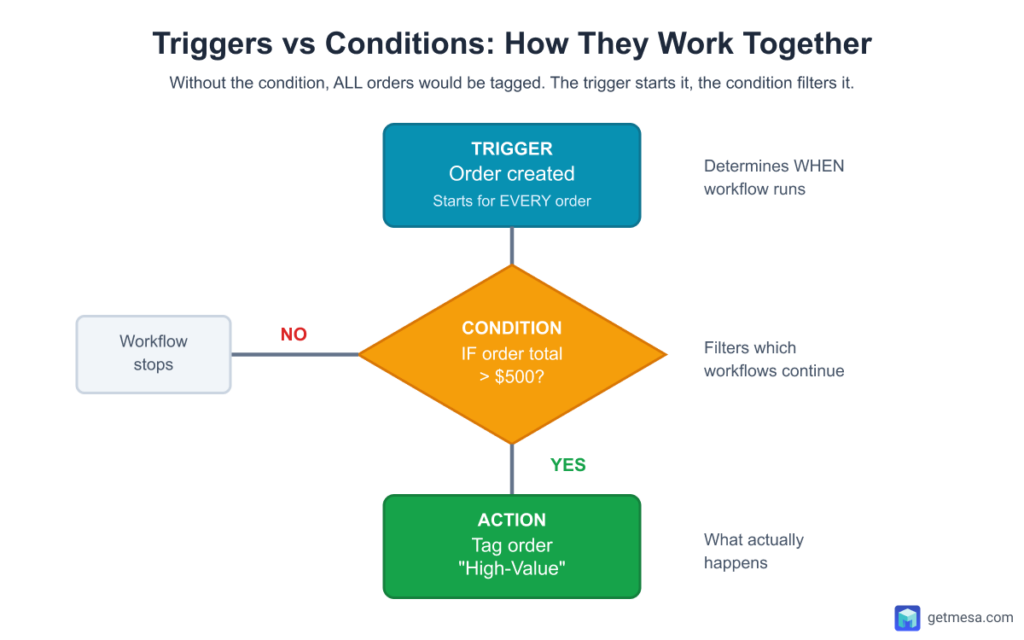
- Trigger: Order created (workflow runs for every single new order)
- Condition: IF order total > $500 (only continues for high-value orders)
- Action: Tag order "High-Value"
Without the condition, ALL orders would be tagged. The trigger starts the engine, conditions steer the direction, actions execute the work.
Common mistake: Trying to use multiple triggers in one workflow. If you need different starting points, create separate workflows. For example, if you want to tag orders on both "Order created" AND "Order paid," you need two workflows—one for each trigger—that perform the same tagging logic.
Trigger data availability
Each trigger provides specific data fields you can use in conditions and actions:
- Order created trigger: Access order total, line items, customer info, shipping address, payment gateway
- Product deleted trigger: Access product title, SKU, vendor—but NOT inventory (it's already deleted)
- Scheduled time trigger: No data fields (because nothing "happened," it's just a timer)
Always check what data is available from your chosen trigger before building complex conditions. If the data you need isn't available, you might need a different trigger or a workaround using "Get data" actions.
Next: Let's explore every available trigger, organized by business function.
Core Shopify triggers by category
These are the native Shopify triggers available in every Flow installation, regardless of plan or apps. Organized by business function for easy navigation.

Order triggers
Flow offers 8 order-related triggers covering the complete order lifecycle from initial creation through deletion. These are among the most frequently used triggers in Flow because orders are the heartbeat of ecommerce operations.
Order triggers form the foundation of most Flow automations. Nearly every store uses "Order created" for initial processing, "Order paid" for confirmed revenue tracking, and "Order risk analyzed" for fraud prevention. Understanding the subtle differences between these triggers—especially the timing of when each fires—is critical for building reliable workflows.
Fires immediately when a new order is placed in your store, regardless of payment status or fulfillment state. This is the single most-used trigger in Shopify Flow.
When to use:
- Tagging orders by sales channel, geographic location, product type, or order value
- Initial order routing to fulfillment locations based on inventory or geography
- Sending internal notifications to operations team about new orders
- Starting order processing workflows that need to run before payment confirmation
- Adding orders to external systems (spreadsheets, CRM, project management)
- Categorizing orders for reporting and analytics
Important notes:
- This trigger fires for ALL orders including unpaid orders, test orders, and draft orders that convert to orders.
- Payment hasn't necessarily been captured yet—orders can be created but then fail payment or be abandoned.
- If you need confirmed payment before taking action (like allocating inventory or triggering fulfillment), use "Order paid" trigger instead.
- The order might also have no risk assessment yet—that comes 1-2 minutes later with "Order risk analyzed" trigger.
Available data: Order total, line items with product details, customer information, shipping and billing addresses, payment gateway, sales channel, tags, notes, discount codes used, shipping method selected, order number.
Fires when payment is successfully captured for an order, whether through automatic payment capture or manual payment capture by merchant.
When to use:
- Triggering fulfillment processes since payment is confirmed and order won't be abandoned
- Sending "thank you for your purchase" confirmation emails
- Exporting order data to external systems (only paid orders, excludes unpaid)
- Awarding loyalty points for confirmed purchases
- Updating sales forecasts and revenue tracking
- Syncing orders to accounting systems for revenue recognition
- Creating customer support tickets for high-value paid orders
Important notes:
- This is separate from "Order created" because many orders are created but never paid—customers abandon at the payment step, credit cards are declined, or manual payment capture is enabled but never executed.
- Using "Order paid" ensures payment is actually in your account before taking action.
- For stores using manual payment capture (common for high-risk management), this trigger fires only after merchant manually captures payment, not at order creation.
- The delay between "Order created" and "Order paid" is typically seconds for automatic capture, but can be hours or days for manual capture.
Available data: Same as "Order created" plus payment confirmation details, payment gateway used, transaction ID, and authorization status.
Fires when ALL line items in an order have been marked as fulfilled—meaning the entire order has been completely shipped or delivered.
When to use:
- Sending post-purchase thank you emails after customer receives their order
- Triggering product review requests (typically with 7-14 day delay after fulfillment)
- Closing out project management tasks or order tracking tickets
- Updating sales commission calculations when orders are fully completed
- Marking orders as "complete" in external systems or dashboards
- Starting post-fulfillment workflows like replenishment reminders
- Calculating fulfillment speed metrics (time from order to fulfilled)
Important notes:
- This trigger only fires when the ENTIRE order is fulfilled. If an order ships in multiple fulfillments (partial shipments from different warehouses), this trigger waits until the last fulfillment completes.
- For workflows that need to run on each individual fulfillment (like sending tracking numbers for each shipment), use "Fulfillment created" trigger instead.
- Some merchants confuse "Order fulfilled" with "Order paid"—they're different events.
- An order can be paid but not fulfilled (awaiting shipment), or fulfilled but not paid (for stores using invoice payment terms).
Available data: Order details plus fulfillment information including tracking numbers, carrier names, fulfillment dates, and which fulfillment location(s) processed the order.
Fires when an order is cancelled by either the merchant or the customer through Shopify's cancellation process.
When to use:
- Sending cancellation confirmation emails to customers
- Alerting inventory team about items returning to available stock
- Notifying customer service team about cancellations for follow-up
- Tracking cancellation patterns, reasons, and frequency
- Removing cancelled orders from active fulfillment queues
- Updating external systems to reflect cancellation status
- Flagging high-value cancellations for retention efforts
Important notes:
- Cancelled orders are NOT the same as deleted orders.
- Cancelled orders remain in Shopify with "Cancelled" status—they're part of order history and reporting. The order still exists, it's just not being fulfilled.
- Cancellation can happen at any stage: before payment, after payment but before fulfillment, or even after partial fulfillment.
- Check the order's fulfillment status in your workflow conditions if cancellation timing matters.
- Some merchants cancel orders as part of fraud prevention workflows—in those cases, you probably don't want to send customer-facing emails.
Available data: Order details, cancellation reason (entered by whoever cancelled), who cancelled (customer vs merchant), refund status (whether refund was issued), restocking status (whether items returned to inventory), cancellation timestamp.
Fires when an order is permanently deleted from Shopify. This is rare—most merchants cancel orders rather than delete them, since deletion removes the order from all reporting and history.
When to use:
- Removing deleted orders from external systems (Google Sheets, CRM, databases)
- Maintaining data consistency across platforms when orders are deleted
- Compliance and audit logging for permanent deletions
- Cleanup workflows for integrations that synced the original order
- Alerting management about order deletions (unusual activity)
- Tracking who deleted orders and why (if deletion reason is available)
Important notes:
- Deleted orders are GONE permanently—they cannot be recovered from Shopify. This is different from cancelled orders, which remain in the system with "Cancelled" status.
- Most merchants rarely delete orders because it removes them from sales reporting, financial records, and customer history.
- Deletion is typically used only for test orders, duplicate orders created by mistake, or in rare cases for privacy/GDPR compliance requests.
- If you're using this trigger, make sure your workflow accounts for the fact that the order no longer exists in Shopify—you can't query it for additional details or update it.
Available data: Limited order data (order number, customer name, basic details) because order is being deleted. You won't have access to full order details like line items or notes—capture any needed data quickly when trigger fires.
Fires after Shopify's automated fraud analysis completes on an order. This typically happens 1-2 minutes after "Order created" trigger fires.
When to use:
- Holding or cancelling high-risk orders before fulfillment to prevent fraud
- Routing suspicious orders to manual fraud review queue
- Capturing payment on low-risk orders when using manual payment capture
- Creating fraud team notifications for orders flagged as risky
- Tagging orders by risk level for reporting and pattern analysis
- Implementing graduated responses based on risk level (hold medium, cancel high)
- Tracking fraud prevention effectiveness and false positive rates
Important notes:
- This trigger ALWAYS fires after "Order created"—there's a 1-2 minute delay while Shopify's fraud analysis runs.
- If you build workflows that need risk data, you must use "Order risk analyzed" trigger, not "Order created."
- The risk assessment includes detailed reasoning: why the order was flagged, which indicators triggered concerns (mismatched billing/shipping, suspicious IP, high velocity, etc.). Risk levels are: Low (safe to fulfill), Medium (some concern, review recommended), High (significant fraud indicators, do not fulfill without verification).
- Shopify's fraud analysis is generally accurate but not perfect—expect some false positives where legitimate customers are flagged as risky. Build manual review processes for medium and high-risk orders rather than auto-cancelling everything.
Available data: Risk level (Low, Medium, High), detailed risk assessment with specific fraud indicators, recommended action, risk score, CVV and AVS check results, order details (same as Order created trigger).
Fires when any financial transaction is created on an order—including payment authorizations, payment captures, refunds, voids, disputes, and chargebacks.
When to use:
- Tracking partial refunds separately from full refunds
- Logging all transaction history for accounting reconciliation
- Monitoring failed payment attempts and authorization issues
- Integrating with external accounting systems (QuickBooks, Xero, NetSuite)
- Alerting accounting team about refunds over certain thresholds
- Tracking payment method usage and gateway performance
- Identifying patterns in failed transactions for checkout optimization
Important notes:
- This trigger fires for MANY transaction types, not just successful payments.
- Use conditions to filter for the transaction kinds you care about: "Sale" = payment, "Refund" = money returned to customer, "Void" = authorization cancelled, "Authorization" = payment hold, "Capture" = payment collected.
- Transaction status can be: "Success", "Failure", "Pending", "Error".
- One order can have many transactions over its lifetime—initial authorization, capture, partial refund, another partial refund, etc. Each triggers this workflow separately.
- The trigger provides gateway information, so you can track which payment methods are succeeding vs failing.
Available data: Transaction type/kind, amount, currency, payment gateway used, transaction status (success/failure/pending), error messages (if failed), order details, customer information, timestamp of transaction.
Fires when a payment schedule due date is reached for orders with deferred payment terms—including B2B Net 30/60/90 payment terms, Shop Pay Installments, subscription billing schedules, and other payment plans.
When to use:
- Sending payment due reminders to B2B customers before due date
- Processing scheduled payment collection attempts
- Updating customer payment status in CRM when payments come due
- Creating overdue payment alerts and follow-up workflows
- Tracking on-time vs late payment patterns by customer
- Calculating aging receivables reports
- Escalating overdue payments to collections team
Important notes:
- This trigger is primarily used by B2B merchants using Shopify Plus with payment terms enabled, or stores offering installment payments through Shop Pay or similar services.
- Not all stores will have payment schedules—many consumer retail stores require immediate payment at checkout.
- The trigger fires on the due date itself (or shortly before if you configure lead time), not when payment is actually made.
- You'll need separate workflows to handle successful vs failed payment collection.
- Payment schedules can have multiple due dates for installment plans—this trigger fires for each installment due date separately.
Available data: Due date, payment amount due, payment schedule details (frequency, number of payments, remaining balance), original order information, customer details, payment terms (Net 30, etc.), whether payment is overdue.
Draft order & Refund triggers
Flow offers 3 triggers for managing draft orders (pre-orders created in admin before customer payment) and refunds. These triggers help track sales pipeline activity and financial transactions.
Draft order and refund triggers provide visibility into sales pipeline and financial adjustments. Use "Draft order created" to track potential sales requiring follow-up, "Draft order deleted" to analyze lost opportunities, and "Refund created" to monitor financial adjustments and customer satisfaction issues. High refund rates and draft order deletion rates signal operational problems requiring investigation.
Fires when a draft order is created in Shopify admin (orders created by merchants before customer payment, often for phone orders, wholesale orders, or custom quotes).
When to use:
- Monitoring sales team activity and pipeline
- Tracking potential sales that need follow-up
- Creating tasks for sales reps to follow up on quotes
- Sending payment links to customers for pending orders
- Reporting on draft order volume and conversion
- Alerting managers about high-value draft orders
- Integrating draft orders into CRM systems
Important notes:
- Draft orders are NOT completed orders—no payment has been collected yet. They represent potential sales requiring follow-up.
- Common uses: phone orders (take order info, send payment link later), wholesale orders (create order, customer pays via invoice), custom quotes (build order, customer reviews before committing).
- Draft orders can expire if not converted within certain timeframe—track aging drafts. High draft order abandonment might indicate pricing issues, complex checkout, or poor follow-up.
- Sales teams use drafts as pipeline management—track conversion rate from draft to completed order.
- Draft orders created by apps/integrations might need different handling than manually created drafts.
Available data: Draft order details (items, customer, totals, notes), who created the draft order, created timestamp, payment status, custom attributes, shipping information.
Fires when a draft order is permanently deleted from Shopify (usually when deal falls through or draft is no longer needed).
When to use:
- Tracking lost sales opportunities and reasons
- Cleaning up draft orders from external systems
- Alerting sales managers about deleted high-value drafts
- Understanding why deals don't close (loss analysis)
- Removing drafts from CRM pipeline
- Calculating draft order conversion rates
- Logging deleted drafts for sales reporting
Important notes:
- Draft order deletions usually mean lost sales—someone decided not to move forward.
- Track deletion patterns: how long drafts sit before deletion (indicates follow-up timing), who's deleting them (sales reps cleaning up vs customers abandoning), what's in deleted drafts (certain products harder to close?).
- High draft deletion rate indicates sales process problems: quotes taking too long, pricing not competitive, poor follow-up, or friction in payment process.
- Most draft orders should convert to orders within 7 days—drafts sitting longer than 14 days are at high risk of deletion.
- Don't confuse draft order deletion with order cancellation—draft orders were never completed purchases. Deleted drafts represent opportunities lost before conversion.
Available data: Limited data since draft is being deleted—draft order number, customer name, total amount, items, who deleted it, deletion timestamp.
Fires when a refund is issued to a customer (full or partial refund on a completed order).
When to use:
- Notifying accounting team about refunds for financial reconciliation
- Alerting customer service about refunds requiring explanation
- Creating follow-up workflows for customer retention after refunds
- Tracking refund patterns by product, reason, or customer
- Monitoring refund fraud (excessive refund requests)
- Calculating refund rate impact on revenue
- Updating customer lifetime value with refund data
Important notes:
- Refunds can be full (entire order) or partial (some items). Partial refunds are common for: damaged items in multi-item orders, price adjustments, promotional credits.
- Refunds don't always mean returns—can be issued for: order cancellations before shipping, price matching, defective items customer keeps, goodwill gestures.
- Track refund reasons carefully: defective products need quality control attention, pricing issues need review, customer service problems need resolution.
- High refund rates indicate problems: product quality issues, misleading product descriptions, poor customer service, complicated return policies.
- Refunds impact cash flow and revenue recognition—accounting needs timely notification.
- Some refunds are to store credit instead of original payment method—differentiate in workflows.
- Refund fraud exists: customers claiming items not received, claiming defects when not true—monitor customers with excessive refund requests.
Available data: Refund amount, refund reason, order details, refunded items, refund method (original payment, store credit, etc.), who issued refund, refund timestamp, whether restocking occurred.
Customer triggers
Flow offers 14 customer-related triggers for managing the complete customer lifecycle—from initial creation through account management, segmentation, payment methods, and engagement tracking. These triggers enable personalized experiences and automated customer relationship management.
Customer triggers enable sophisticated lifecycle marketing and relationship management. The most impactful triggers are "Customer joined segment" for dynamic personalization, "Customer abandons checkout" for revenue recovery, and "Customer payment method revoked" for subscription retention. Understanding how these triggers work together creates automated customer journey workflows that scale with your business.
Fires when a new customer record is created in your store. This happens either when someone creates an account directly, or when a guest checkout automatically generates a customer profile in Shopify.
When to use:
- Initial customer tagging and segmentation for lifecycle marketing
- Adding new customers to email marketing platforms (Klaviyo, Mailchimp, Omnisend)
- Creating customer records in external CRM systems (HubSpot, Salesforce)
- Starting welcome workflow sequences for new customers
- Tracking customer acquisition sources and channels
- Cohort analysis tagging (marking which month/campaign customers joined)
- Setting up initial customer attributes and preferences
Important notes:
- This trigger fires for multiple scenarios: (1) customer manually creates account on your site, (2) guest checkout automatically creates customer record after purchase, (3) merchant manually creates customer in admin, (4) customer imported via CSV or API. The trigger doesn't distinguish between these scenarios—you'll need to check order count or account status to understand the context.
- Guest checkouts create customer records but those customers don't have activated accounts until they set a password. See "Customer account enabled" trigger for true account activations.
Available data: Customer name, email, phone, created date, accepts marketing status, tags, order count (how many orders they've placed), total amount spent, default address, customer note.
Fires after a customer activates their account by clicking the verification email link and setting a password. This represents engaged customers who took the extra step to create a login.
When to use:
- Sending welcome emails specifically to account holders (not guest checkout customers)
- Offering account-exclusive perks like saved addresses, order history, wishlists
- Triggering account onboarding sequences that explain account benefits
- Differentiating engaged customers (created accounts) from guest shoppers
- Enrolling account holders in loyalty programs automatically
- Starting personalized recommendation engines for logged-in customers
- Tracking account creation conversion rate (invites sent vs accounts activated)
Important notes:
- This is separate from "Customer created" because many customer records exist without activated accounts—guest checkout creates customer profiles, but customers haven't verified email or set password.
- "Customer account enabled" specifically identifies customers who completed the activation process.
- There's often a delay between customer creation and account enablement—could be minutes (they activate immediately) or never (guest checkout customers who never create login).
- Only use this trigger for workflows that specifically require account login capability.
- The trigger provides confirmation that customer can now log into your store.
Available data: Customer details, account activation timestamp, email verification status, plus all standard customer data (orders, tags, addresses).
Fires when a store admin manually disables a customer account, preventing the customer from logging in.
When to use:
- Removing disabled customers from active marketing email lists
- Logging account deactivations for security and compliance audits
- Alerting customer service team about account status changes
- Updating external systems (CRM, loyalty programs) with account status
- Tracking which admin disabled the account and when
- Creating workflows to handle consequences of account disabling
- Suppressing account-specific communications to disabled accounts
Important notes:
- Account disabling is a manual merchant action, not something customers do themselves. It's typically used for fraud cases, abusive customers, or customers who violated terms of service.
- Disabled accounts still exist in Shopify—the customer record remains with full order history, but the customer cannot log in.
- This is different from "Customer deleted" which removes the entire record. If you're disabling accounts as part of fraud workflows, make sure you're not accidentally sending customer-facing emails that would alert fraudsters.
- Consider privacy implications—disabled accounts should probably be removed from marketing entirely.
Available data: Customer details, who disabled the account (admin user), timestamp of disabling, customer's order history and tags.
Fires when a customer record is permanently deleted from Shopify. This is often done for GDPR/privacy compliance requests or cleanup of test customer data.
When to use:
- Removing deleted customers from all external systems (email platforms, CRM, databases)
- GDPR and data privacy compliance workflows
- Audit logging for regulatory compliance (who deleted what and when)
- Cleaning up integrations that synced the customer data
- Sending deletion confirmation to data protection/legal team
- Maintaining data consistency across platforms when customer data is erased
- Tracking data deletion requests and completion
Important notes:
- Deleted customers are PERMANENTLY GONE from Shopify—no recovery possible. This is serious and irreversible.
- Most deletions are for GDPR "right to be forgotten" requests or privacy law compliance.
- When customer is deleted, their order history remains but is no longer associated with customer record—orders show as placed by "Deleted customer." Act quickly in your workflow to capture any needed data before deletion completes.
- Some jurisdictions require you to delete customer data from ALL systems, not just Shopify—your workflow should cascade deletions to every platform where customer data exists.
- Consider legal review of your deletion workflows to ensure compliance.
Available data: Limited customer data because deletion is in progress—capture email, name, basic details quickly. Full order history is not accessible via trigger (orders remain but are disconnected from customer).
Fires when a customer opts into email marketing through signup forms, checkout email subscription checkboxes, or account settings preference changes.
When to use:
- Adding new subscribers to email marketing platform segments
- Triggering welcome email series for new subscribers
- Compliance logging (tracking when and how customer consented to marketing)
- Tracking subscription source attribution (which form, page, or touchpoint)
- Updating marketing permissions in external CRM systems
- Starting subscriber-specific automation flows
- Measuring subscription conversion rate by traffic source
Important notes:
- This trigger fires for explicit opt-ins only—when customer actively checks box or submits form.
- It does NOT fire for customers who were already subscribed (existing subscribers don't re-trigger this).
- Subscription can happen at multiple points: account creation, checkout, popup forms, footer signups, etc. Track the subscription source to understand which acquisition channels work best.
- Remember that unsubscribes don't trigger anything—there's no "Customer unsubscribed" trigger, so you'll need to use scheduled workflows to periodically sync subscription status.
- Different from "Customer created"—not all customers subscribe to marketing.
Available data: Customer email, name, subscription timestamp, marketing consent status, customer tags, order history, which channel they subscribed through.
Fires when a customer enters a segment you've defined in Shopify (customer groups based on criteria like VIP spenders, at-risk churners, first-time buyers, location-based groups, etc.).
When to use:
- Triggering segment-specific marketing campaigns automatically
- Activating tier-based perks and benefits (VIP free shipping, early access)
- Churn prevention workflows (customer enters "At Risk" segment)
- Win-back campaigns (customer enters "Inactive 90 Days" segment)
- Personalization triggers (update website experience based on segment)
- Loyalty tier changes (customer reaches new spending threshold)
- Geographic targeting (customer moves to new segment based on location)
Important notes:
- This trigger does NOT fire for existing segment members—only when customer enters segment AFTER segment was created.
- If you create a "High Spenders" segment and 500 customers already qualify, those 500 won't trigger workflows. Only new entries trigger.
- Segments are dynamic—customers enter and exit automatically as they meet or stop meeting criteria.
- Use this trigger with "Customer left segment" to create complete lifecycle workflows.
- Consider entry/exit timing—customers might bounce between segments quickly if criteria are close (spent $1,995, then $2,005, crossing threshold).
- Add buffer to prevent notification spam.
Available data: Segment name, segment ID, customer details, when they joined segment, all standard customer data (order history, tags, spend).
Fires when a customer no longer meets the criteria for a segment they were previously in (exits the segment automatically).
When to use:
- Removing segment-specific perks automatically (no longer VIP? Remove free shipping)
- Win-back campaigns (customer left "Active Buyers" segment due to inactivity)
- Tier demotion workflows (notify customer they're about to lose benefits)
- Re-engagement campaigns (customer fell out of engaged segment)
- Churn analysis (tracking who leaves high-value segments)
- Updating external systems when customer status changes
- Grace period offers (spend $X to stay in VIP tier)
Important notes:
- Segment exits are automatic based on criteria no longer being met.
- Customer might exit because: spent less (fell below VIP threshold), became inactive (time-based segment), changed location (geographic segment), or demographic change.
- Use this trigger to prevent benefit abuse—remove perks when customer no longer qualifies.
- Consider grace periods for valuable customers: "You're $50 away from maintaining VIP status—shop this week!"
- Time-based segments can cause predictable exits (everyone enters "New Customer" segment at signup, exits 60 days later). Design workflows accordingly.
Available data: Segment name, segment ID, customer details, when they exited segment, all standard customer data.
Fires when one or more tags are added to a customer record, regardless of who/what added them (manual merchant action, another workflow, or app).
When to use:
- Cascading workflows where one workflow's tag triggers the next workflow
- Triggering email campaigns based on specific tags
- Syncing tag changes to external systems (CRM gets updated when tag added)
- Automation chains (tag added → triggers next automation step)
- Removing or replacing tags (if "Old-Tag" added, remove it and add "New-Tag")
- Tracking tag-based customer journeys
- Implementing tag-based business logic (specific tags trigger specific actions)
Important notes:
- This trigger fires EVERY TIME tags are added, even if multiple tags added simultaneously (one trigger event for the action).
- It fires regardless of who added tags—merchant, workflow, app, API, or CSV import.
- Be careful with tag-based workflow chains: Workflow A adds tag → Workflow B (triggered by tag added) adds different tag → Workflow C (triggered by that tag) adds another tag → infinite loop if not careful.
- Use conditions to prevent loops: "Customer does NOT have tag X" before adding tag X.
- The trigger doesn't tell you which specific tags were added—just that tags were added to customer.
Available data: Customer details with ALL current tags (not just newly added ones), who triggered the tag addition (if manual), timestamp, order history.
Fires when one or more tags are removed from a customer record, regardless of who/what removed them.
When to use:
Removing perks or benefits when qualifying tags are removed
Tracking tag lifecycle and changes over time
Cleanup workflows (when temporary tags removed, trigger next action)
Syncing tag removals to external systems
Triggering workflows that depend on tag absence
Audit logging for important tag changes
Reverting actions that were tag-dependent
Important notes:
This trigger fires when tags are removed but doesn't tell you WHICH tags were removed—you see the customer's current tags (what remains), not what was removed.
To know which tag was removed, you'd need to compare against stored data.
Tag removals can be manual (merchant removes tag), automated (workflow removes tag), or bulk (CSV import updates).
Common use case: temporary tags that mark workflow progress—when tag removed, it signals completion of that stage.
Be careful with tag removal timing: if you remove a tag that another workflow depends on, you might break that workflow's logic.
Available data: Customer details with current remaining tags (after removal), timestamp of removal, customer order history.
Fires when a customer adds a new payment method to their account (credit card, PayPal, Shop Pay, etc.).
When to use:
- Confirming payment method setup for subscription customers
- Updating billing information in external subscription management systems
- Tracking payment method preferences and trends
- Security monitoring (unusual payment method additions)
- Enabling subscription-based purchases (payment method required)
- Removing payment method setup reminders once added
- Tracking payment method diversity (customers with multiple payment options)
Important notes:
- Not all customers add payment methods to accounts—many use guest checkout with one-time payment.
- This trigger is primarily relevant for subscription businesses, B2B customers with stored payment methods, or stores using Shop Pay with saved payment info.
- Payment methods are stored securely—you don't get actual card numbers, just metadata like card type (Visa, Mastercard) and last 4 digits.
- Multiple payment methods per customer are allowed—this trigger fires for each new addition.
- Consider using this trigger to proactively enable subscription conversion when customers show intent by saving payment info.
Available data: Payment method type (credit card, PayPal, etc.), card brand (Visa, Mastercard), last 4 digits, expiration date, billing address, customer details.
Fires when a customer updates an existing payment method (new expiration date, new billing address, replaced card, etc.).
When to use:
- Confirming payment method updates for active subscriptions
- Clearing failed payment flags (if customer updated after failure)
- Security monitoring (frequent updates might indicate fraud)
- Updating billing information in external systems
- Removing payment update reminder workflows
- Tracking payment method maintenance patterns
- Resuming paused subscriptions after payment update
Important notes:
- Updates can be initiated by customer (proactive update) or triggered by failed payments (reactive update).
- Context matters—an update after failed payment is different from routine card replacement.
- Payment method updates often happen when: cards expire and customer gets replacement, billing address changes, customer switches preferred payment type.
- For subscription businesses, payment method updates are critical recovery points—when customer updates after failure, you have short window to retry billing before they churn.
- Act quickly with confirmation and billing retry.
Available data: Updated payment method details (type, last 4 digits, expiration, billing address), previous payment method info (if available), customer subscription status, timestamp of update.
Fires when a customer removes a payment method from their account or when payment method is automatically revoked (expired, cancelled by bank, fraud detection).
When to use:
- Pausing active subscriptions (no valid payment method available)
- Sending "update payment method" urgent emails to subscription customers
- Creating high-priority support tickets for at-risk subscription revenue
- Tracking churn risk (payment method removal often precedes cancellation)
- Security logging (fraud investigations may revoke payment methods)
- Removing customers from subscription-only offers
- Alerting customer success team about high-value customer payment issues
Important notes:
- Revocation can be customer-initiated (deliberately removed) or automatic (card expired, bank cancelled, fraud).
- Distinguish between these if possible—deliberate removal might indicate churn intent, automatic expiration is usually addressable.
- For subscription businesses, this trigger is CRITICAL—revoked payment methods mean imminent failed billing and potential churn. Act within hours, not days.
- Some payment methods expire gradually (credit cards have expiration dates)—proactive workflows can prevent revocations by sending update reminders before expiration.
- This trigger is your last chance to save subscription revenue.
Available data: Revoked payment method details (what was removed), revocation reason (if available—expired, removed, cancelled), customer subscription status, remaining payment methods (if customer has multiple), customer details.
Fires when a customer reaches the checkout page (entered email, started entering payment/shipping info) but doesn't complete the purchase within Shopify's abandonment window (typically 10 hours of inactivity).
When to use:
- Abandoned checkout recovery email campaigns (most common use)
- Remarketing workflows to recover lost sales
- Exit intent offers and incentives
- Tracking checkout abandonment patterns and reasons
- A/B testing recovery messaging and discount strategies
- Identifying checkout friction points (where do people abandon?)
- High-value abandonment alerts (big carts need personal outreach)
Important notes:
- Abandoned checkouts are NOT orders—no order record is created until customer completes purchase. The checkout data is stored separately.
- Customers often abandon legitimately: comparison shopping, need approval, waiting for payday, distracted by life.
- Recovery emails work best when: sent within 2-24 hours, personalized with cart contents, include light incentive (not heavy discount—train customers to abandon), mobile-optimized (many abandon on mobile).
- Don't spam—2-3 recovery emails maximum.
- This trigger only fires once per checkout abandonment—if customer returns and abandons again, new trigger event.
Available data: Checkout URL, abandoned cart contents (products, quantities, variants), customer email, subtotal, created date, shipping address (if entered), phone number (if entered), discount codes applied.
Fires when a customer viewed at least one product but left the store without adding to cart or checking out (abandoned browse or product view).
When to use:
- Browse abandonment email campaigns (lighter touch than cart abandonment)
- Remarketing to interested shoppers who didn't commit
- Product interest tracking without purchase conversion
- Personalized follow-up based on browsed products
- Converting browsers to buyers with targeted messaging
- Tracking product page performance (high views, low conversions)
- Building interest segments for future campaigns
Important notes:
- This trigger fires for BROWSING only—customer viewed products but took no action. It's less urgent than abandoned cart/checkout because customer showed interest but never committed.
- Browse abandonment emails should be gentler: no "you forgot this" language, focus on "you might like" and product recommendations.
- Success rates are lower than cart recovery (5-10% vs 20-30%) but worth implementing for volume.
- Exclude customers who subsequently added to cart or purchased (they're in different flows).
- Consider browse abandonment the "awareness" stage—they're researching, not ready to buy yet.
- Multi-product browse works better than single product (shows broader interest).
Available data: Products viewed, product URLs, time on site, customer email (if they're logged in or previously provided email), customer session data, referral source.
Product & Inventory triggers
Flow offers 10 product and inventory triggers covering product lifecycle management, catalog changes, and inventory tracking. The inventory triggers are among the most critical for preventing stockouts and maintaining accurate product availability.
Product and inventory triggers are essential for catalog management and stockout prevention. The most critical trigger is "Product variant inventory quantity changed" for low stock alerts—use it with proper conditions (current quantity AND prior quantity) to avoid alert spam. Pair "Product variant out of stock" and "Product variant back in stock" triggers to automate product visibility based on availability.
Fires when a new product is added to your store (manually, via CSV import, or through apps/API).
When to use:
- Auto-tagging new products by category, vendor, price point, or attributes
- Assigning products to collections automatically based on title or type
- Alerting merchandising team about new product additions
- Checking for missing required data (images, descriptions, SEO fields)
- Syncing new products to external systems immediately
- Starting product setup workflows (create variants, set pricing, configure shipping)
Important notes:
- Products created via bulk import or API integration will trigger this workflow for EACH product—potentially hundreds or thousands of times.
- Design workflows to handle volume.
- Products are often created incomplete (missing images, descriptions) and updated later—use delays before checking completeness.
- The trigger fires before product is published to sales channels—check publication status if workflow depends on product being live.
Available data: Product title, vendor, product type, tags, price, compare-at-price, SKU, inventory quantity, images, description, status (active/draft/archived), collections.
Fires when a product is permanently deleted from Shopify (rare compared to archiving).
When to use:
- Removing deleted products from external systems (Google Sheets, inventory software)
- Creating URL redirects from deleted product pages to relevant collections
- Cleaning up product data in integrations
- Audit logging for product deletions
- Alerting teams about unexpected deletions
Important notes:
- Deleted products are gone permanently—capture any needed data quickly when trigger fires.
- Most merchants archive rather than delete to preserve order history and reporting.
- Product deletion doesn't delete historical order data—past orders still reference the product.
- Deletion is typically used for: test products, duplicates, discontinued items being removed completely.
Available data: Limited data since product is being deleted—product ID, title, SKU, vendor are available but detailed data may not be.
Fires when product status changes between Active, Draft, or Archived.
When to use:
- Creating URL redirects when products are archived (SEO preservation)
- Notifying merchandising team about status changes
- Syncing product visibility to external systems
- Removing archived products from advertising campaigns
- Tracking product lifecycle stages
- Handling seasonal product activation/deactivation
Important notes:
- Status changes to Draft make product invisible to customers but keep it in admin.
- Archived products are hidden from admin lists by default but still exist.
- Most workflows care about Active → Archived (product going away) or Archived → Active (product returning).
- Draft status is typically temporary during product setup.
Available data: Product details, previous status, new status, who made the change, status change timestamp.
Fires when a new variant is added to an existing product (new size, color, material option).
When to use:
- Checking for duplicate SKUs across store
- Setting up inventory tracking for new variants
- Alerting team about product expansion
- Syncing new variants to external systems
- Initializing variant-specific data (barcodes, costs, locations)
Important notes:
- Variants added via bulk operations will trigger this many times rapidly.
- New variants start with no inventory—you'll likely get immediate out-of-stock trigger unless inventory is set during creation.
- Variants have their own SKUs, prices, and inventory—they're not copies of parent product settings.
Available data: Variant details (title, SKU, price, inventory, barcode), parent product information, variant options (size, color, etc.), inventory policy.
Fires when a variant is removed from a product.
When to use:
- Logging variant deletions for inventory audit trails
- Removing variants from external inventory systems
- Cleaning up variant-specific data (barcodes, tracking)
- Alerting team about reduced product options
- Checking if deletion leaves product with no variants
Important notes:
- Deleted variants with inventory don't automatically restock—inventory is lost.
- This can cause inventory discrepancies if not handled properly.
- Deleting the last variant on a product can cause issues—products need at least one variant.
- Consider archiving variants instead of deleting for audit trail preservation.
Available data: Deleted variant details (SKU, title, last known inventory), parent product information, deletion timestamp.
Fires whenever inventory level changes for any product variant at any location (increase or decrease). This is the most-used inventory trigger.
When to use:
- Low stock alerts (send notification when inventory drops below threshold)
- Inventory level monitoring and tracking
- Reorder point triggering (notify suppliers when stock is low)
- Stock movement auditing
- Replenishment workflow automation
- Inventory performance tracking
Important notes:
- This trigger fires for EVERY inventory change—receiving shipments, sales, manual adjustments, returns.
- High-volume stores generate thousands of these daily.
- The "quantity prior" field is CRITICAL—use it to prevent duplicate alerts.
- Without checking prior quantity, you'd get alerts as inventory drops from 9→8→7→6 instead of just once at 10→9.
- Trigger fires for all locations aggregated—you don't get per-location granularity without checking location in conditions.
Available data: Current inventory quantity, prior inventory quantity, variant details (SKU, title, price), product information, inventory policy, available quantity.
Fires when variant inventory hits exactly zero (completely out of stock).
When to use:
- Unpublishing or hiding out-of-stock products from storefront
- Urgent stockout notifications (more critical than low stock)
- Tagging products for back-in-stock notifications
- Pausing advertising for unavailable products
- Creating restock urgency tasks
- Tracking stockout frequency and duration
Important notes:
- This trigger fires when inventory hits zero—it doesn't distinguish between "sold out" vs "manually set to zero" vs "returned to vendor."
- For products with multiple variants, this fires when ANY variant hits zero (not when all variants are zero).
- If you want to hide products only when completely out of stock across all variants, you need more complex logic checking all variant inventory levels.
- Back-in-stock triggers will fire separately when inventory returns.
Available data: Variant details, product information, out of stock timestamp, inventory tracking status.
Fires when variant inventory goes from zero to any positive number (restocked).
When to use:
- Republishing hidden products when inventory returns
- Sending back-in-stock notifications to waiting customers
- Resuming paused advertising campaigns
- Removing out-of-stock tags and status
- Tracking restock time and efficiency
- Alerting sales team that product is available again
Important notes:
- This fires immediately when inventory goes from 0 to any positive number—even if just 1 unit.
- Consider setting minimum threshold before republishing (wait until at least 5 units available to avoid immediate re-stockout).
- Back-in-stock doesn't tell you HOW MUCH inventory returned—could be 1 unit or 1,000 units.
- Check actual quantity in conditions if minimum threshold matters.
- Pair this with variant out of stock trigger to create complete visibility/availability management.
Available data: Variant details, new inventory quantity, product information, restocked timestamp.
Fires when an inventory item is created (this is different from product/variant creation—it's the inventory tracking record).
When to use:
- Setting up multi-location inventory tracking for new items
- Initializing inventory at all fulfillment locations
- Creating inventory records in external warehouse management systems
- Setting default inventory policies (continue selling when out of stock, etc.)
- Tracking new SKUs entering inventory system
Important notes:
- Inventory items are the underlying inventory tracking records—separate from products/variants.
- One variant = one inventory item.
- This trigger is useful for multi-location inventory setup and advanced inventory management.
- Most merchants don't need inventory item triggers—variant triggers handle most use cases.
- Inventory items control policies like "track inventory" and "continue selling when out of stock"—use this trigger to set those policies automatically.
Available data: Inventory item ID, SKU, tracked status (whether inventory is tracked), product variant details, inventory policy settings.
Fires when inventory item tracking record is removed (typically when variant is deleted).
When to use:
- Removing inventory items from external warehouse systems
- Cleaning up multi-location inventory records
- Audit logging for inventory tracking changes
- Syncing deletions to external inventory software
Important notes:
- Inventory item deletion usually happens automatically when variant is deleted—you rarely delete inventory items directly.
- This is a low-level trigger that most merchants don't need unless running sophisticated multi-location inventory or WMS integrations.
- Deleted inventory items lose all location-level quantity data.
Available data: Inventory item ID, SKU, associated variant (if still exists), deletion timestamp.
Fulfillment triggers
Fulfillment has the most triggers of any category—19 in total—because it's the most complex operational process with multiple stages, stakeholders, and exception scenarios. These triggers cover everything from initial fulfillment creation through delivery tracking and fulfillment service communication.
Fulfillment triggers provide complete visibility into every stage of order fulfillment. From the initial "ready to fulfill" decision point through carrier tracking events to fulfillment service communication, these 19 triggers enable comprehensive fulfillment automation and exception handling. Most workflows use "Fulfillment order ready to fulfill" for pre-shipment logic and "Fulfillment event created" for post-shipment customer communication.
Fires when a fulfillment is created for an order (items are marked as shipped or fulfilled).
When to use:
- Sending shipping confirmation emails to customers with tracking information
- Tracking fulfillment speed and warehouse performance metrics
- Updating order status in external systems (CRM, ERP, project management)
- Triggering post-purchase workflows that depend on shipment
Important notes:
- This trigger fires for each fulfillment created. I
- f an order has partial fulfillments (ships from multiple locations), this trigger fires multiple times for that order.
- Use "Order fulfilled" trigger if you need to wait until the entire order is complete.
Fires when a tracking event occurs from the shipping carrier (in transit, out for delivery, delivered, delivery exception, returned to sender, etc.).
When to use:
- Sending real-time delivery status updates to customers
- Triggering review requests specifically after confirmed delivery
- Exception handling for failed deliveries or delays
- Monitoring carrier performance and delivery success rates
- Proactive customer service for delivery issues
Important notes:
- Event frequency depends on carrier tracking updates.
- Some carriers provide granular updates (every scan), others are sparse (only major milestones).
- Plan workflows accordingly—don't assume every package will trigger 5+ events.
Fires when a fulfillment order is ready for processing—meaning inventory is available at assigned location, fraud risk assessment is complete, and payment has cleared.
When to use:
- Submitting orders to third-party logistics (3PL) or fulfillment services
- Routing orders to appropriate warehouses based on inventory, geography, or priority
- Implementing fraud holds before allowing fulfillment
- Priority fulfillment logic for VIP customers or expedited shipping
- Decision point for whether orders should ship
Important notes:
- This is THE critical trigger for pre-fulfillment logic.
- It fires after risk analysis completes but before items actually ship.
- This is your last automated checkpoint before product leaves your control.
- Most fraud prevention, routing, and holds should use this trigger.
Fires when a fulfillment order transitions to "on hold" status (either manually by merchant or automatically by workflow).
When to use:
- Notifying operations team when orders require manual review
- Creating task queues for held orders
- Alerting customer service about potential delays
- Tracking hold reasons and frequency
- Escalating holds that remain unresolved too long
Important notes: Holds can be placed by multiple workflows or manually. This trigger fires regardless of hold source. Use the "hold reason" data field to understand why order was held and route appropriately.
Fires when all holds are removed from a fulfillment order and it's ready to proceed.
When to use:
- Automatically resuming fulfillment processes after hold resolution
- Notifying warehouse that order is clear to ship
- Tracking hold duration (time from hold to release)
- Measuring review efficiency and bottlenecks
- Updating customer about cleared status
Important notes: This fires when ALL holds are released. If order has multiple holds (fraud + payment verification), it won't trigger until both are cleared. Time-sensitive—act quickly after this trigger to minimize fulfillment delays.
Fires when a fulfillment order is reassigned from one fulfillment location to another.
When to use:
- Tracking fulfillment routing changes and reasons
- Notifying new warehouse of incoming assignment
- Syncing location changes to external warehouse management systems
- Analyzing routing patterns for optimization
- Customer communication if move causes delays
Important notes: Moves typically happen due to inventory availability, routing optimization, or capacity constraints. The trigger includes data about both original and new fulfillment locations.
Fires when a fulfillment order is divided into multiple fulfillment orders (typically because items ship from different locations).
When to use:
- Notifying customers they'll receive multiple shipments
- Explaining split shipment timing and tracking
- Calculating additional shipping costs from splitting
- Offering consolidation options if still possible
- Tracking split rate for inventory optimization
Important notes: Splits are usually automatic based on inventory location. They increase shipping costs but often improve delivery speed. Consider building consolidation logic that checks for multiple orders from same customer before allowing splits.
Fires when multiple fulfillment orders are combined into a single fulfillment order.
When to use:
- Confirming successful consolidation
- Updating customer about combined shipment
- Recalculating shipping costs (should decrease)
- Tracking merge success rate
- Syncing merged status to warehouse systems
Important notes: Merges happen less frequently than splits. They typically result from manual intervention or smart consolidation workflows that detect multiple orders to same customer within short timeframe.
Fires when a fulfillment order is cancelled (order was cancelled, items returned to inventory, or fulfillment no longer needed).
When to use:
- Notifying warehouse to stop fulfillment if in progress
- Sending cancellation confirmation to customers
- Restocking inventory notifications
- Updating external systems with cancellation
- Tracking cancellation patterns and timing
Important notes: Cancellations can occur at any stage. The earlier in fulfillment process they occur, the easier to prevent shipment. This trigger is time-critical—act within minutes to stop items from shipping.
Fires when the fulfillment date/time for an order is changed (delayed or expedited).
When to use:
- Notifying customers of delivery date changes
- Updating promise dates in external systems
- Tracking reschedule reasons (capacity, inventory, carrier issues)
- Compensating customers for delays (discounts, loyalty points)
- Alerting management to systematic fulfillment issues
Important notes: Reschedules usually indicate problems—inventory delays, capacity constraints, or carrier issues. Monitor this trigger's frequency; high reschedule rates signal operational problems needing attention.
Fires when items for a fulfillment order are ready for customer pickup (buy online, pick up in store - BOPIS).
When to use:
- Sending "ready for pickup" notifications to customers
- Alerting store staff that pickup order is ready
- Tracking pickup preparation time from order to ready
- Creating pickup instructions for customers
- Measuring BOPIS performance metrics
Important notes: Pickup-specific trigger for stores offering BOPIS. Only fires for pickup fulfillments, not shipped orders. Critical for pickup customer experience—slow notifications lead to customer frustration.
Fires when items are prepared for local delivery (same-day or next-day local courier delivery).
When to use:
- Notifying local delivery drivers of ready orders
- Sending "out for delivery today" messages to customers
- Coordinating with local courier services
- Tracking local delivery preparation time
- Managing local delivery capacity
Important notes: Local delivery has tight time constraints. This trigger needs immediate action to meet same-day delivery promises. Different workflows than standard shipping.
Fires when merchant submits a request to fulfillment service asking them to fulfill an order.
When to use:
- Confirming request successfully sent to 3PL/fulfillment service
- Logging fulfillment request timing for SLA tracking
- Creating audit trail of fulfillment requests
- Monitoring request volume and patterns
- Alerting if requests fail to send
Important notes: This is the outbound request from merchant to fulfillment service. It doesn't mean fulfillment accepted or started—just that you asked them to fulfill. Follow-up triggers track their response.
Fires when fulfillment service accepts the fulfillment request and commits to fulfilling the order.
When to use:
- Confirming fulfillment service received and accepted request
- Tracking acceptance rate by fulfillment service
- Measuring time from request to acceptance
- Updating customer with fulfillment confirmation
- Alerting if acceptance takes unusually long
Important notes: Acceptance means fulfillment service committed to the order. This is different from actual shipment. Most services accept quickly (minutes), but delays can indicate inventory or capacity issues.
Fires when fulfillment service rejects a fulfillment request (usually due to inventory unavailability, address issues, or restricted items).
When to use:
- Immediate escalation to operations team
- Finding alternative fulfillment options
- Customer communication about delays
- Investigating rejection reasons
- Routing to different fulfillment location
Important notes: Rejections are serious—they mean order won't ship as planned. Immediate action required to prevent customer disappointment. Track rejection rate by fulfillment service; high rates indicate systematic problems.
Fires when merchant requests to cancel a fulfillment that was previously requested from fulfillment service.
When to use:
- Tracking cancellation request timing (before shipment?)
- Confirming request sent to fulfillment service
- Customer communication about cancellation attempt
- Monitoring cancellation request success rates
- Alerting if cancellation requests frequently fail
Important notes: Submitting cancellation request doesn't guarantee success—fulfillment service might reject if already shipped. Time-critical: faster cancellation requests have higher success rates. This is the initial request step.
Fires when fulfillment service confirms they can cancel the fulfillment (items not yet shipped, successfully pulled from fulfillment queue).
When to use:
- Confirming cancellation succeeded
- Sending cancellation confirmation to customer
- Restocking inventory in system
- Tracking cancellation success rate
- Measuring cancellation response time
Important notes: Acceptance means you successfully caught the order before shipment. This is the ideal outcome for cancellation requests. Track which fulfillment services have best cancellation acceptance rates.
Fires when fulfillment service cannot cancel the fulfillment (already shipped or too late in process).
When to use:
- Immediate customer communication that order already shipped
- Creating return process for customer
- Tracking "too late to cancel" patterns
- Alerting customer service team
- Updating cancellation expectations (timeframes)
Important notes: Rejections indicate you missed the cancellation window. Use these to calibrate cancellation timing expectations. Fast-fulfilling services (SFN, Amazon FBA) have very short cancellation windows—sometimes minutes.
Fires when fulfillment service reports they cannot fulfill the order and intend to close it (permanent failure, not temporary delay).
When to use:
- Immediate escalation to senior operations team
- Finding alternative fulfillment immediately
- Customer service intervention and communication
- Investigating failure reasons (inventory error, damaged goods, lost items)
- Compensating customers for service failures
Important notes: This is the worst-case fulfillment scenario—complete failure to deliver. Rare but critical when it happens. Requires immediate human intervention. Always offer substantial compensation (refund, discount, expedited replacement) to retain customer trust.
Discount & Promotion triggers
Flow offers 2 discount triggers for monitoring and managing promotional activities. These triggers help prevent unauthorized discounts, track promotion creation, and ensure discount strategy compliance.
Discount triggers enable promotional governance and compliance. Use these triggers to prevent margin erosion from unauthorized discounting, maintain promotional calendar visibility, and ensure discount strategy alignment across teams. Most workflows focus on approval processes for discounts exceeding certain thresholds and notification systems for promotional coordination.
Fires when a new automatic discount is created (discounts that apply at checkout without requiring a code).
When to use:
- Discount approval workflows (require manager approval for deep discounts)
- Monitoring promotional activity and discount creation patterns
- Syncing discounts to marketing calendars and campaign schedules
- Alerting teams about new promotions going live
- Preventing unauthorized or excessive discounting
- Tracking discount strategy compliance
- Integrating discounts with external marketing systems
Important notes:
- Automatic discounts apply without customer action—they see reduced prices at checkout automatically.
- This makes unauthorized automatic discounts particularly costly (they apply to all eligible purchases immediately).
- Consider requiring approval for: discounts over certain threshold, store-wide discounts, discounts with no end date.
- Automatic discounts can conflict with discount codes—test stacking rules.
- Track creation source: manually created by admin vs API/app created vs Flow-created might require different handling.
Available data: Discount name, discount type (percentage, fixed amount, buy X get Y), discount value, start date, end date, applicable products/collections/customer segments, prerequisites, usage limits, combination settings.
Fires when a new discount code is generated (codes customers enter at checkout).
When to use:
- Tracking discount code creation and distribution
- Approval workflows for high-value codes
- Preventing unauthorized discount code generation
- Monitoring promotional code proliferation
- Syncing codes to email marketing platforms (Klaviyo, Mailchimp)
- Alerting teams about influencer/affiliate code creation
- Ensuring discount codes follow naming conventions
Important notes:
- Discount codes require customer action (entering code at checkout) vs automatic discounts which apply automatically.
- Codes are easier to control distribution (give code only to specific customers/campaigns) but harder to track usage attribution.
- Common mistake: creating codes with typos or confusing names—consider validation rules.
- Discount codes can be shared beyond intended audience (code leaks on coupon sites)—monitor usage patterns.
- Single-use codes work for influencer/affiliate tracking.
- Bulk discount code creation (CSV import, API) will trigger this many times—design workflows to handle volume.
Available data: Discount code, discount type (percentage, fixed amount, free shipping), discount value, start date, end date, applicable products/collections, usage limits (total uses, one per customer), prerequisites, customer eligibility rules.
Return triggers
Flow offers 7 return triggers covering the complete return lifecycle from initial customer request through final closure. These triggers enable automated return management, customer communication at each stage, and return abuse detection.
Return triggers enable comprehensive return lifecycle management. Use "Return requested" and "Return approved" for customer communication, "Return processed" for refund automation, and "Return closed" for final cleanup. Track the complete return journey from request to closure to identify process improvements and reduce return rates. Monitor "Return reopened" closely—reopens indicate problems requiring immediate attention.
Fires when a customer submits a return request through Shopify's return system.
When to use:
- Sending return request acknowledgment emails to customers
- Creating support tickets for return review
- Alerting customer service team about new return requests
- Starting return approval workflows
- Tracking return request patterns by product, reason, or customer
- Flagging returns from customers with return abuse history
- Calculating return rate metrics
Important notes:
- Return requested doesn't mean return is approved—it's the initial request stage.
- Customers can request returns for many reasons: defective, wrong item, changed mind, doesn't fit, etc.
- Return reason data is valuable for product quality tracking.
- Some return requests should be auto-approved (defective items within 30 days), others need review (high-value returns, serial returners, outside return window).
- Use customer return history to detect abuse patterns—multiple returns in short period, always returning same product types, suspicious return reasons.
Available data: Return ID, order details, items being returned, return reason, customer information, return shipping preference, refund method, return request timestamp.
Fires when a merchant or automated system approves a return request.
When to use:
- Sending return shipping labels to customers
- Providing return instructions and packaging requirements
- Starting reverse logistics workflows
- Updating inventory expectations (incoming returns)
- Tracking approval time and efficiency
- Creating return shipping tasks for fulfillment team
- Setting up refund processing once items received
Important notes:
- Approved returns aren't completed returns—items still need to be shipped back, received, and inspected.
- Set customer expectations clearly: approval ≠ immediate refund.
- Some merchants auto-approve certain returns (low value, defective items, loyal customers), others manually review all returns.
- Approval timing matters—slow approvals frustrate customers.
- Track time from request to approval.
- Consider instant approval for: returns within 30 days, items under $50, customers with no return history.
- Returns can be approved with conditions: restocking fees, store credit only, partial refunds if damaged during customer use.
Available data: Return details, approval timestamp, approved items, return shipping method, who approved (merchant vs automated), refund method, restocking fee amount (if applicable).
Fires when a return request is rejected by merchant.
When to use:
- Sending decline explanations to customers (important for satisfaction)
- Documenting decline reasons for policy compliance
- Escalating declined returns that need manager review
- Offering alternatives (exchanges, store credit, discounts instead of return)
- Tracking decline reasons and patterns
- Creating customer service follow-up for high-value declined returns
- Monitoring decline rate and customer satisfaction impact
Important notes:
- Declined returns create customer dissatisfaction—handle carefully.
- Always provide clear decline reason and alternative options.
- Common decline reasons: past return window, final sale items, items damaged by customer, missing tags/packaging, health/hygiene items (underwear, swimwear, etc.).
- Declines should follow published return policy consistently.
- Consider exceptions for: VIP customers, first-time returners, items slightly outside window, defective products (always accept defective regardless of time).
- Track decline reasons—high decline rates might indicate unclear return policies or product quality issues.
Available data: Return details, decline reason, who declined, declined timestamp, original return request details, customer information.
Fires when a return is cancelled (by customer or merchant) after being requested or approved.
When to use:
- Notifying customer that return is no longer active
- Updating inventory forecasts (no longer expecting return)
- Tracking return cancellation patterns and reasons
- Alerting fulfillment team to disregard incoming return
- Cleaning up return-related tags and status
- Removing return from active returns queue
- Analyzing why returns get cancelled (customer changed mind, resolved issue, etc.)
Important notes:
- Cancellations can happen at any stage: after request before approval, after approval before shipping, or after customer received label but changed mind.
- Common reasons: customer decided to keep item, issue resolved through support, wrong item requested for return, customer missed return window.
- Cancellations are generally positive (customer keeping product) unless merchant cancelled due to policy violations.
- Track customer-initiated vs merchant-initiated cancellations separately.
- If customer frequently requests then cancels returns, might indicate indecision or returns process friction.
Available data: Return details, cancellation reason, who cancelled (customer vs merchant), cancellation timestamp, return stage when cancelled (requested/approved).
Fires when returned items are received and the return is processed (inspected, accepted into inventory, refund initiated).
When to use:
- Initiating customer refunds (items received and inspected)
- Restocking inventory for resellable items
- Sending "refund processed" confirmation emails
- Updating customer account with return completion
- Tracking processing time and efficiency
- Creating quality control workflows for defective returns
- Calculating return processing costs
Important notes:
- Processing means physical return received and inspected—this is when refunds should be issued.
- Don't process returns automatically upon shipment (customer might not actually ship).
- Inspect condition before processing—damaged items might warrant partial refunds or no refund.
- Processing speed impacts customer satisfaction: aim for 24-48 hours after receipt.
- Some merchants hold items 24 hours after processing before restocking (allows refund disputes to surface).
- Track return condition quality by customer—serial returners who damage items need flagging.
- Processing includes: inspect items, determine condition, restock if resellable, initiate refund, update customer, log to records.
Available data: Return details, processing timestamp, items condition, restock status, refund amount, refund method, processing notes, inspection results.
Fires when a return is finalized and closed (refund completed, all actions done, no further activity expected).
When to use:
- Sending final return completion notifications to customers
- Closing support tickets related to the return
- Finalizing return metrics and reporting
- Requesting feedback on return experience
- Removing return from active queues
- Calculating total return cost (shipping + restocking + processing)
- Updating customer lifetime value with return impact
Important notes:
- Closed returns are completely finished—all refunds processed, items restocked or disposed, documentation complete.
- This is the endpoint of return lifecycle.
- Use this trigger for cleanup, final communications, and analytics.
- Closed returns should stay closed unless exceptional circumstances require reopening (rare).
- Track time from request to closure—efficient return processing improves customer satisfaction.
- Average closure time: 7-14 days (return shipped, received, inspected, processed, refunded).
- Returns that stay open >30 days need investigation.
- Closed status doesn't always mean customer satisfaction—track outcomes: full refund, partial refund, denied, exchange, etc.
Available data: Return details, closure timestamp, final refund amount, final status, total return cost, customer satisfaction data (if available), complete return timeline.
Fires when a previously closed return is reopened (typically due to disputes, quality issues discovered later, or customer service escalations).
When to use:
- Alerting management about return complications
- Creating high-priority support tickets for resolution
- Investigating why return needed reopening (refund disputes, quality issues)
- Tracking return problem patterns
- Escalating to appropriate teams (quality, customer service, finance)
- Documenting return exceptions and policy violations
- Preventing future return issues
Important notes:
- Reopened returns are rare and indicate problems: customer disputed refund amount, returned items found defective after restocking, chargeback filed, inspection was wrong, policy exception needed.
- Reopens are expensive—they redo work already completed and damage customer satisfaction.
- Common causes: rushed inspection, unclear return policies, miscommunication with customer, items damaged in return shipping.
- Track reopen rate—should be <2% of returns.
- High reopen rates indicate systemic problems in return process.
- Reopens require immediate management attention and root cause analysis.
- Use reopens as learning opportunities to improve return workflows.
Available data: Return details, original closure date, reopen reason, who reopened, reopen timestamp, original processing details, dispute information.
Collection triggers
Flow offers 2 collection triggers for managing your product collections and merchandising structure. Collections are groups of products used for navigation, marketing, and organization.
Collection triggers help manage merchandising structure and prevent SEO issues. Use "Collection created" to coordinate cross-team efforts for new collections and "Collection deleted" to create URL redirects that preserve search rankings and prevent customer 404 errors. Always redirect deleted collection URLs to relevant category pages rather than leaving them broken.
Fires when a new collection is created in Shopify (manual collections or smart collections).
When to use:
- Notifying merchandising team about new collections
- Creating collection landing pages or SEO content automatically
- Syncing collections to external marketing systems
- Setting up collection-specific advertising campaigns
- Initializing collection metadata (descriptions, images, SEO)
- Alerting content team to create collection promotional materials
- Tracking collection creation patterns and strategy
Important notes:
- Collections can be manual (merchant adds products individually) or smart (automatic based on rules like tags, price, vendor).
- Smart collections might be created empty if rules don't match any products yet—products appear as they're created or updated to match criteria.
- Collection creation often precedes promotional campaigns—use this trigger to coordinate merchandising, content, and marketing efforts.
- Some collections are created by apps or bulk imports—validate they meet store standards.
- Empty collections should be flagged quickly—they create poor customer experience if published.
- Collections are hierarchical (can nest under other collections)—consider parent/child relationships in workflows.
Available data: Collection title, collection type (manual/smart), collection handle (URL slug), product count, smart collection rules (if applicable), sort order, publication status, created timestamp, who created it.
Fires when a collection is permanently deleted from Shopify.
When to use:
- Creating URL redirects from deleted collection pages (SEO preservation)
- Removing collections from navigation menus and external systems
- Alerting teams about merchandising structure changes
- Cleaning up collection data in external marketing platforms
- Logging collection deletions for audit trails
- Updating sitemap and SEO structure
- Tracking merchandising strategy changes
Important notes:
- Deleted collections are permanently removed—products remain but lose that organizational grouping.
- This is different from unpublishing (hides collection from customers but keeps it in admin).
- Collection deletion breaks: navigation links pointing to collection, external ad campaigns using collection URLs, bookmarks customers saved, SEO rankings for collection pages.
- Always create redirects when deleting collections to prevent 404 errors and preserve SEO equity.
- Products in deleted collections aren't deleted—they just lose that collection membership.
- Smart collection deletion removes the automatic organization rules—if you recreate a collection with same rules, it's a new collection (doesn't restore the old one).
- Consider archiving/unpublishing instead of deleting for collections you might need again (seasonal collections, past campaigns).
Available data: Limited data since collection is being deleted—collection title, handle, type (manual/smart), product count at deletion, who deleted it, deletion timestamp.
B2B triggers (Shopify Plus)
Flow offers 4 B2B triggers for managing wholesale and business buyer operations. These triggers are available only on Shopify Plus with B2B features enabled and help automate company onboarding, contact management, and permission assignment.
B2B triggers enable automated wholesale operations for Shopify Plus merchants. Use "Company created" for comprehensive onboarding, "Company location created" for multi-site shipping setup, "Company contact created" for buyer onboarding, and "Company contact assigned permission" for security and role management. These triggers are essential for scaling B2B operations without manual administration overhead.
Requirements: All B2B triggers require Shopify Plus plan with B2B features enabled. If you're not on Plus or haven't enabled B2B, these triggers won't appear in Flow.
Fires when a new B2B company is created in Shopify (either manually by merchant or through company account request approval).
When to use:
- Automating B2B customer onboarding workflows
- Assigning account managers based on company location or industry
- Setting up payment terms and credit limits automatically
- Creating company records in external CRM systems (Salesforce, HubSpot)
- Sending B2B welcome packages and ordering instructions
- Initializing company-specific pricing or catalog access
- Tracking new wholesale customer acquisition
Important notes:
- Companies are the parent entities in B2B—they contain locations (shipping addresses) and contacts (buyers).
- Company creation is typically the first step in B2B onboarding.
- Companies can be created through: merchant manually adding them, approved company account requests from buyers, API/app integrations.
- Company creation should trigger comprehensive onboarding: assign account manager, set payment terms (Net 30/60/90), establish credit limits, configure company-specific pricing, grant catalog access, send welcome communications.
- Companies have metafields for storing custom data: industry, tax exemption status, preferred shipping carrier, contract terms.
- B2B features require Shopify Plus—these triggers won't appear on lower plans.
Available data: Company name, company location details (address, tax ID), external ID, note, created timestamp, who created the company, default payment terms, contact count.
Fires when a new location (shipping address) is added to a B2B company. Companies can have multiple locations for different warehouses, retail stores, or office addresses.
When to use:
- Setting up location-specific shipping rules and rates
- Assigning fulfillment routing based on proximity to company locations
- Notifying logistics team about new delivery addresses
- Validating addresses for commercial delivery requirements
- Creating location records in external warehouse management systems
- Setting up location-specific inventory allocation
- Tracking multi-location company expansion
Important notes:
- Companies typically have multiple locations representing different facilities—headquarters, warehouses, retail stores, distribution centers.
- Each location can have different: shipping addresses, delivery instructions, receiving hours, contact persons, special requirements (dock, forklift, signature).
- Location creation often happens after initial company creation as business relationship develops.
- Locations can have metafields storing: dock availability, delivery time windows, special handling requirements, preferred carriers.
- Validate locations carefully—incorrect addresses cause expensive freight returns and delivery failures.
- B2B orders specify which company location receives the shipment—proper location setup is critical for fulfillment routing.
- Some locations might be bill-to addresses (invoicing) vs ship-to addresses (delivery)—clarify in setup.
Available data: Company name, location address (street, city, state, zip, country), location name/identifier, phone number, delivery instructions, tax exemptions, location metafields, created timestamp.
Fires when a new contact (buyer/user) is added to a B2B company. Contacts are individuals who can place orders on behalf of the company.
When to use:
- Sending welcome emails to new company buyers
- Setting up user-specific permissions and access levels
- Creating contact records in CRM systems
- Notifying account managers about new company buyers
- Tracking which individuals place orders for companies
- Sending training materials for B2B ordering portal
- Managing contact-specific communication preferences
Important notes:
- Contacts are individual buyers within companies—one company can have many contacts with different permission levels.
- Contact creation happens when: merchant adds buyers manually, company admin invites team members, contacts request access and are approved.
- Contacts have different roles and permissions: some can place orders, some can only view orders, some manage company settings.
- Permission assignment is critical—wrong permissions create security issues or frustration.
- Contacts should receive onboarding: how to use B2B portal, ordering process, payment terms, who to contact for support.
- Track which contacts are active buyers vs inactive—helps identify key decision makers.
- Some contacts might need approval workflows before orders process (junior buyers need manager approval).
Available data: Contact name, email, phone, company name, locale/language, created timestamp, customer account details (if linked to customer record).
Fires when a contact is given specific permissions within the company (ordering, location management, company management, etc.).
When to use:
- Confirming permission assignments to contacts via email
- Sending role-specific instructions and training materials
- Notifying account managers about permission changes
- Tracking permission distribution across company contacts
- Creating audit trails for permission management
- Setting up role-based workflows (different actions for different permissions)
- Alerting when high-level permissions are granted (security monitoring)
Important notes:
- B2B permissions are granular: place orders, manage locations, manage contacts, view all orders, manage payment methods, etc.
- Different contacts need different permissions based on roles—purchasing managers need full ordering access, warehouse managers need location management, accountants need payment method access.
- Permission changes should be communicated clearly—contacts need to know what they can/cannot do.
- High-level permissions (company management) should be restricted—only grant to trusted individuals.
- Track permission changes over time—frequent changes might indicate confusion about roles or security concerns.
- Some permissions have financial implications (ability to place orders = spending company money)—ensure appropriate approval processes.
- Permission assignment might require account manager approval for certain levels—build approval workflows for sensitive permissions.
Available data: Contact details, company name, permission type granted, previous permission level (if changed), who granted permission, permission assignment timestamp, permission scope (company-wide vs location-specific).
Subscription triggers
Flow offers 5 subscription triggers for managing recurring billing and subscription lifecycle. These triggers work with Shopify Subscriptions and third-party subscription apps like Recharge, Smartrr, and Appstle.
Subscription triggers are essential for recurring revenue management. Use "Subscription contract created" for onboarding, "Subscription billing attempt failure" for retention and dunning workflows, and "Subscription billing attempt challenged" for fraud protection. Failed billing workflows are particularly critical—they determine whether you save or lose subscription revenue. Most subscription churn is passive (failed payments) rather than active (cancellations), making payment failure triggers your most important retention tool.
Fires when a new subscription contract is created (customer signs up for recurring product delivery).
When to use:
- Welcoming new subscription customers with onboarding emails
- Awarding loyalty points or bonuses for subscription signups
- Tagging customers as subscribers for segmentation
- Notifying fulfillment team about new recurring orders
- Tracking subscription acquisition sources and campaigns
- Setting up customer success touchpoints for retention
- Syncing subscription data to external CRM or analytics systems
Important notes:
- Subscription contracts define the recurring relationship—product, frequency (weekly, monthly, quarterly), pricing, delivery schedule.
- Contracts can be prepaid (customer pays upfront for X deliveries) or pay-as-you-go (charged each billing cycle).
- New subscribers are high-value customers—their lifetime value is typically 3-5x one-time purchasers.
- Subscription creation should trigger enhanced onboarding: explain how subscriptions work, set expectations for billing and shipping, provide easy management links, offer support contact.
- First delivery timing matters—ensure inventory is available and fulfillment is prioritized.
- Some subscriptions start immediately, others start on specific dates—check contract start date.
- Track which products drive subscription signups—focus marketing on high-conversion subscription offerings.
Available data: Subscription contract ID, customer details, product/variant being subscribed, billing frequency (every 30 days, every 2 weeks, etc.), next billing date, contract status, pricing, delivery schedule, created timestamp.
Fires when a subscription contract is modified (frequency changed, paused, resumed, cancelled, product swapped, etc.).
When to use:
- Tracking subscription changes and customer behavior patterns
- Sending confirmation emails for subscription modifications
- Updating external systems with subscription changes
- Identifying churn signals (paused/cancelled subscriptions)
- Triggering retention workflows when subscriptions are cancelled
- Adjusting inventory forecasts based on subscription changes
- Monitoring subscription health metrics
Important notes:
- Subscription updates cover many changes: status (active/paused/cancelled), frequency (every 30 days → every 60 days), next billing date (customer skipped a delivery), product (swapped to different variant), payment method, shipping address.
- Not all updates require action—some are routine (address updates), others are churn signals (cancellations, pauses).
- Cancelled subscriptions are critical—this is your last chance to retain revenue through win-back offers or save workflows.
- Track cancellation reasons: too expensive, don't need product frequently, quality issues, found alternative.
- Paused subscriptions are softer churn—customer intends to return but wants break.
- Multiple pauses or frequent frequency changes indicate subscription-market fit issues.
- Use updates to identify at-risk subscribers before they cancel completely.
Available data: Contract ID, customer details, previous contract state, new contract state, what changed (status, frequency, product, etc.), update timestamp, cancellation reason (if cancelled).
Fires when a subscription billing payment is successfully processed (recurring charge captured successfully).
When to use:
- Sending billing confirmation emails to subscribers
- Awarding loyalty points for continued subscription payments
- Updating accounting systems with recurring revenue
- Tracking successful billing patterns and payment health
- Triggering fulfillment for the subscription order
- Calculating monthly recurring revenue (MRR) metrics
- Confirming payment method is working properly
Important notes:
- Successful billing means payment processed and subscription continues—this is the healthy path.
- Billing success triggers order creation for fulfillment (subscription orders work like regular orders after payment).
- Use successful billing events to celebrate customer loyalty—milestone emails (3 months, 6 months, 1 year) strengthen retention.
- Track billing success rate by payment method (credit cards vs PayPal vs Shop Pay)—some methods have higher success rates.
- Billing success doesn't guarantee future success—cards expire, get cancelled, hit limits.
- Proactive payment method expiration monitoring prevents future failures.
- Some subscription platforms retry failed payments multiple times before this success trigger fires—that's handled by billing failure workflow.
Available data: Billing amount, payment method used, subscription contract details, billing cycle number, next billing date, order created from billing, customer information, billing timestamp.
Fires when a subscription billing payment fails (declined card, insufficient funds, expired card, etc.).
When to use:
- Sending "update payment method" urgent notifications to subscribers
- Pausing subscriptions until payment method is updated
- Starting dunning workflows (retry payment attempts)
- Creating high-priority support tickets for at-risk subscribers
- Tracking payment failure reasons and patterns
- Alerting customer success team about churn risk
- Monitoring revenue at risk from failed payments
Important notes:
- Billing failures are CRITICAL churn indicators—immediate action required to save subscription revenue.
- Common failure reasons: expired cards (30-40% of failures), insufficient funds (25-30%), stolen/cancelled cards (10-15%), incorrect CVV/billing address (10-15%).
- Failure timing matters—act within hours, not days.
- Most subscription platforms auto-retry failed payments: 1st retry after 3 days, 2nd retry after 7 days, cancel after 14 days total.
- Your workflows should coordinate with retry schedule.
- First failure is concerning but not fatal—many subscribers update payment and resume.
- Multiple failures (2nd or 3rd attempt failing) are extremely high churn risk requiring personal intervention.
- Track failure rate by payment method and card type—high failure rates indicate card decline patterns or fraud flags.
- Some failures are temporary (insufficient funds) vs permanent (cancelled card)—tailor messaging accordingly.
Available data: Failure reason, subscription contract details, billing amount that failed, payment method that failed, retry schedule, customer information, billing attempt timestamp, number of failed attempts.
Fires when a subscription billing is disputed or challenged by customer or bank (chargeback initiated, payment contested, fraud dispute).
When to use:
- Alerting fraud team immediately about disputes
- Pausing or cancelling subscriptions with active disputes
- Creating dispute response workflows and documentation
- Tagging customers with dispute history for future risk assessment
- Tracking dispute patterns and financial impact
- Escalating high-value disputes to management
- Gathering evidence for dispute resolution
Important notes:
- Challenged billing is most serious subscription issue—it's not just failed payment, it's contested charge.
- Disputes result from: customer doesn't recognize charge (forgot about subscription), fraudulent signup (stolen card), dissatisfaction with product (customer chose dispute instead of cancellation), confusion about billing schedule.
- Respond to disputes quickly—typically 7-14 day window to provide evidence before automatic loss.
- Disputes are expensive: chargeback fees ($15-25), lost product if already shipped, administrative time, potential card processing restrictions if dispute rate too high.
- Track dispute rate carefully—rates >0.5% trigger payment processor scrutiny.
- Some "challenges" are preliminary inquiries (customer asking bank what charge is) vs formal disputes (chargeback filed)—distinguish if possible.
- Subscribers who dispute charges should probably have subscriptions cancelled—they're unlikely to remain satisfied customers even if you win dispute.
Available data: Challenge/dispute reason, disputed amount, subscription contract details, customer information, dispute ID, challenge type (inquiry vs chargeback), challenge timestamp, evidence deadline.
Metaobject triggers
Flow offers 1 metaobject trigger for working with custom data structures. Metaobjects are flexible data containers used for form submissions, custom content types, and structured data that doesn't fit standard Shopify objects.
Metaobject triggers enable custom data workflow automation. The most common use case is processing Shopify Forms submissions—contact forms, surveys, and applications. Check metaobject type carefully in conditions since different types have different field structures. This trigger turns forms into automated workflows without requiring third-party form apps or Zapier-style integrations.
Fires when a new metaobject entry is created, including Shopify Forms submissions, custom content entries, and structured data created by apps or API.
When to use:
- Processing form submissions from Shopify Forms (contact forms, surveys, applications)
- Adding form respondents to email marketing lists automatically
- Creating support tickets from customer inquiries
- Processing custom application or registration forms
- Tracking form submission patterns and sources
- Syncing form data to external CRM or spreadsheets
- Triggering workflows based on custom data creation
Important notes:
- Metaobjects are custom data structures—their fields and purposes vary widely depending on how you've configured them.
- Common uses: Shopify Forms creates metaobject entries for each submission, custom registration forms, waitlist signups, B2B application forms, product customization data, content management (blog posts, FAQs, testimonials).
- You must check metaobject type/definition to understand what data you're receiving—different metaobject types have different fields.
- Form submissions via Shopify Forms are the most common metaobject creation source for most merchants.
- Access metaobject fields using Liquid:
{{ metaobject.field_name }}. - Metaobjects created by apps might have different structures than manually created ones—test workflows with actual data.
- This trigger enables form-to-workflow automation without third-party form tools.
Available data: Metaobject type/definition, all custom fields defined in the metaobject structure (varies by configuration), metaobject handle, created timestamp, display name, associated resources (if linked to products, customers, etc.).
Dispute & Fraud triggers
Flow offers 2 triggers related to payment disputes and financial transactions. These triggers help monitor chargebacks, track disputed charges, and maintain transaction records for accounting and fraud prevention.
Dispute and fraud triggers provide financial oversight and risk management. Use "Dispute created" for immediate chargeback response and customer flagging—quick action improves dispute win rates. Use "Tender transaction created" selectively for accounting integration and high-level monitoring rather than reacting to every transaction (high volume makes per-transaction workflows expensive). Disputes are expensive beyond just the disputed amount—factor in chargeback fees, processor risk, and administrative burden when designing dispute response workflows.
Fires when a chargeback or inquiry dispute is opened by a customer or their bank (customer contests a charge on their credit card statement).
When to use:
- Alerting fraud team immediately about chargebacks
- Tagging customers with chargeback history for future order screening
- Holding or cancelling future orders from customers with active disputes
- Gathering evidence for dispute resolution (tracking, delivery confirmation, communication logs)
- Tracking chargeback patterns by product, geography, or payment method
- Calculating financial impact of disputes (chargeback fees + lost revenue)
- Escalating high-value disputes to management for review
Important notes:
- Disputes are serious—they indicate potential fraud, customer dissatisfaction, or "friendly fraud" (customer forgot purchase, claims unauthorized charge, or disputes instead of requesting return).
- Respond quickly—typically 7-14 day window to submit evidence before automatic loss.
- Disputes cost money: chargeback fees ($15-25 per dispute regardless of outcome), lost merchandise if already shipped, lost revenue if you lose dispute, administrative time gathering evidence.
- High dispute rates (>0.5-1%) trigger payment processor scrutiny and potential account holds.
- Track dispute reasons: "Fraudulent" (claimed card stolen), "Unrecognized" (customer doesn't remember purchase), "Product not received" (delivery dispute), "Product not as described" (quality dispute).
- Evidence needed varies by reason: delivery disputes need tracking/signature, fraud disputes need AVS/CVV matching, product disputes need descriptions/photos.
- Win rates vary: 20-40% for merchants on average—strong evidence increases odds.
- Customers who file disputes should be flagged—even if you win, they're high-risk for future disputes.
Available data: Dispute ID, order details, disputed amount, dispute reason, dispute status (open/won/lost), evidence due date, customer information, dispute type (chargeback vs inquiry), dispute creation timestamp, payment gateway involved.
Fires when money passes between merchant and customer, creating a tender transaction event (payment authorizations, captures, refunds, voids, etc.).
When to use:
- Logging all financial transactions for accounting reconciliation
- Tracking payment method usage patterns and performance
- Monitoring transaction success vs failure rates by gateway
- Syncing transaction data to external accounting systems (QuickBooks, Xero)
- Identifying payment processing issues and gateway problems
- Creating detailed financial audit trails
- Calculating payment processing fees and costs
Important notes:
- Tender transactions are low-level financial events—every money movement creates tender transaction.
- Types include: authorization (hold placed on card), capture (money actually collected), refund (money returned), void (authorization cancelled before capture), adjustment (amount changed).
- One order typically has multiple tender transactions: authorize $100 → capture $100 (or authorize → void if cancelled before capture).
- Transaction tracking is essential for: accounting reconciliation (matching Shopify to bank deposits), payment method performance analysis (which gateways have highest success rates), fraud detection (unusual transaction patterns), fee calculation (payment processor charges per transaction).
- Most merchants don't need workflows for every tender transaction—they're high-volume and granular.
- Use this trigger for: accounting system integration, unusual transaction detection, gateway performance monitoring.
- Alternative approach: use scheduled workflows to query transactions daily/weekly rather than reacting to each individual transaction.
Available data: Transaction amount, transaction type (authorization/capture/refund/void), payment gateway, payment method, status (success/failure/pending), order details, customer information, transaction timestamp, currency, gateway response codes.

Flow system triggers
These triggers are built into Shopify Flow itself rather than responding to Shopify store events. They enable time-based automation and workflow health monitoring.
Flow system triggers enable operational automation beyond store events. Use "Scheduled time" for recurring reports, batch processing, and time-based tasks—but remember the 100-item limit on data queries. Use "Workflow error occurred" to create a centralized monitoring system that catches broken workflows before they cause business problems. Every Flow installation should have at least one error monitoring workflow active.
Fires at the specific date and time you configure. This is Flow's most flexible trigger for recurring tasks, batch operations, and time-based automation.
When to use:
- Daily/weekly/monthly reports and summaries
- Scheduled data exports to external systems
- Recurring inventory checks (out of stock products, low stock alerts)
- Time-based campaigns (birthday emails, subscription anniversaries)
- Batch processing workflows (update tags, clean up data)
- Regular compliance tasks (daily backups, weekly audits)
- Performance monitoring and health checks
Important notes:
- Scheduled workflows have a 100-item limit when using "Get data" actions—if you query "get all products," Flow returns maximum 100 results per run.
- For stores with 500+ products, create multiple scheduled workflows with filters (one for Collection A, one for Collection B) or use MESA which has no item limits.
- Schedule options include: one-time (specific date/time), recurring daily (every day at 9am), recurring weekly (every Monday at 9am), recurring monthly (first of month), custom intervals (every 2 hours, every 6 hours).
- Scheduled workflows run in UTC timezone—convert to your local time when configuring.
- Workflows run within 1-2 minutes of scheduled time (not exact to the second).
- Scheduled triggers have NO event data—there's no "order" or "product" that triggered it, so you must use "Get data" actions to retrieve information.
- Most powerful for: reports, batch updates, recurring checks, cleanup tasks.
- Don't use scheduled triggers for real-time needs—they're for periodic batch operations.
Available data: None—scheduled triggers provide only the current timestamp. Use "Get data" actions to retrieve orders, products, customers, or other information for processing.
Fires when an error occurs in any of your Flow workflows. Limited to one notification per workflow version within 30 days to prevent alert spam.
When to use:
- Monitoring workflow health and catching broken automations
- Alerting operations team when critical workflows fail
- Debugging workflow issues by capturing error details
- Tracking workflow reliability and failure patterns
- Creating centralized error logging for all workflows
- Ensuring workflow failures don't go unnoticed
- Escalating critical workflow failures to management
Important notes:
- This trigger fires a MAXIMUM of once per 30 days per workflow version—if workflow fails multiple times in 30 days, you only get one notification.
- This prevents alert fatigue but means you might miss repeated failures.
- Create one centralized error monitoring workflow that handles ALL workflow errors rather than error handling in each individual workflow.
- Common error causes: API timeouts (external services slow/down), missing data (expected field is empty), condition logic errors (comparing wrong data types), action failures (email service unavailable, external system rejects data).
- Test workflows thoroughly before activating to prevent errors.
- After Shopify updates, review workflow run history—sometimes platform changes break existing workflows.
- Errors don't automatically pause workflows—broken workflows keep running and failing unless you manually pause them.
- Use this trigger as safety net, not primary quality control—test workflows before relying on error notifications.
Available data: Workflow name, workflow ID, error message, error type, workflow version, timestamp of error, link to workflow in Flow admin.
Other Shopify app triggers
Beyond Shopify's native triggers, many Shopify apps add their own triggers to Flow. These app-specific triggers extend Flow's capabilities for specialized use cases like influencer marketing, timed promotions, reviews, loyalty programs, and more.

Shopify Collabs triggers
Shopify Collabs is Shopify's native influencer marketing platform. It provides 5 triggers for managing creator relationships, gift distribution, commission tracking, and tier management.
Fires when an influencer or creator submits an application to join your Collabs community.
When to use:
- Reviewing creator applications and making approval decisions
- Sending application acknowledgment emails to creators
- Routing applications to marketing team for evaluation
- Tracking creator application volume and sources
- Filtering applications by follower count, niche, or platform
- Creating approval workflows based on creator criteria
- Building application pipeline in CRM or project management tools
Important notes:
- Creator applications include: creator's social media profiles, follower counts, engagement metrics, content samples, why they want to join.
- Set clear approval criteria: minimum follower count, relevant audience, content quality, brand alignment.
- Auto-approve, auto-decline, or manual review based on criteria.
- Fast application response improves creator experience—aim for 24-48 hour turnaround.
- Track application sources: how did creators hear about program?
- Applications can be high volume during campaigns—design workflows to handle scale.
Available data: Creator name, social media handles, follower counts, platforms (Instagram, TikTok, YouTube), engagement rate, application message, niche/category, application timestamp.
Fires when a creator is approved and officially joins your Collabs community.
When to use:
- Sending welcome emails with program guidelines and links
- Providing creators with unique discount codes or affiliate links
- Onboarding creators with brand guidelines and content expectations
- Setting up creator profiles in external tracking systems
- Assigning creators to tiers or categories automatically
- Tracking creator acquisition and community growth
- Notifying team about new creator partnerships
Important notes:
- Approved creators need immediate onboarding: discount codes, affiliate links, brand guidelines, content examples, posting requirements, commission structure, payment terms.
- Clear communication prevents misunderstandings about expectations.
- Set creators up for success: provide product recommendations, content ideas, posting schedules, hashtag suggestions.
- Track creator performance from day one: first post timing, sales generated, engagement quality.
- Some creators go silent after approval—build in check-ins at 7, 14, 30 days to activate them.
- Approval is just the start—retention and activation matter more than acquisition.
Available data: Creator name, social media profiles, follower counts, tier assignment, discount code, affiliate link, approval timestamp, creator ID.
Fires when a creator claims a gifted product that you offered them (product seeding for content creation).
When to use:
- Confirming gift claim and providing next steps for creators
- Tracking which products creators are interested in
- Setting expectations for content creation timelines
- Creating fulfillment orders for gifted products
- Monitoring gift claim rates (offered vs claimed)
- Following up on content creation after gift delivery
- Calculating product seeding costs and ROI
Important notes:
- Gift claiming confirms creator interest—not all gifted products get claimed (creators might not want product, might be inactive, might have received too many gifts).
- Claimed gifts create content expectations: most brands expect social posts, reviews, or mentions in exchange for free products.
- Set clear expectations upfront: content timeline (post within 30 days), content requirements (photo/video, tags, hashtags), what happens if no content posted.
- Track content creation rate: of gifts claimed, what percentage result in actual posts?
- Low conversion means: wrong products gifted, unclear expectations, or creators treating program as free shopping.
- Don't over-gift: start with smaller product value, increase for performing creators.
- Some creators claim gifts but never post—address this with clear terms and consider removing from program.
Available data: Creator name, product gifted, product value, gift claim timestamp, creator contact information, expected content deliverables.
Fires when an order is tracked back to a specific creator (sale generated through creator's discount code or affiliate link).
When to use:
- Tracking creator sales performance and attribution
- Calculating creator commissions automatically
- Sending performance notifications to top creators
- Identifying high-performing creators for relationship building
- Measuring creator program ROI by individual creator
- Thanking creators for driving sales
- Flagging unusual attribution patterns (potential fraud)
Important notes:
- Attribution connects sales to specific creators—critical for commission calculation and performance tracking.
- Orders can be attributed through: unique discount codes (creator shares code with audience), affiliate links (tracking pixels identify creator traffic), referral parameters (URL tracking codes).
- Track attribution accuracy: some orders might be misattributed (customer used code but discovered brand elsewhere).
- Key metrics per creator: total orders, total revenue, average order value, conversion rate, commission earned.
- High-performing creators deserve rewards: higher commissions, exclusive products, featured placement, bonus payments.
- Low-performing creators need support or removal: provide better content examples, optimize their discount codes, or exit non-performers.
- Watch for attribution fraud: creators using their own codes for personal purchases, sharing codes in discount communities instead of authentic content promotion.
Available data: Creator name, order number, order value, commission amount, products purchased, customer information (if available), attribution source (discount code/affiliate link), order timestamp.
Fires when a creator is assigned to a new tier (VIP, Gold, Silver, Standard, etc.).
When to use:
- Notifying creators about tier upgrades or changes
- Explaining new tier benefits and requirements
- Adjusting commission rates based on tier level
- Providing tier-specific perks (early access, exclusive products)
- Tracking creator progression through program tiers
- Celebrating creator achievements and milestones
- Sending tier-specific content guidelines and expectations
Important notes:
- Tier systems create gamification: creators work toward higher tiers for better benefits.
- Define clear tier criteria: Bronze (0-$1K sales), Silver ($1K-$5K), Gold ($5K-$20K), VIP ($20K+).
- Tier benefits scale: higher commissions, better products, exclusive access, personal support, bonus opportunities.
- Tier movement happens: upgrades (creator performing well), downgrades (creator declining), lateral moves (category changes).
- Communicate tier changes promptly and positively: upgrades are celebrations, downgrades are opportunities to re-engage.
- Track tier distribution: what percentage in each tier?
- Too many VIPs dilutes exclusivity, too few means criteria too strict.
- Re-evaluate tier criteria quarterly based on program performance.
- Some creators game the system: buying own products to hit tier thresholds—monitor for unusual patterns.
Available data: Creator name, tier name, previous tier (if changed), tier benefits, commission rate, tier assignment timestamp, tier criteria met.
Shopify Launchpad triggers (Shopify Plus Only)
Shopify Launchpad is a Shopify Plus feature for scheduling and automating promotional events, product launches, and flash sales. It provides 2 triggers for event-based automation.
Fires when a Launchpad event begins (scheduled start time arrives).
When to use:
- Confirming promotional campaigns are live
- Sending launch notifications to team and customers
- Tracking event start times for reporting
- Triggering external marketing systems (ads, emails)
- Monitoring event execution and timing
- Creating event start logs for analysis
- Coordinating multi-channel campaign launches
Important notes:
- Launchpad events include: publishing collections, activating discounts, theme changes, product publishing—multiple actions coordinated to single start time.
- Event start confirms scheduled changes executed successfully.
- Use this trigger for: launch announcements, marketing activation, monitoring setup, team coordination.
- Events can fail to start: technical issues, conflicts with other events, configuration errors—monitor closely.
- Event start is just beginning—success depends on: site performance under load, inventory availability, customer service responsiveness, marketing reach.
- Track event metrics from start: traffic spike, conversion rate, average order value, bestselling products.
- Some events start gradually (early access for VIPs, then general public)—stage communications accordingly.
Available data: Event name, event type, scheduled start time, actual start time, event details (products, collections, discounts affected), event duration.
Fires when a Launchpad event concludes (scheduled end time arrives or event manually ended).
When to use:
- Confirming promotional campaigns concluded successfully
- Reverting site changes after event (theme, collections, discounts)
- Sending event performance summaries to team
- Deactivating related marketing campaigns
- Generating post-event reports and analysis
- Tracking event conclusion for inventory planning
- Coordinating post-event follow-up communications
Important notes:
- Event end reverses event start changes: unpublish collections, deactivate discounts, revert theme customizations, restore original product states.
- Event end timing is critical: too early leaves money on table, too late extends commitments beyond planned duration.
- Use this trigger for: cleanup tasks, performance reporting, inventory updates, marketing deactivation.
- Post-event analysis reveals: what sold well (stock more next time), what didn't (avoid future events), peak traffic times (optimize timing), customer segments (who actually bought).
- Events often leave residual traffic: SEO rankings from event pages, customers who bookmarked sale pages—handle gracefully with redirects or "event ended" messaging.
- Some events end manually (merchant stops event early due to stockouts, technical issues)—differentiate from scheduled end in reporting.
Available data: Event name, scheduled end time, actual end time, event performance metrics (if available), duration, products/collections affected, event outcome status.
Third-party app triggers
Many popular Shopify apps add custom triggers to Flow, extending automation capabilities beyond native Shopify events. These triggers typically require the app to be installed and connected to Flow.
Common app categories with Flow triggers:
Review apps (Judge.me, Yotpo, Stamped.io, Loox):
- Review submitted
- Negative review received (1-2 stars)
- Review with photo/video submitted
- Review request sent
- Review moderation needed
Loyalty apps (LoyaltyLion, Smile.io, Swell, Yotpo Loyalty):
- Points earned
- Tier upgraded/downgraded
- Reward redeemed
- Referral completed
- Birthday/anniversary milestone
Subscription apps (Recharge, Smartrr, Appstle, Bold Subscriptions):
- Subscription created (covered in Subscription Triggers section)
- Subscription cancelled
- Billing attempt failed
- Subscription paused/resumed
- Product swapped
Customer support apps (Gorgias, Zendesk, Freshdesk, Help Scout):
- Ticket created
- Ticket closed
- Negative CSAT/satisfaction score received
- Ticket tagged with specific tag
- Ticket assigned to agent
Email marketing apps (Klaviyo, Mailchimp, Omnisend):
- Subscriber added to list
- Campaign sent
- Email bounced
- Unsubscribe occurred
- Segment membership changed
Form apps (Shopify Forms, Typeform, Jotform):
- Form submitted (covered partially in Metaobject Triggers)
- Specific form field value entered
- Multi-step form completed
Inventory apps (Stocky, Inventory Planner, TradeGecko):
- Stock transfer completed
- Purchase order received
- Inventory adjustment made
- Low stock threshold reached
How to find app triggers:
- In Flow trigger selection: When creating workflows, scroll past native Shopify triggers to see installed app triggers
- App documentation: Check app's help docs for "Flow integration" or "automation" sections
- App settings: Many apps have Flow connection settings showing available triggers
- Shopify App Store: App listings mention Flow compatibility in features
Important notes about app triggers:
- App must be installed and active for triggers to appear in Flow
- Some apps require explicit Flow connection in app settings before triggers work
- App uninstallation removes associated triggers (workflows break)
- App-specific triggers use app-specific data fields—consult app documentation
- Free apps usually have limited triggers vs paid tiers
- Some triggers require specific app plan levels (basic vs premium features)
Use case example combining multiple app triggers:
Create comprehensive review management workflow:
- When review submitted (Judge.me trigger) AND rating <3 stars, create Gorgias support ticket for follow-up, tag customer "Negative-Reviewer", send internal alert to quality team.
- When review >4 stars, send thank-you email, request customer share review on social media, award 50 loyalty points (Smile.io action).
- When review includes photo AND rating 5 stars, feature review on homepage (update metafield), send extra 100 bonus points, thank customer profusely.
App triggers dramatically extend Flow's capabilities beyond native Shopify events. Install apps that add triggers relevant to your operations—review apps for review automation, loyalty apps for rewards, subscription apps for recurring revenue management. Always check app documentation for trigger details and data fields available. App triggers transform Flow from basic Shopify automation to comprehensive business process automation.
What triggers DON'T exist
Flow is powerful but has limitations. Understanding what triggers DON'T exist helps set realistic expectations and prevents hours spent searching for triggers that aren't there.

Missing "Updated" triggers
What's missing:
- Order updated - No trigger for when order tags change, notes are added, or shipping addresses are modified
- Product updated - No trigger for when product details change (title, description, price, images)
- Customer updated - No trigger for when customer email, phone, or address changes (except dedicated tag triggers)
Why it matters: Many workflows need to react to changes, not just creation. Example: "When product image is updated, regenerate alt text with AI" requires a Product Updated trigger that doesn't exist. Workaround: Use tag-based triggers (when specific tags are added/removed) to signal updates, or use external automation tools like MESA that have dedicated "updated" triggers.
Real user example from onboarding: "I need to rerun a workflow when product images are updated, but Flow doesn't have a 'product updated' trigger. Can MESA trigger Flow workflows when products change?" (Yes, this is exactly what MESA's Product Updated trigger enables.)
Missing granular triggers
What's missing:
- Product image updated specifically - Product Updated trigger doesn't exist, and even if it did, you couldn't filter for image changes only
- Specific metafield value changed - No trigger for when custom metafield data is updated
- Order note added - Order Updated doesn't exist, can't detect note additions
- Inventory updated at specific location - Inventory quantity changed fires for all locations aggregated, not per-location
Why it matters: Workflows often need to react to specific field changes, not entire record updates. Checking all fields after a broad trigger is inefficient and error-prone.
Scale limitations
The 100-item limit: Scheduled workflows using "Get data" actions return maximum 100 results per run.
Example problem: "Check all products daily and update sale tags based on compare-at-price" fails if you have 500 products—Flow only processes first 100.
Workarounds: Create multiple scheduled workflows with filters (Collection A, Collection B, etc.), or use MESA which processes unlimited items per workflow.
Real user example: "We bulk update product prices and need to recalculate discount tags. Flow has a constraint of 100 updated products. That doesn't work for us." This is a documented limitation driving MESA adoption.
Missing external triggers
What's missing: Flow cannot be triggered by external API calls, webhooks from non-Shopify systems, or third-party automation tools directly.
Why it matters: Integration workflows where external systems need to trigger Shopify actions require workarounds: custom app development, middleware like MESA, or reverse integration (Shopify triggers external system instead).
Example: "Can external inventory system trigger Flow when stock arrives at warehouse?" No—Flow has no webhook endpoint for external triggers.
When Flow triggers aren't enough: If you need updated triggers, per-location inventory triggers, processing 100+ items in scheduled workflows, or external system integration, explore MESA which extends beyond Flow's native capabilities. See our Shopify Flow Alternatives guide for detailed comparison.
For most use cases: Flow's 100+ triggers handle the majority of automation needs. Start with Flow, identify specific limitations through actual use, then evaluate alternatives only when you hit concrete barriers.
Conclusion
You've just explored every available Shopify Flow trigger—over 100 triggers covering orders, customers, products, inventory, fulfillment, returns, subscriptions, B2B operations, disputes, and more. Each trigger opens automation possibilities that eliminate manual work, reduce errors, and scale your operations.
The triggers that power most automation:
- Order created - Foundation for order processing, tagging, and routing
- Product variant inventory quantity changed - Prevents stockouts with low inventory alerts
- Order risk analyzed - Protects revenue by catching fraud before fulfillment
- Fulfillment order ready to fulfill - Critical decision point for shipping logic
- Customer joined segment - Enables dynamic personalization and lifecycle marketing
- Scheduled time - Powers recurring reports, batch operations, and maintenance tasks
These six triggers solve 80% of common automation needs. Start here before exploring specialized triggers.
When Flow triggers aren't enough:
If you need order/product/customer updated triggers, per-location inventory triggers, processing more than 100 items in scheduled workflows, or external system integrations, explore MESA which extends beyond Flow's native capabilities with 500+ additional triggers and unlimited data processing.
See our Shopify Flow Alternatives guide to understand when upgrading makes sense, and our Shopify Flow Examples guide for step-by-step workflow building tutorials using these triggers.