How To Write Product Image Alt Tags Using AI
As a Shopify store owner, you understand the importance of optimizing your online shop for search engines. One crucial aspect that is often overlooked is the importance of Shopify product alt tags for your images.
In this blog article, we explore how to use AI to create effective, SEO-friendly alt tags for your product images. With the right tools and strategies in place, you’ll be able to boost your store’s visibility, drive more organic traffic, and ultimately, increase sales.
So, let’s explore the exciting possibilities that AI has to offer in optimizing your Shopify product alt tags.
Interested in doing more with AI? Try MESA today and start building smarter automations.
Topics:
Watch the workflow tutorial video
Step-by-step workflow instructions
Time needed: 10 minutes
We’ll walk you through making two workflows:
The first will submit our product images to img2prompt using our API app. Then, we’ll store the process ID in a Shopify database table within MESA for use in our second workflow.
The second workflow will start with a webhook that is listening for the Image2Prompt process to complete then updates our product image alt tags accordingly.
To get started, be sure to add MESA to your Shopify store.
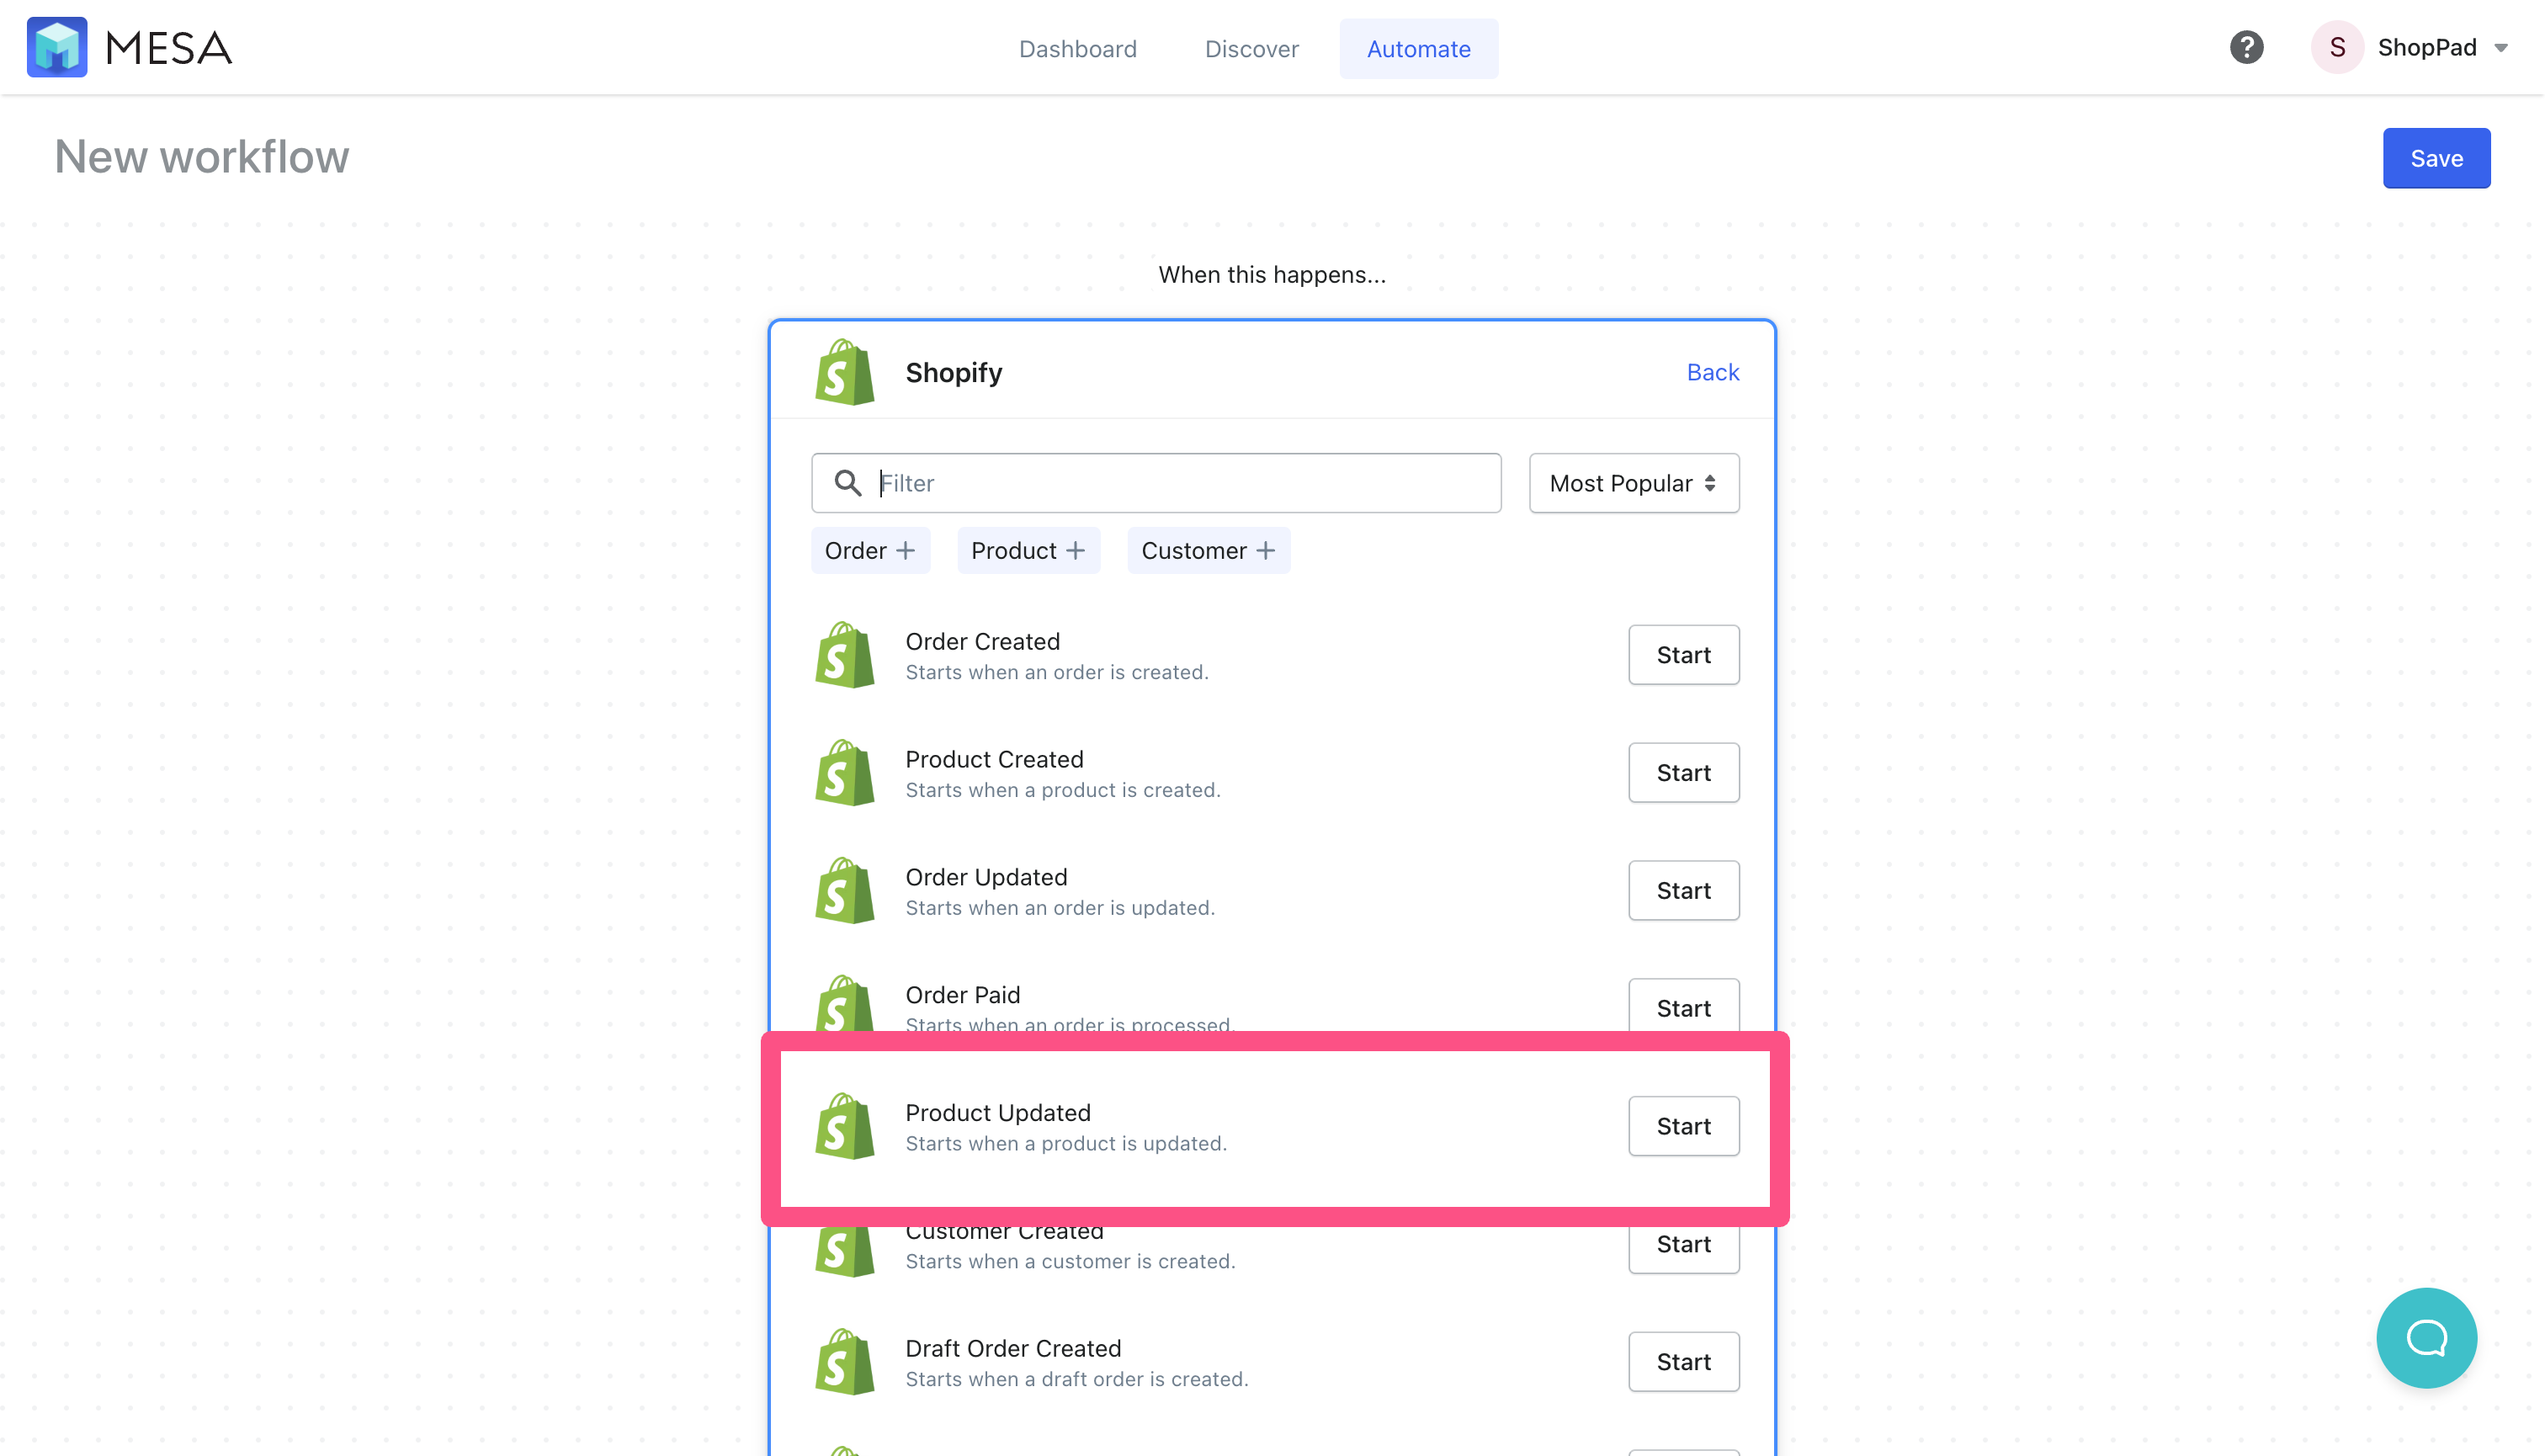
- First, start a new workflow using the Shopify Product Updated trigger event
You could also use the Product Created trigger event depending how you prefer the workflow to start.
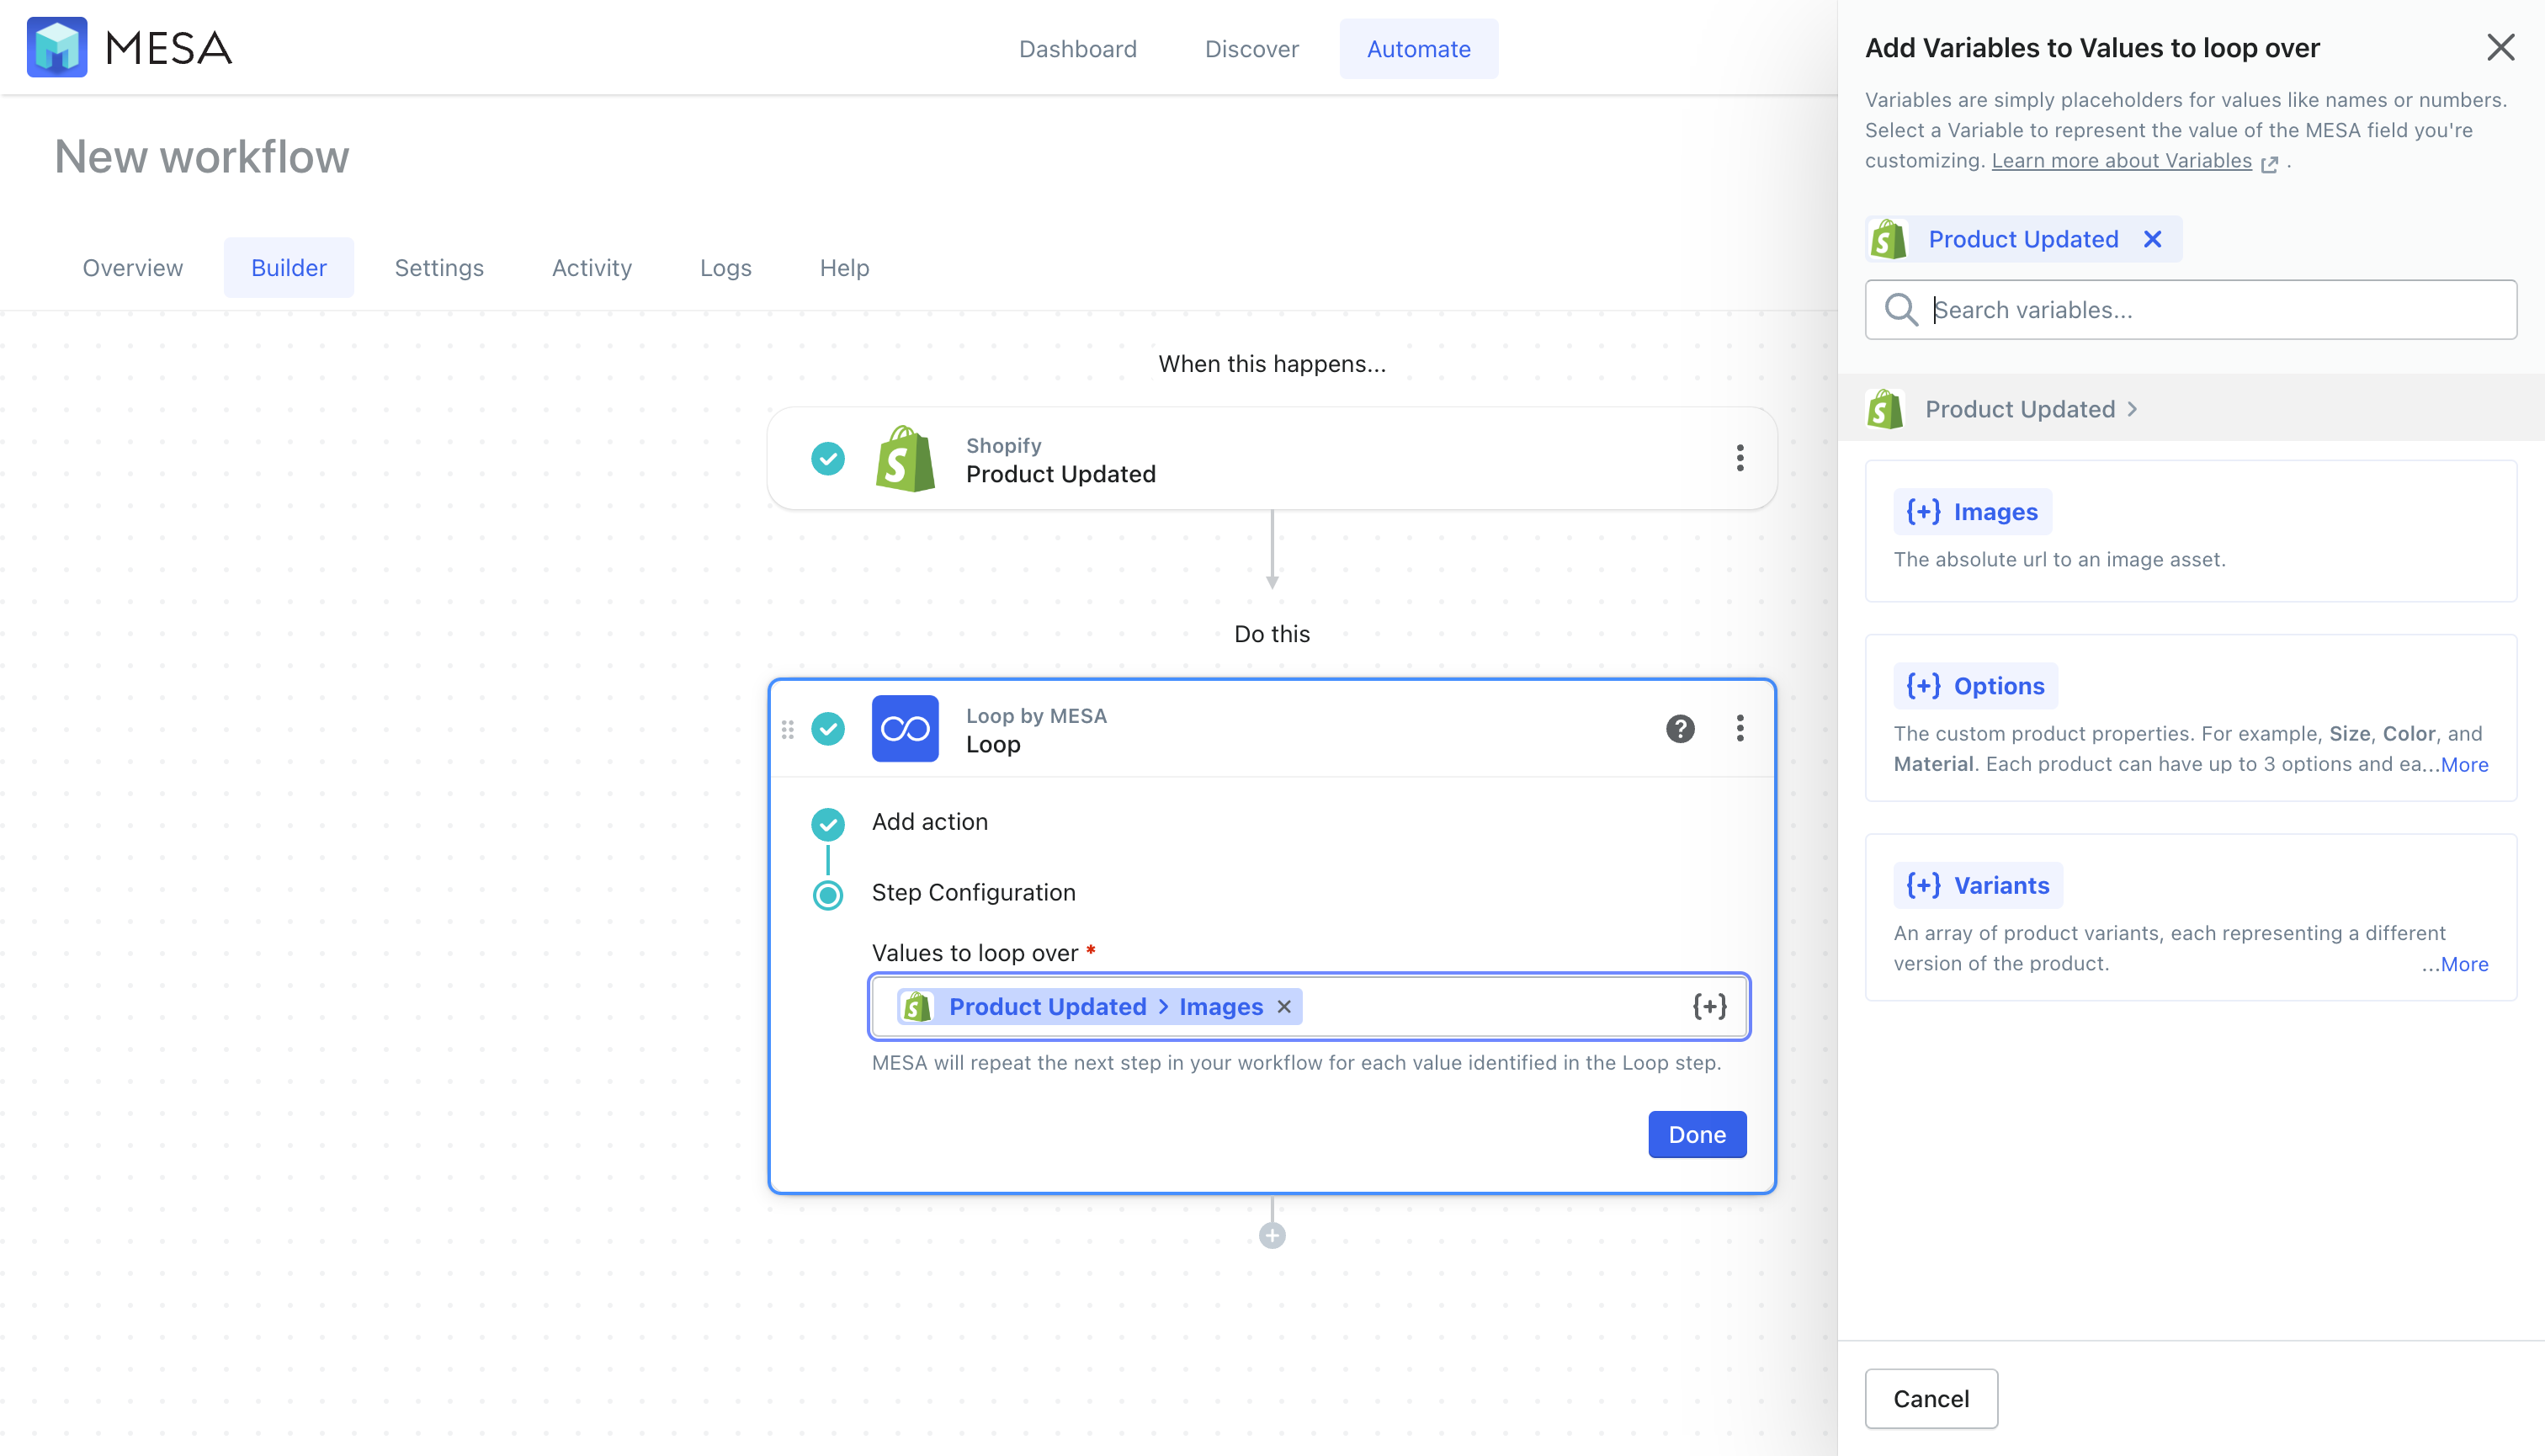
- Next, add the Loop by MESA action
Then, use the Variable Selector to specify looping over all Product Updated > Images
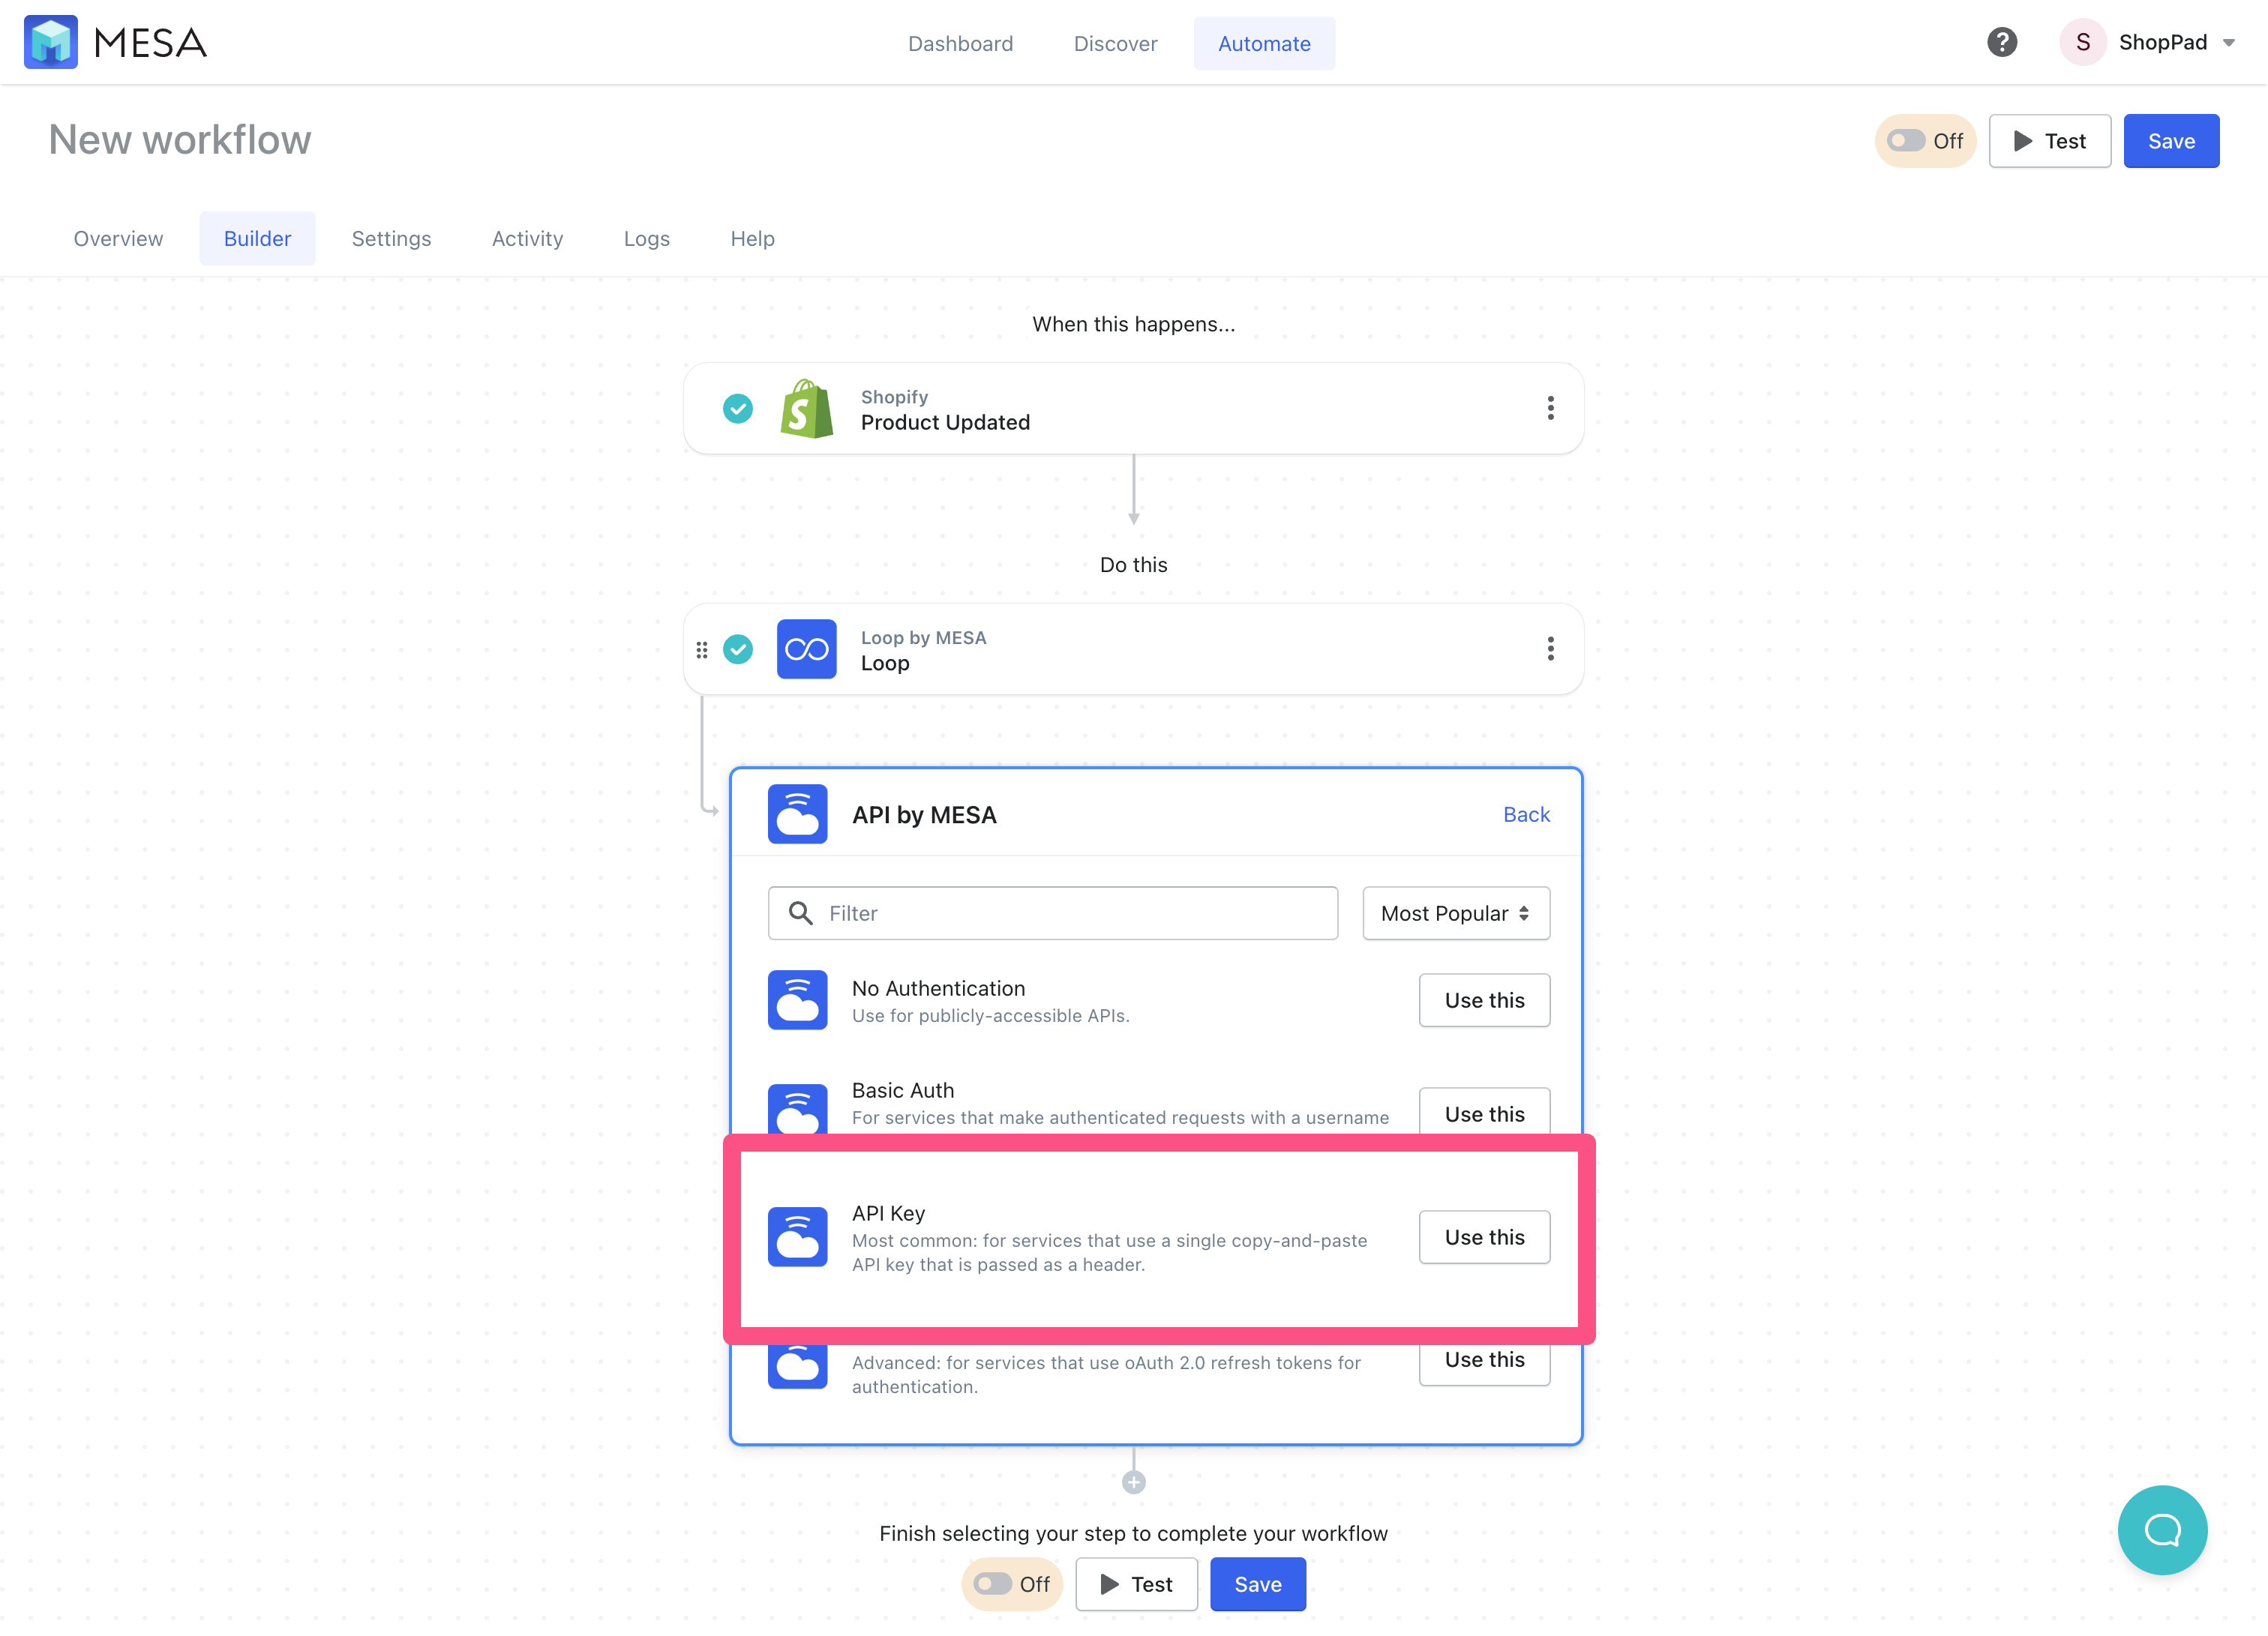
- Next, add the API by MESA action
Then, choose the API Key step. This is what the Replicate.com API supports. Be sure to add your API token to authenticate.
- Next, add the API URL under step configuration
Be sure the Method is POST then, add the following URL:
https://api.replicate.com/v1/predictions
We’ll come back to this step to add more configuration to the Advanced Options. For now, let’s continue.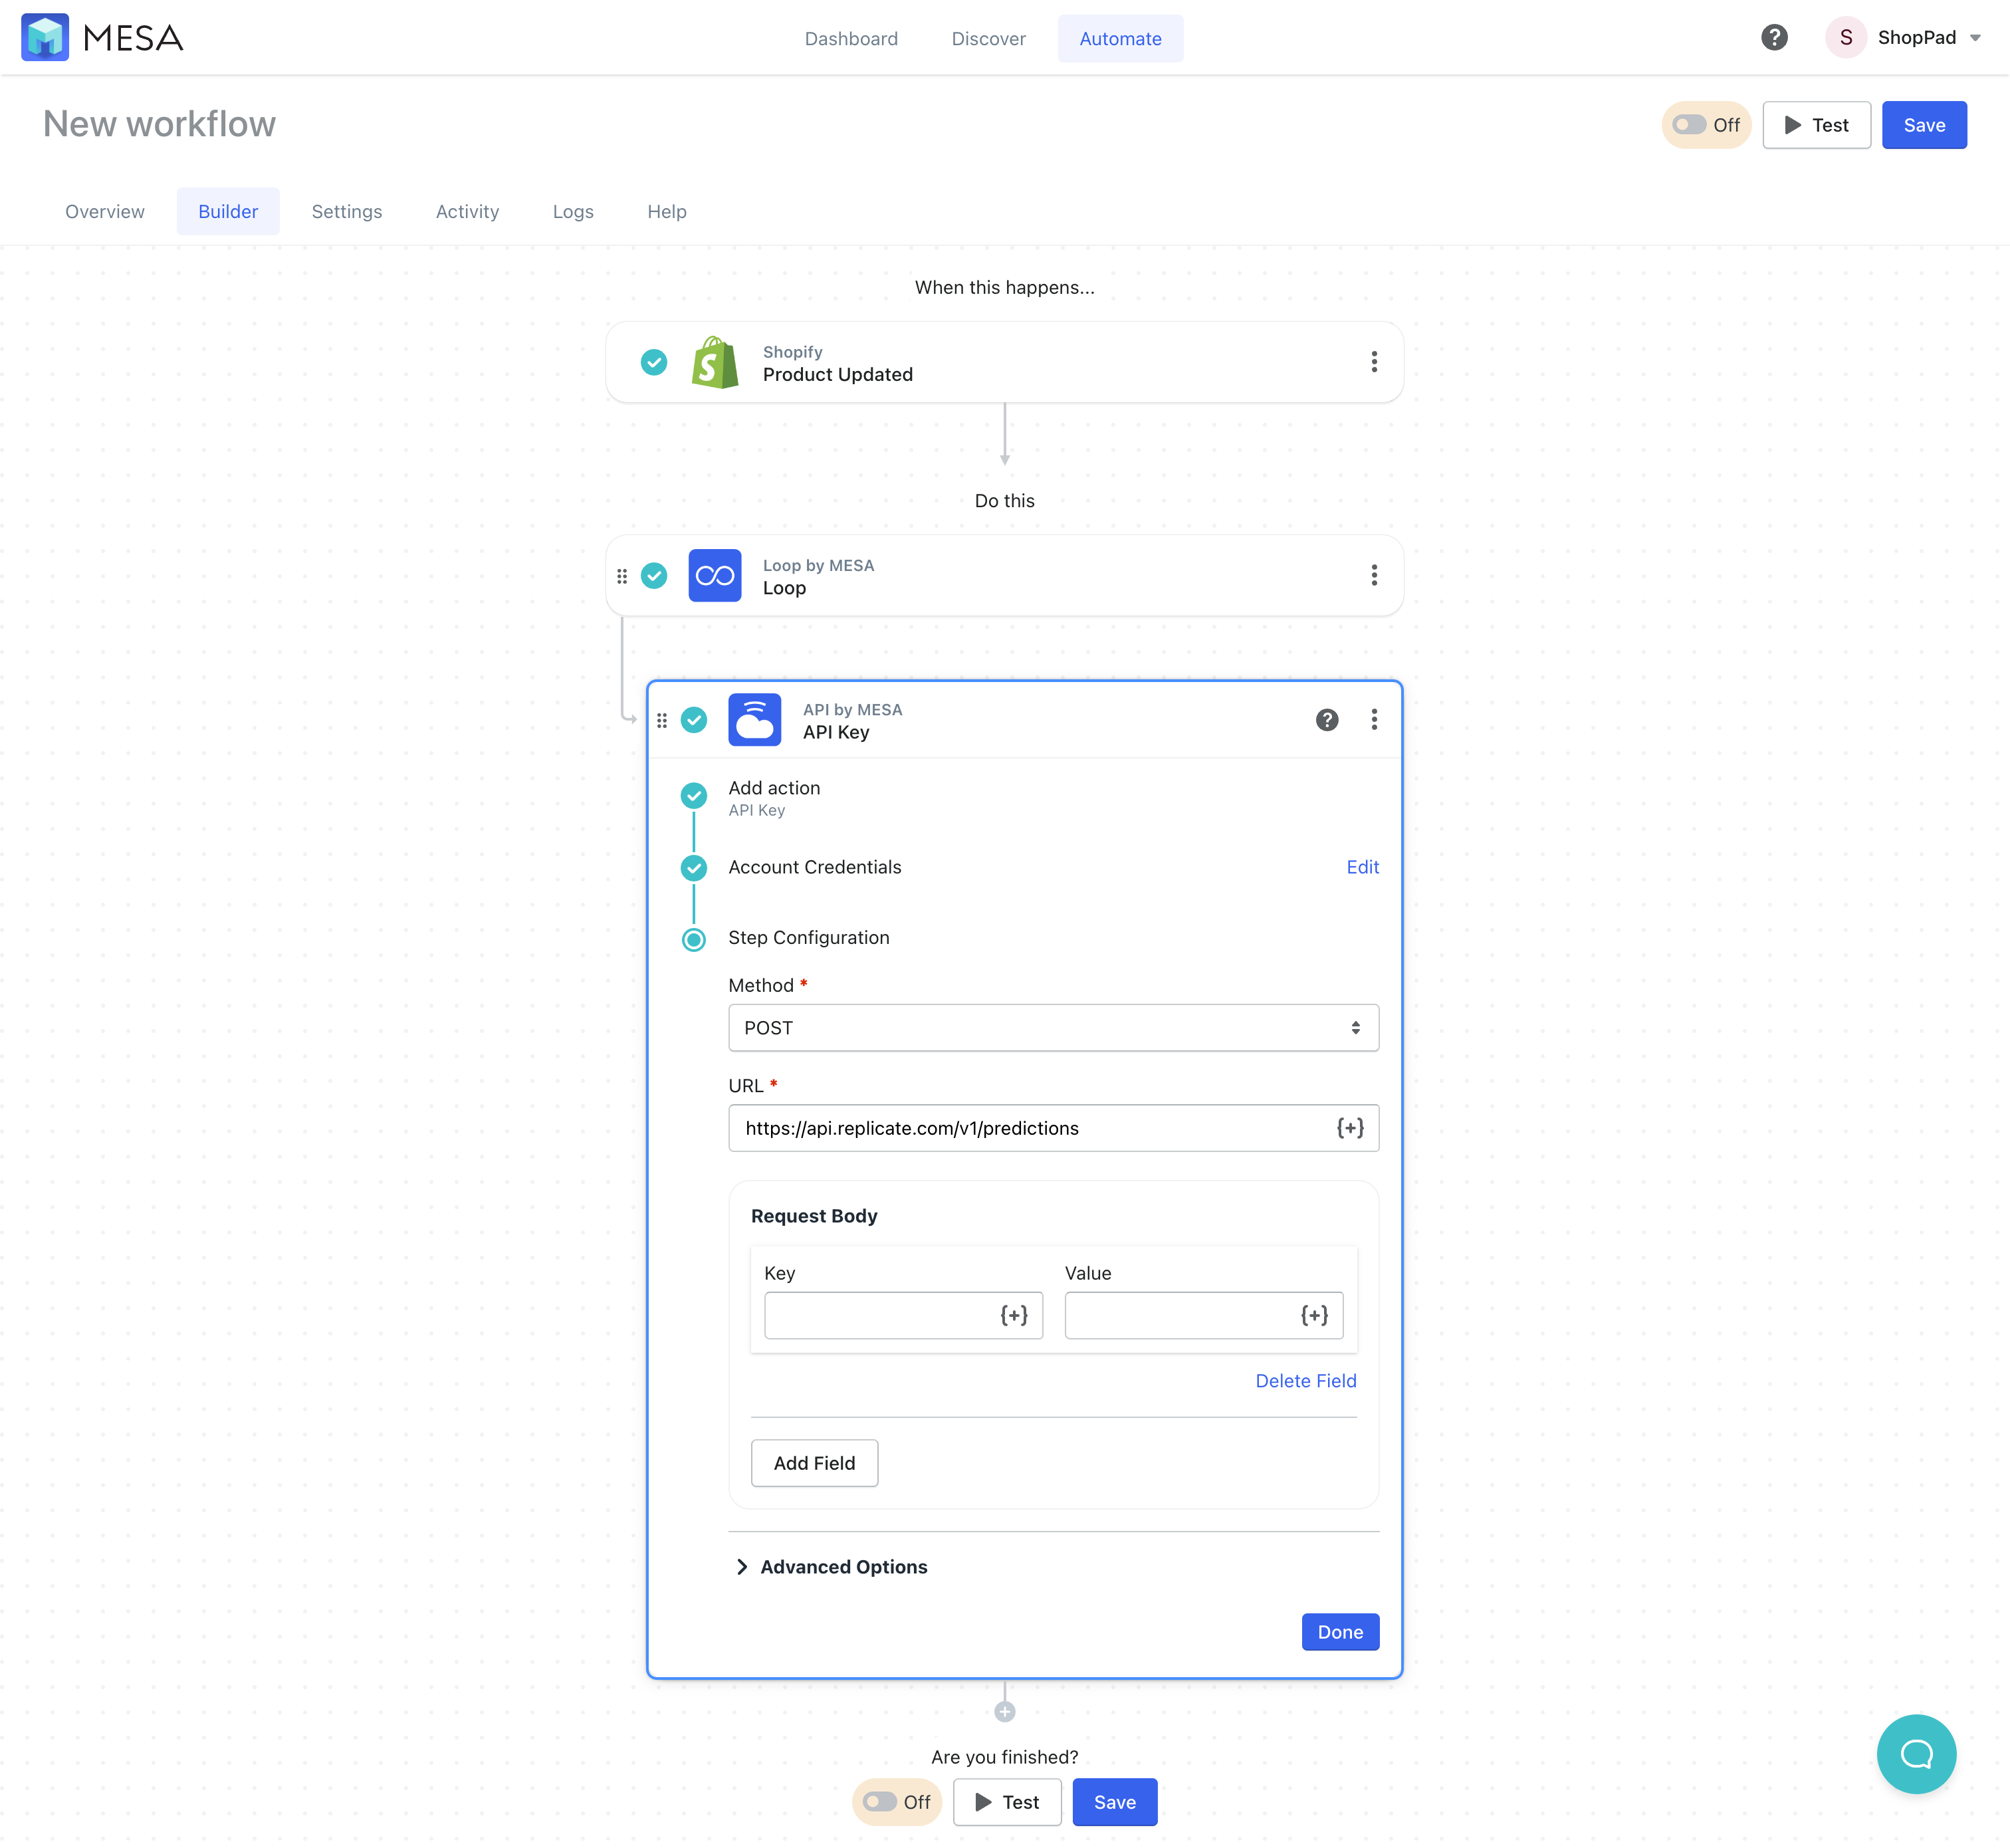
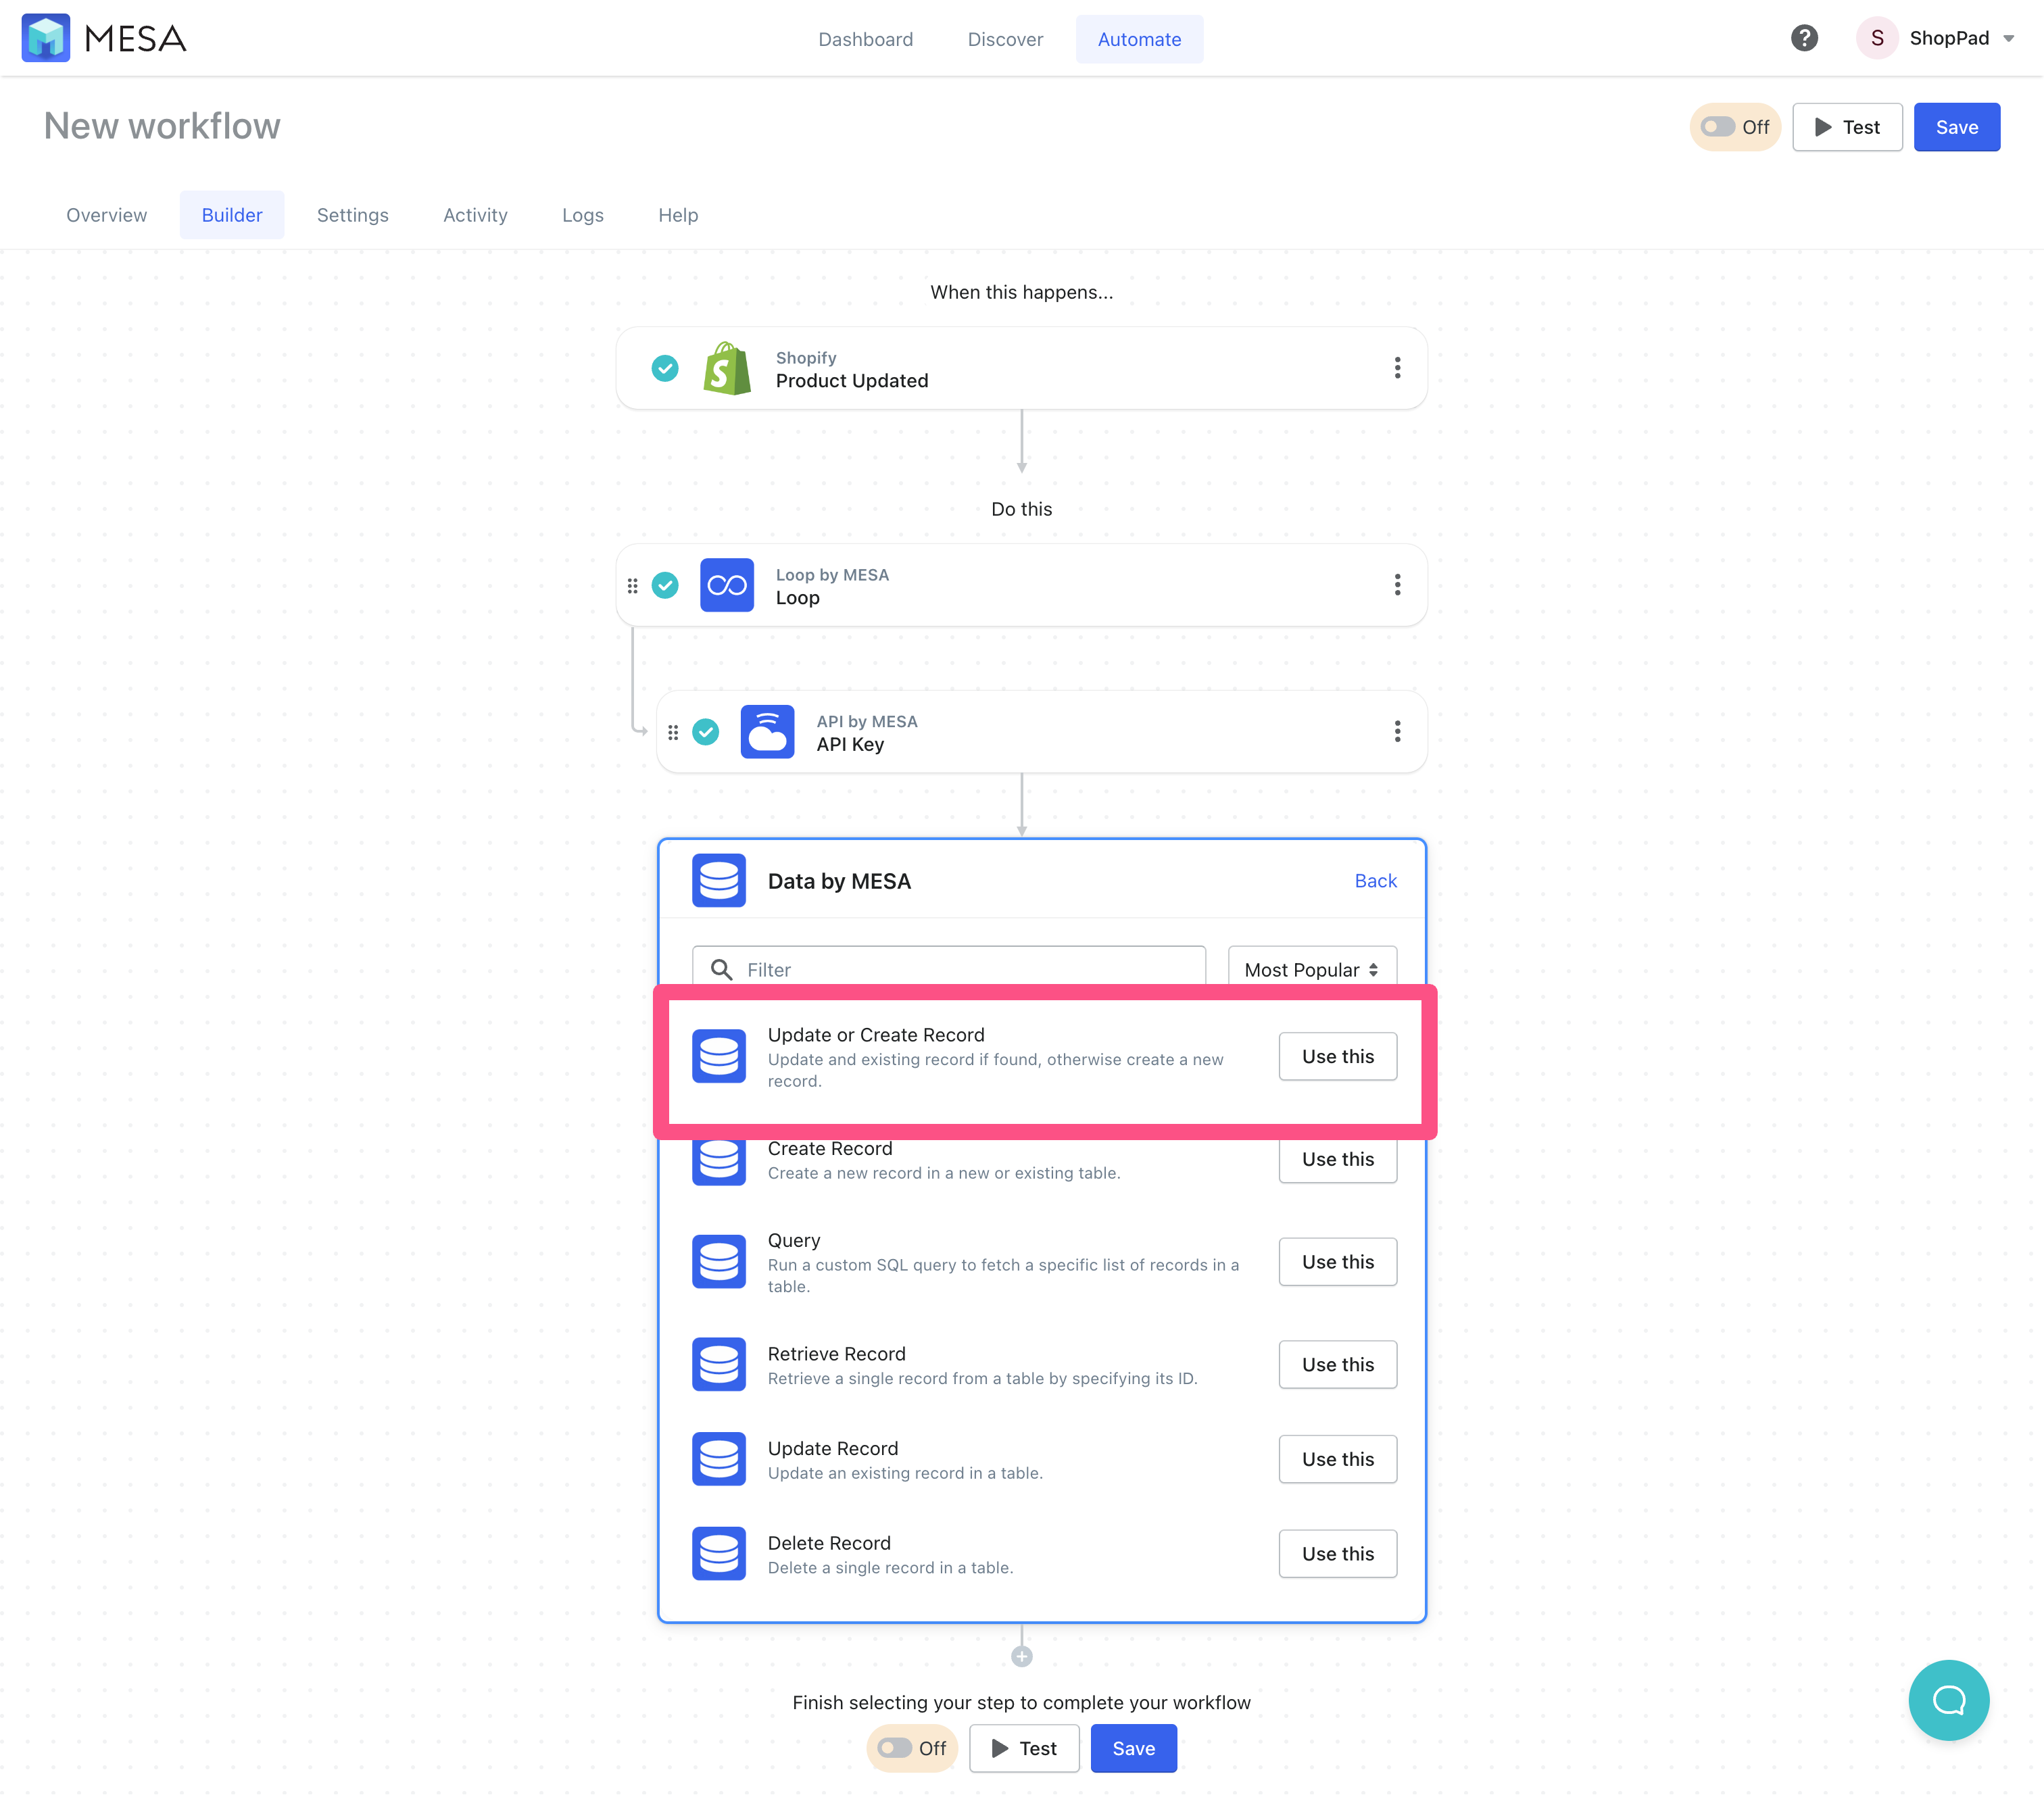
- Next, add the Data by MESA app
Choose the Update or Create Record action step.
- Create a new database table
Name your table, “Product Image Webhooks” then add this Where Clause:
webhook_id (Equals) {{api.id}}
Then, add the following columns:product_id (Number) {{shopify.id}}umber
product_image_id (N) {{loop.id}}ext
webhook_id (T) {{shopify.image.id}}
Note – Because we haven’t saved the workflow nor did we run a test, the workflow isn’t aware of all the variables available yet.
Save then, name your workflow when you’re ready.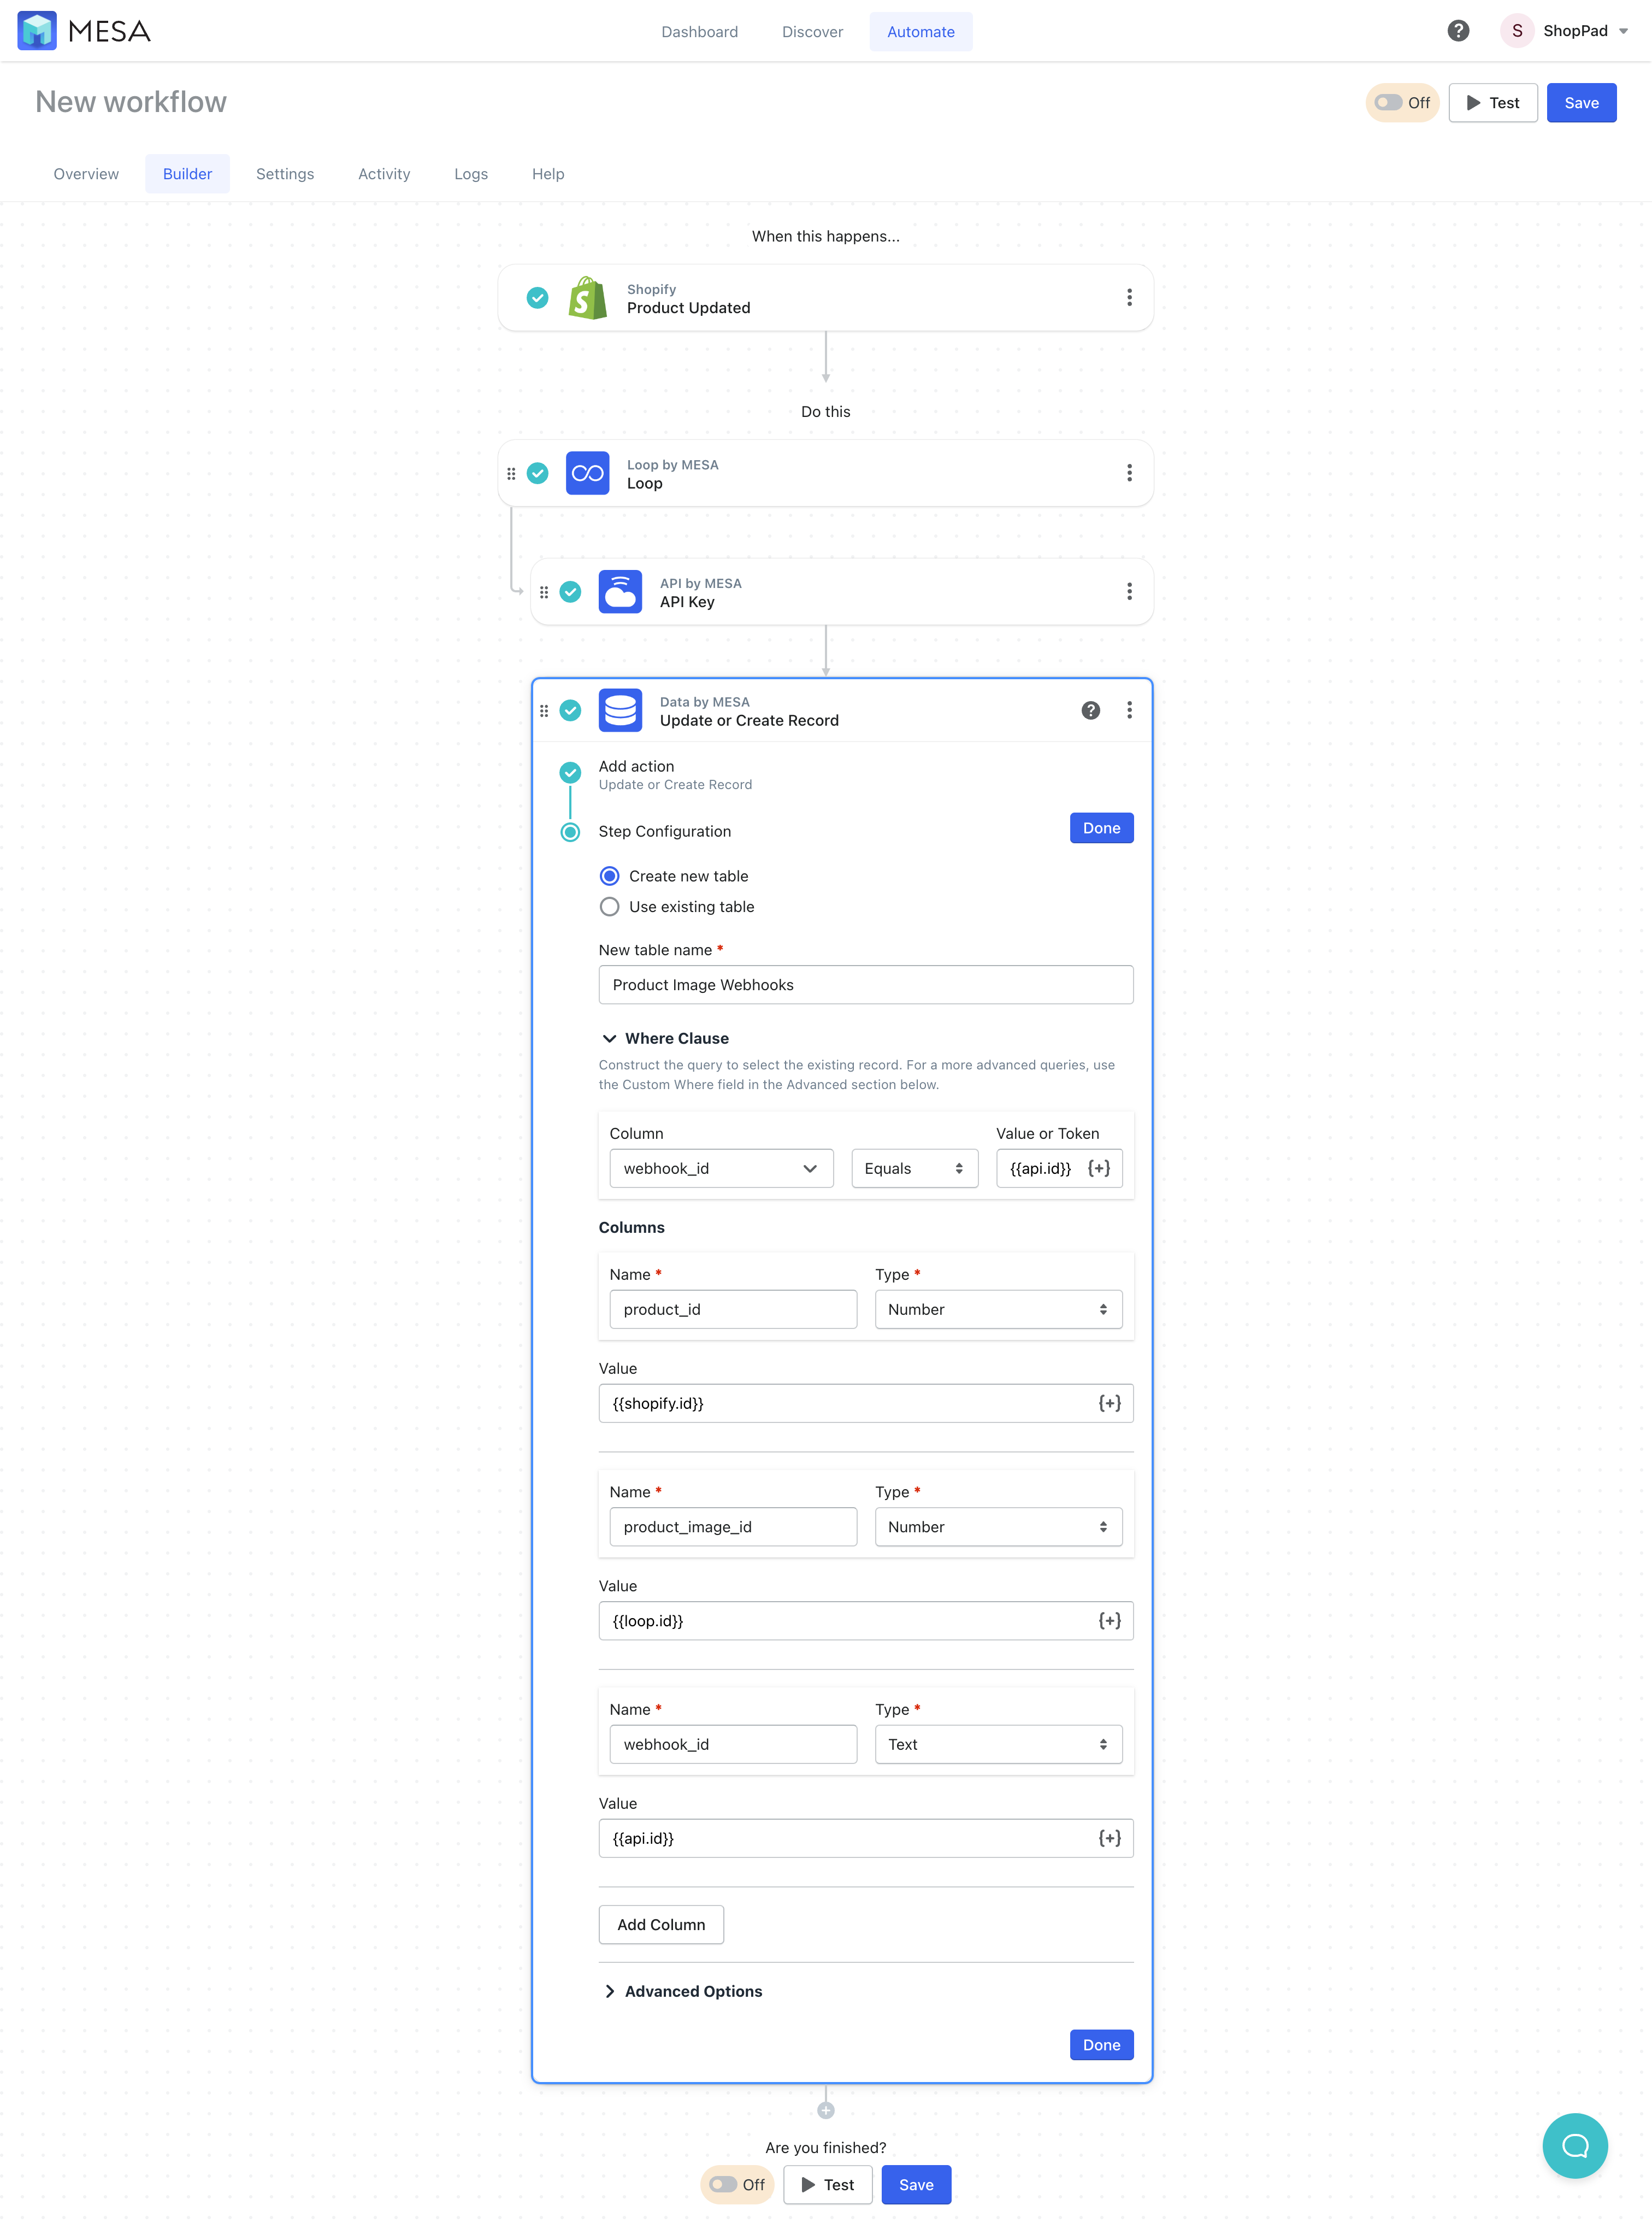
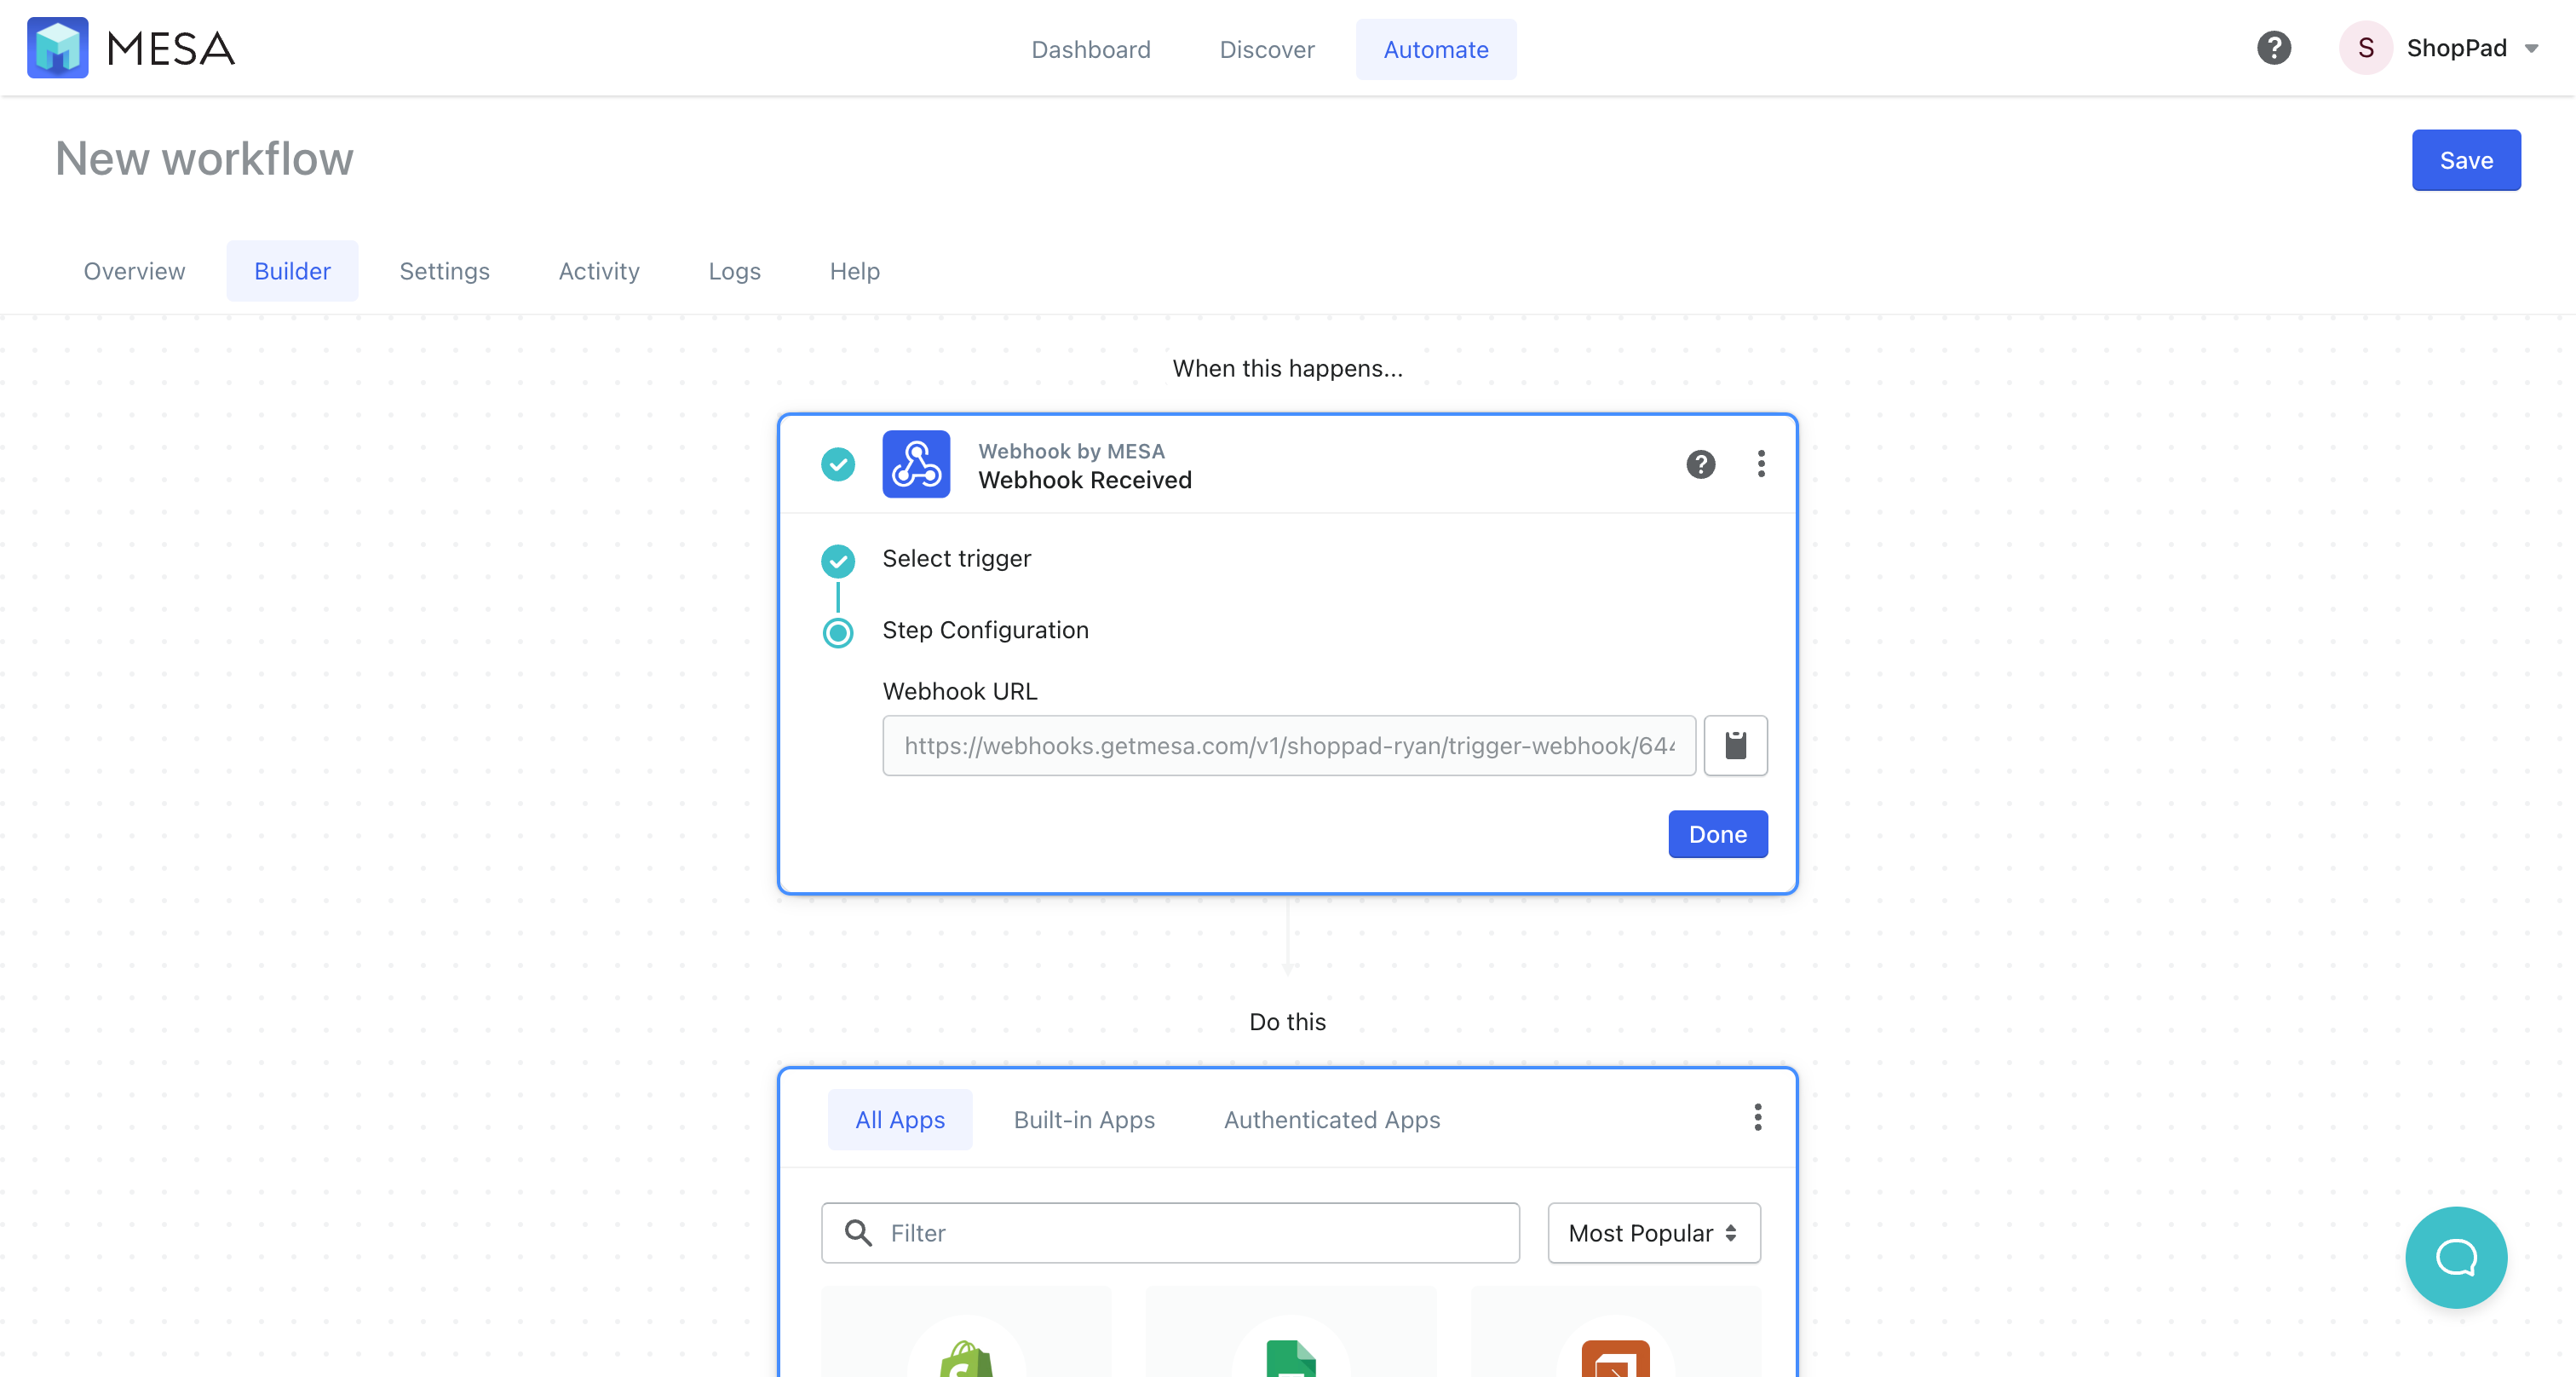
- Create a new workflow using Webhook by MESA as the trigger step
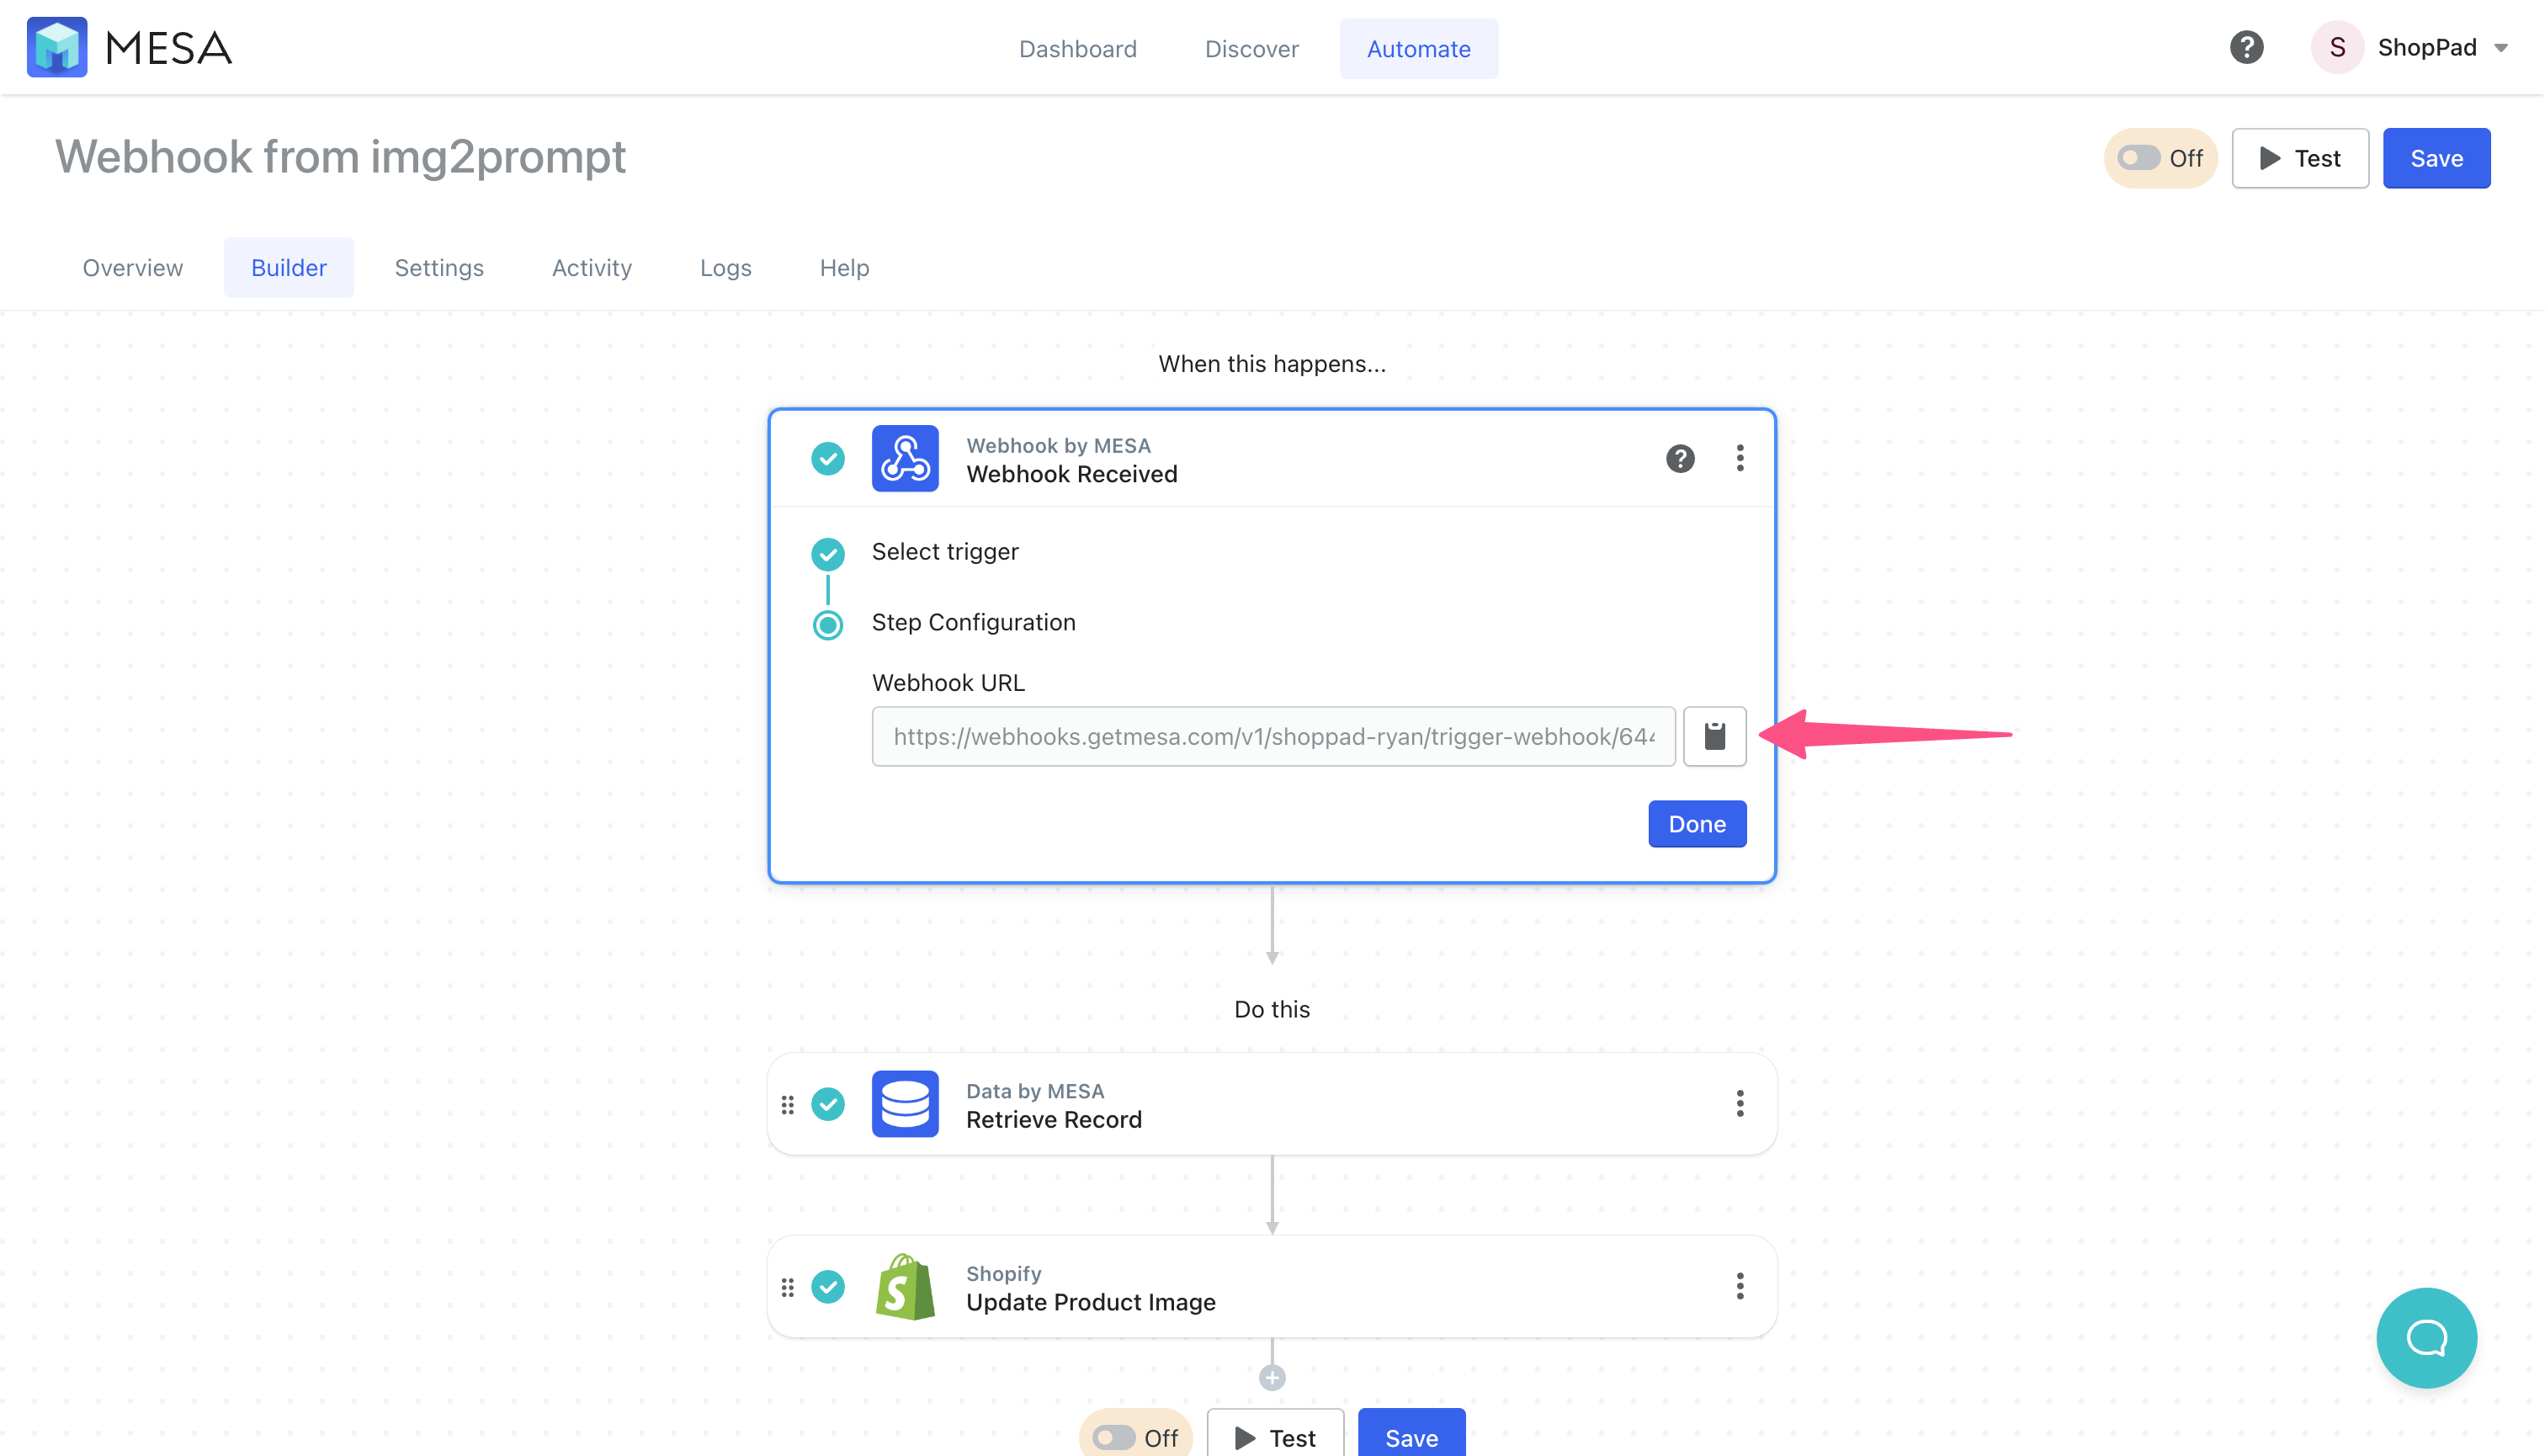
When you click Edit, you’ll see the webhook URL assigned for this workflow. We’ll come back to this after completing this workflow setup for use in the prior workflow.
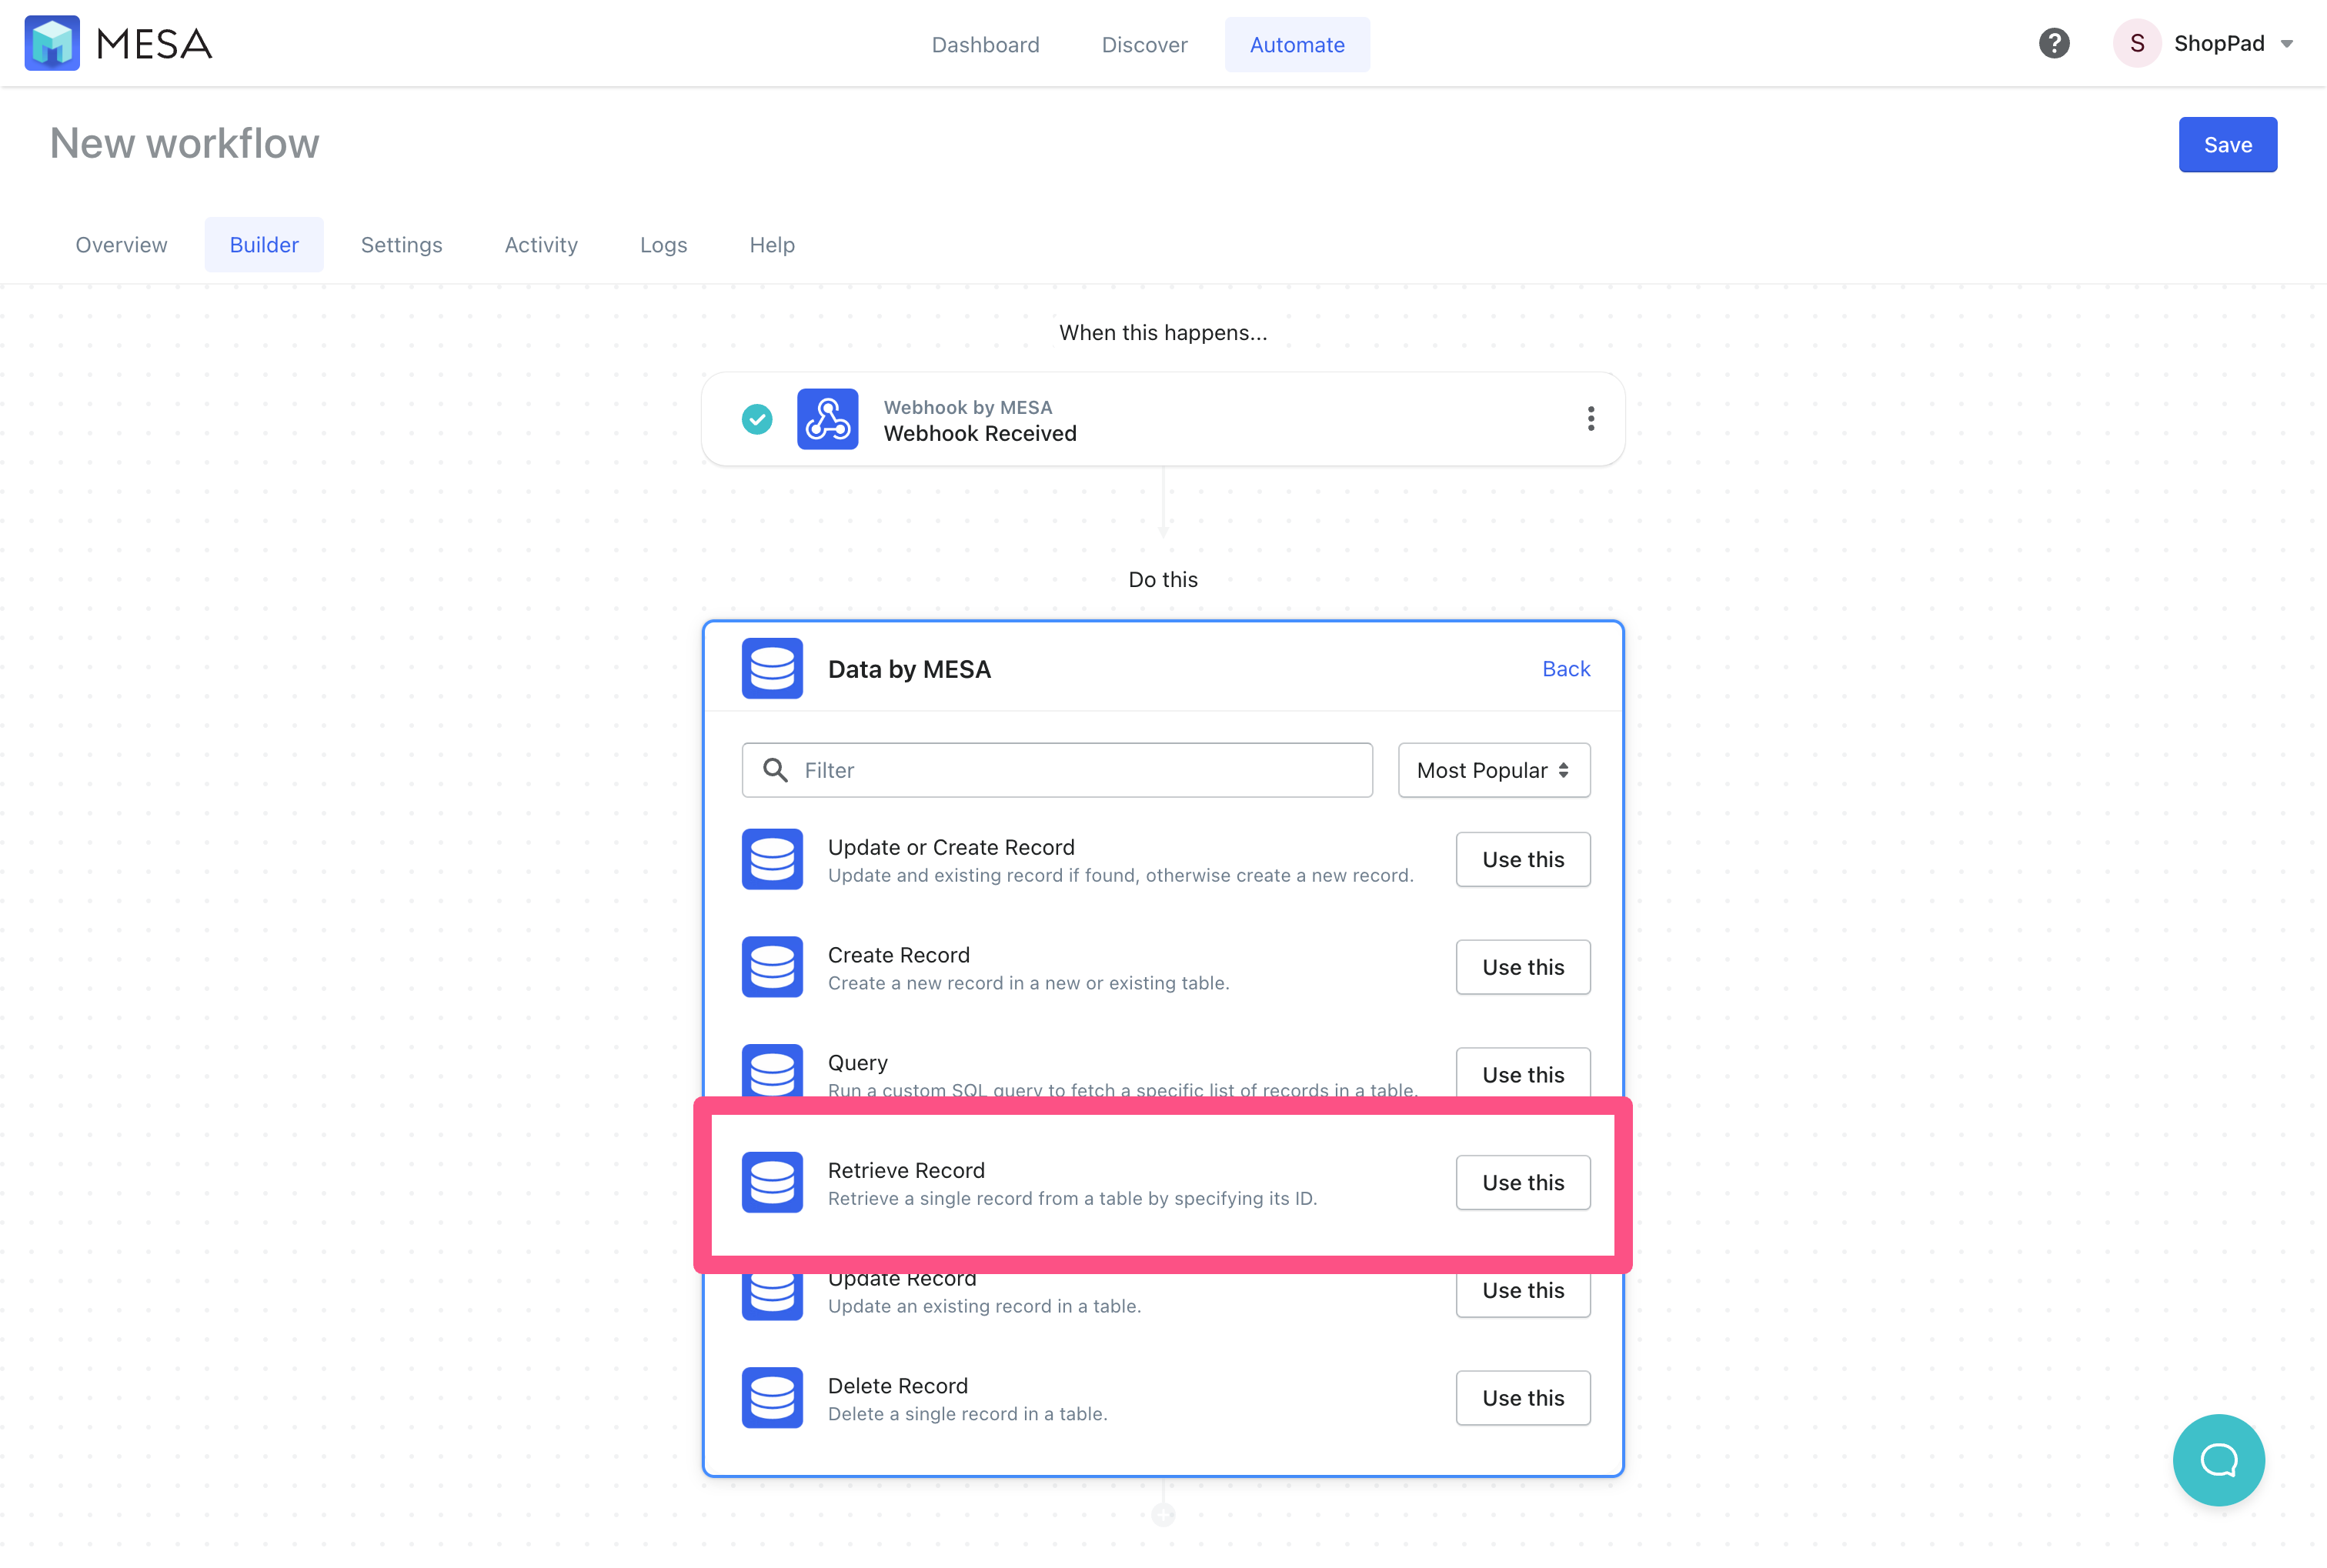
- Next, add the Data by MESA app to your workflow
Then, select the Retrieve Record action step.
- Configure the data retrieved
Select the “Product Image Webhooks” table from the list. Then, under the Where Clause, specify:
webhook_id (Equals) {{webhook.id}}
Note – since we haven’t saved this workflow, there are no variables in the selector yet.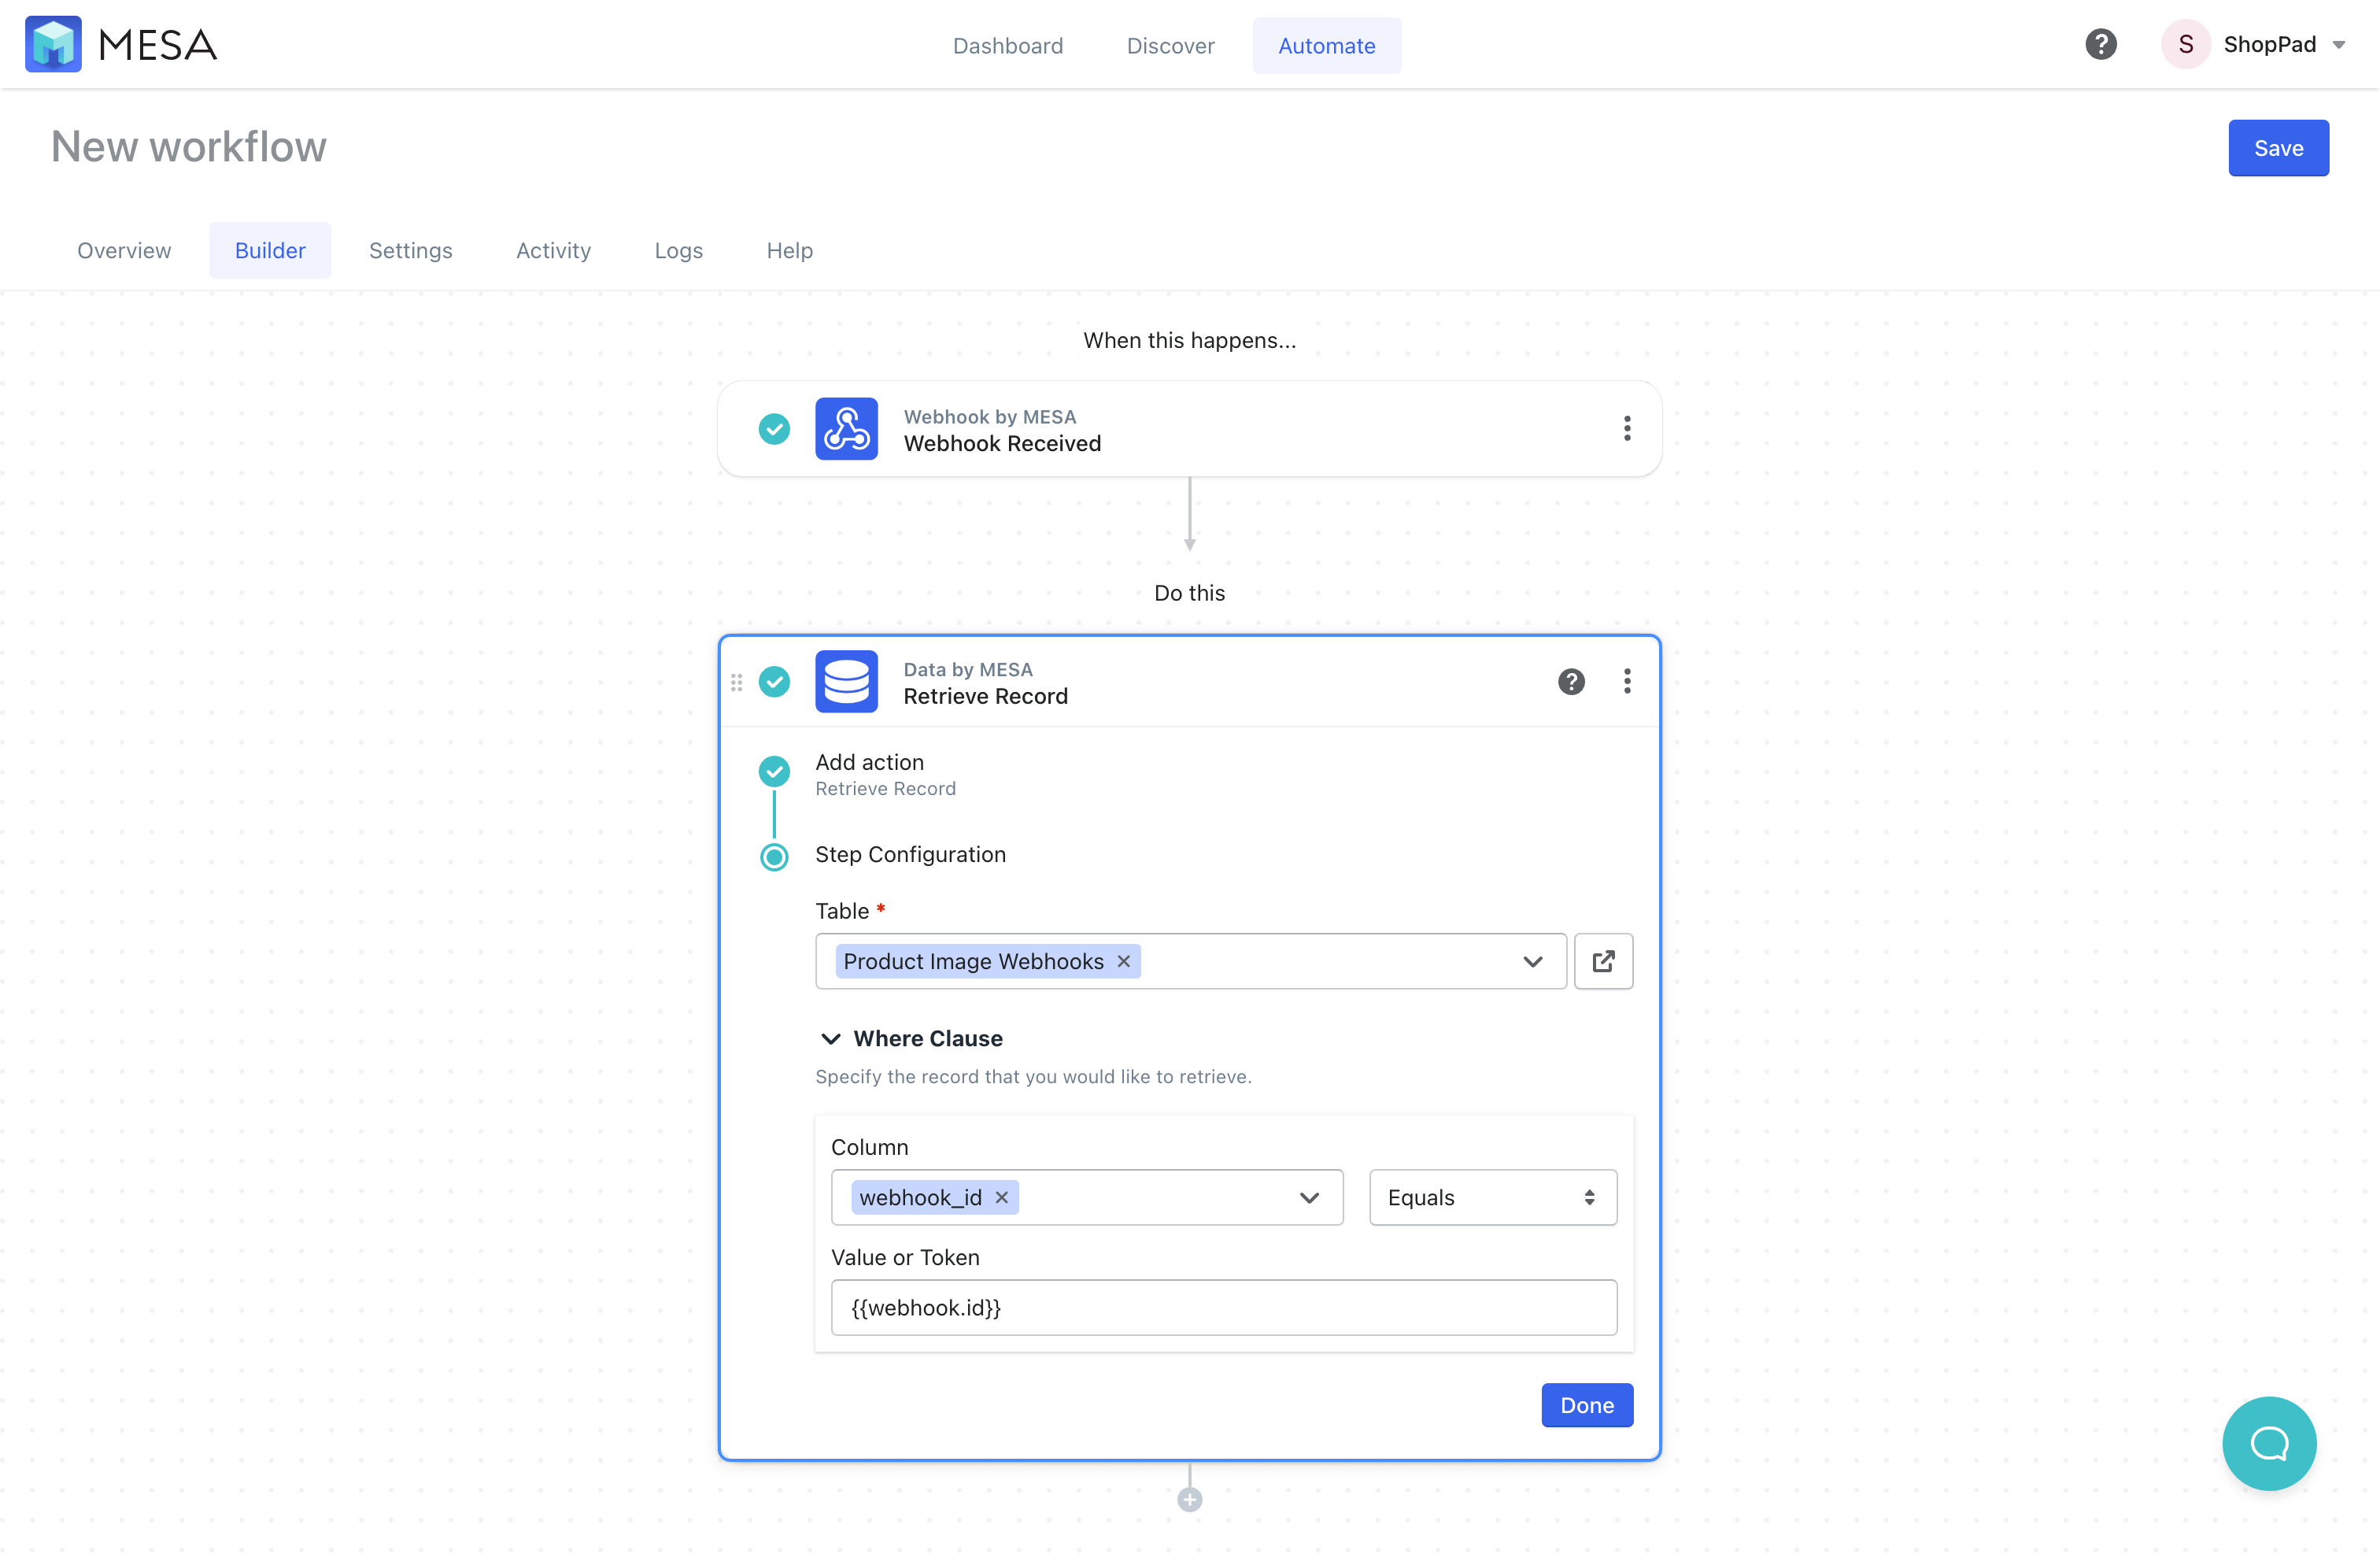
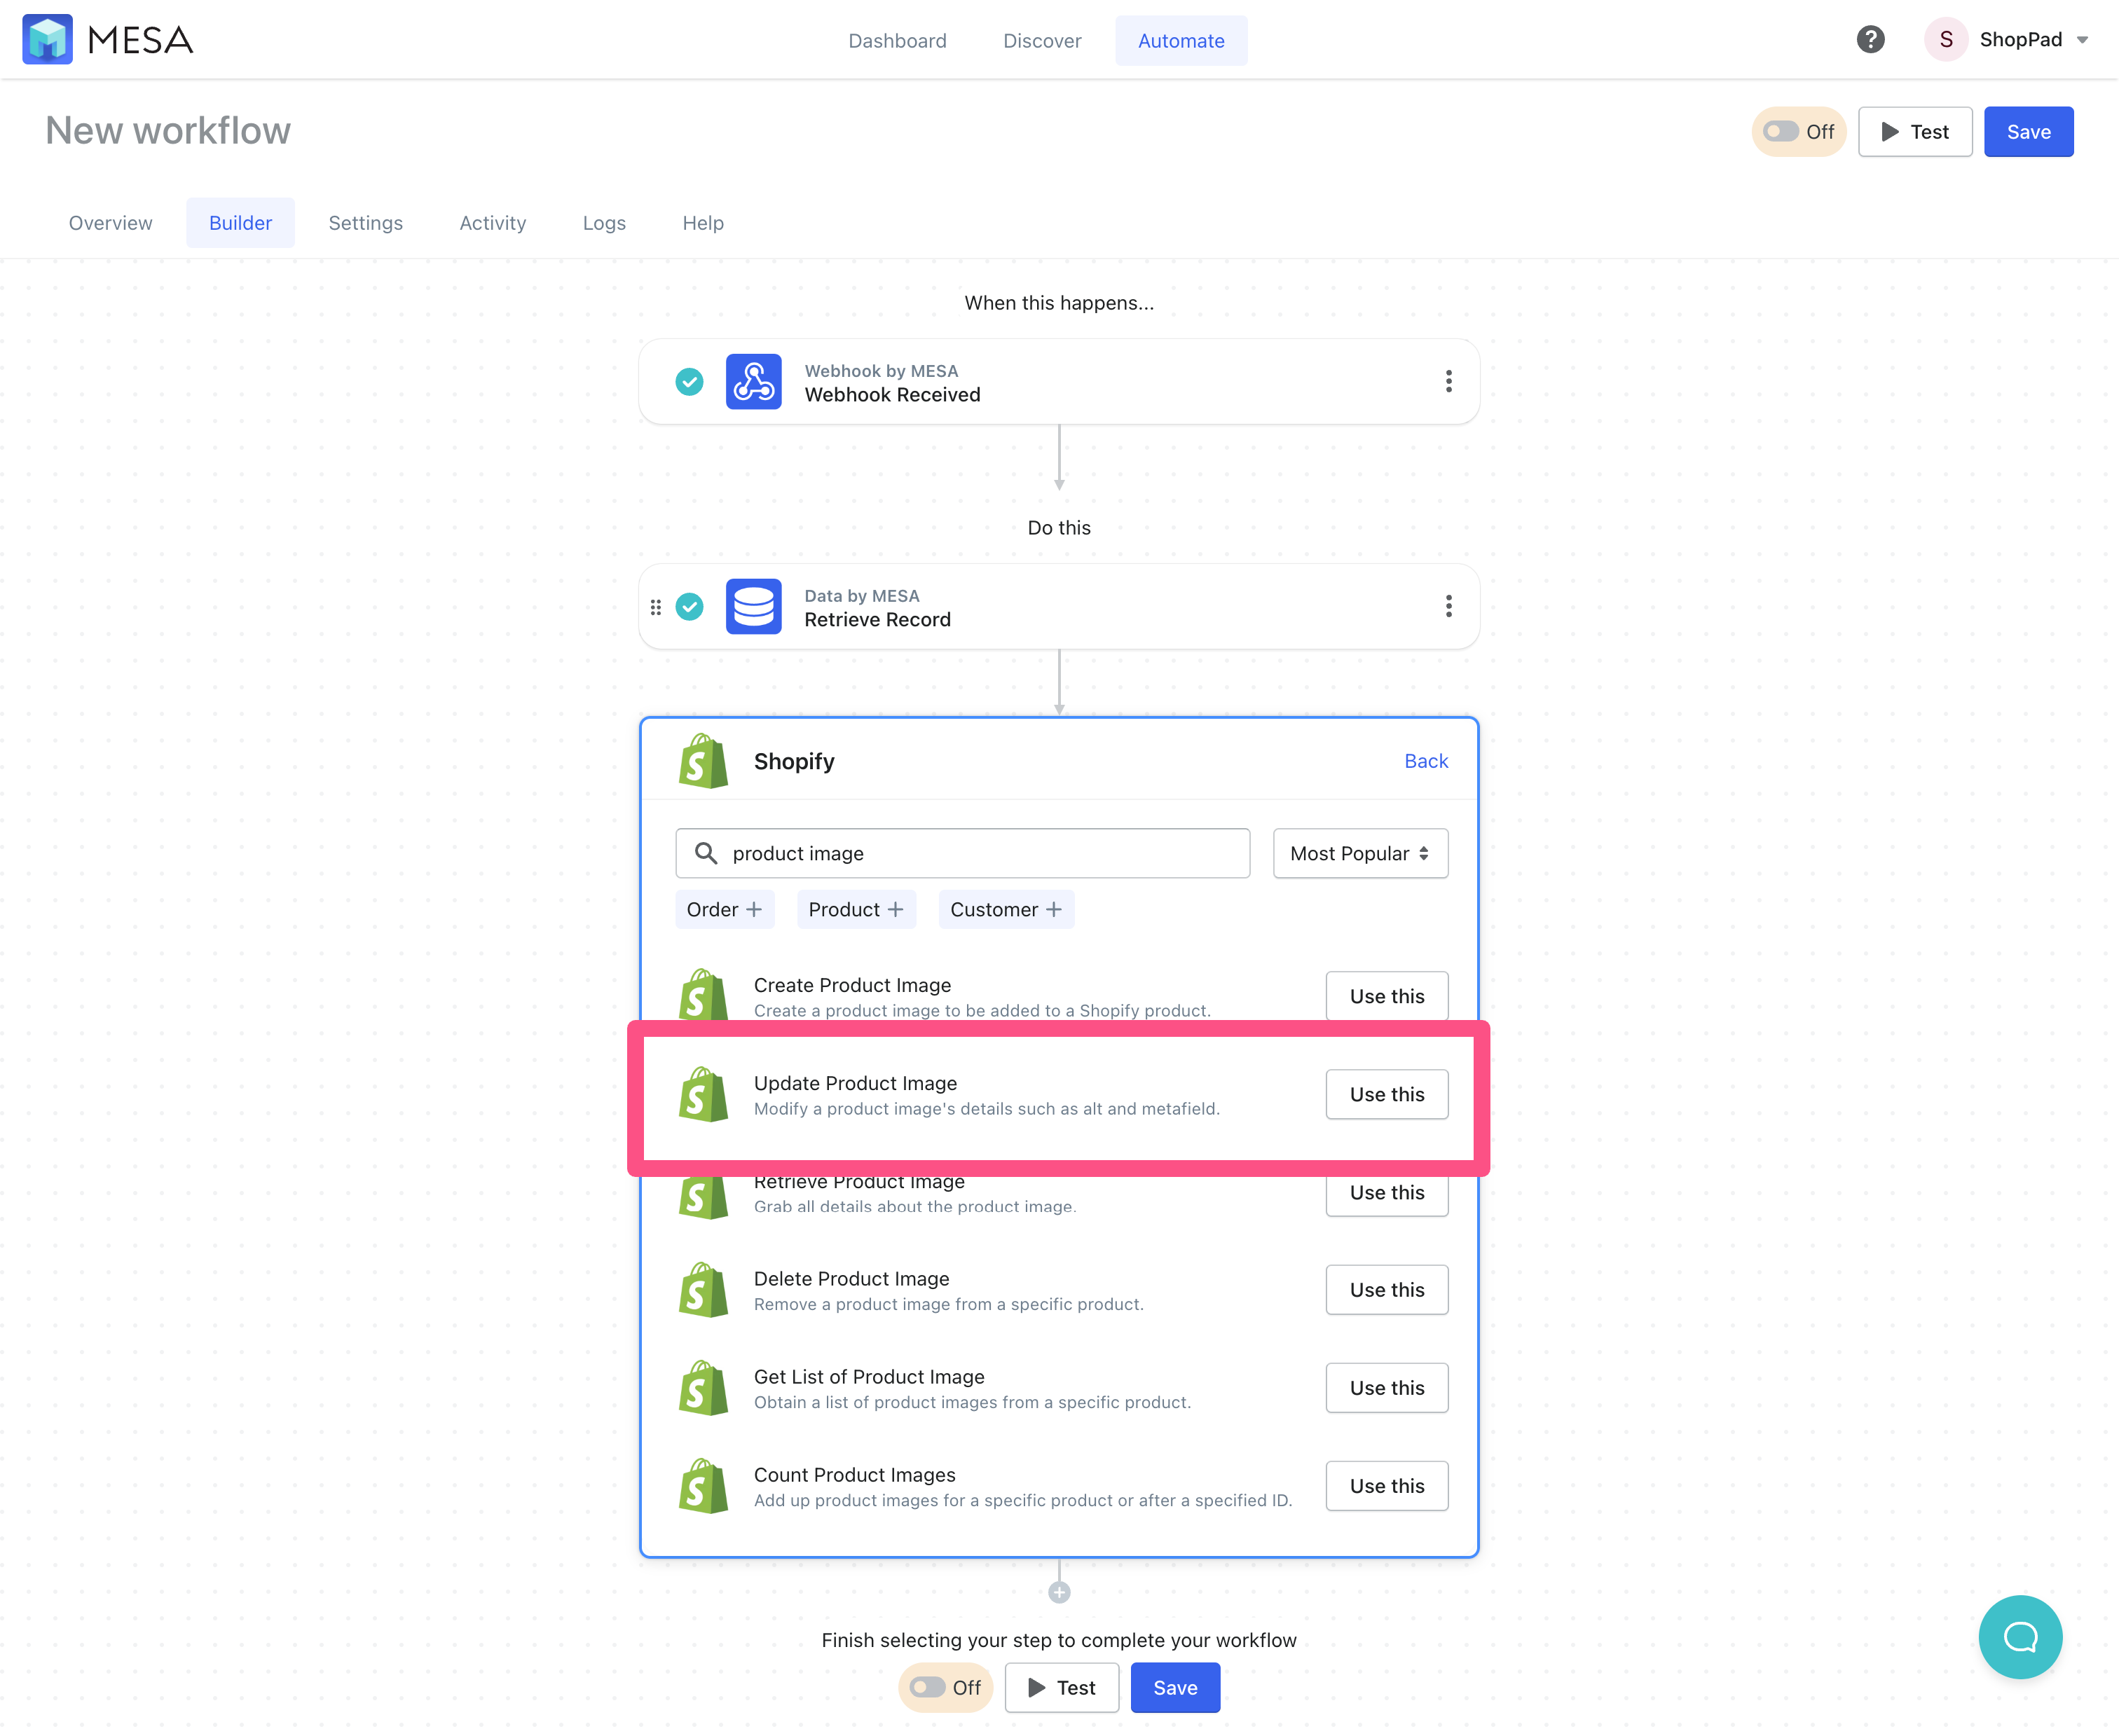
- Next, add the Shopify app to your workflow
Then, choose the Update Product Image action step.
- Configure the product image fields to be updated
You can use the variable selector {+} for each field to assign the Product ID as Retrieve Record > Product ID and the Image ID as Retrieve Record > Product Image ID.
Then click the Add Field button to assign the Key field asaltand the value being the Webhook Received > Output variable or,{{webhook.output}}.
This is where we update the Shopify product alt tag based on the API response.
Be sure to Save then, name your workflow.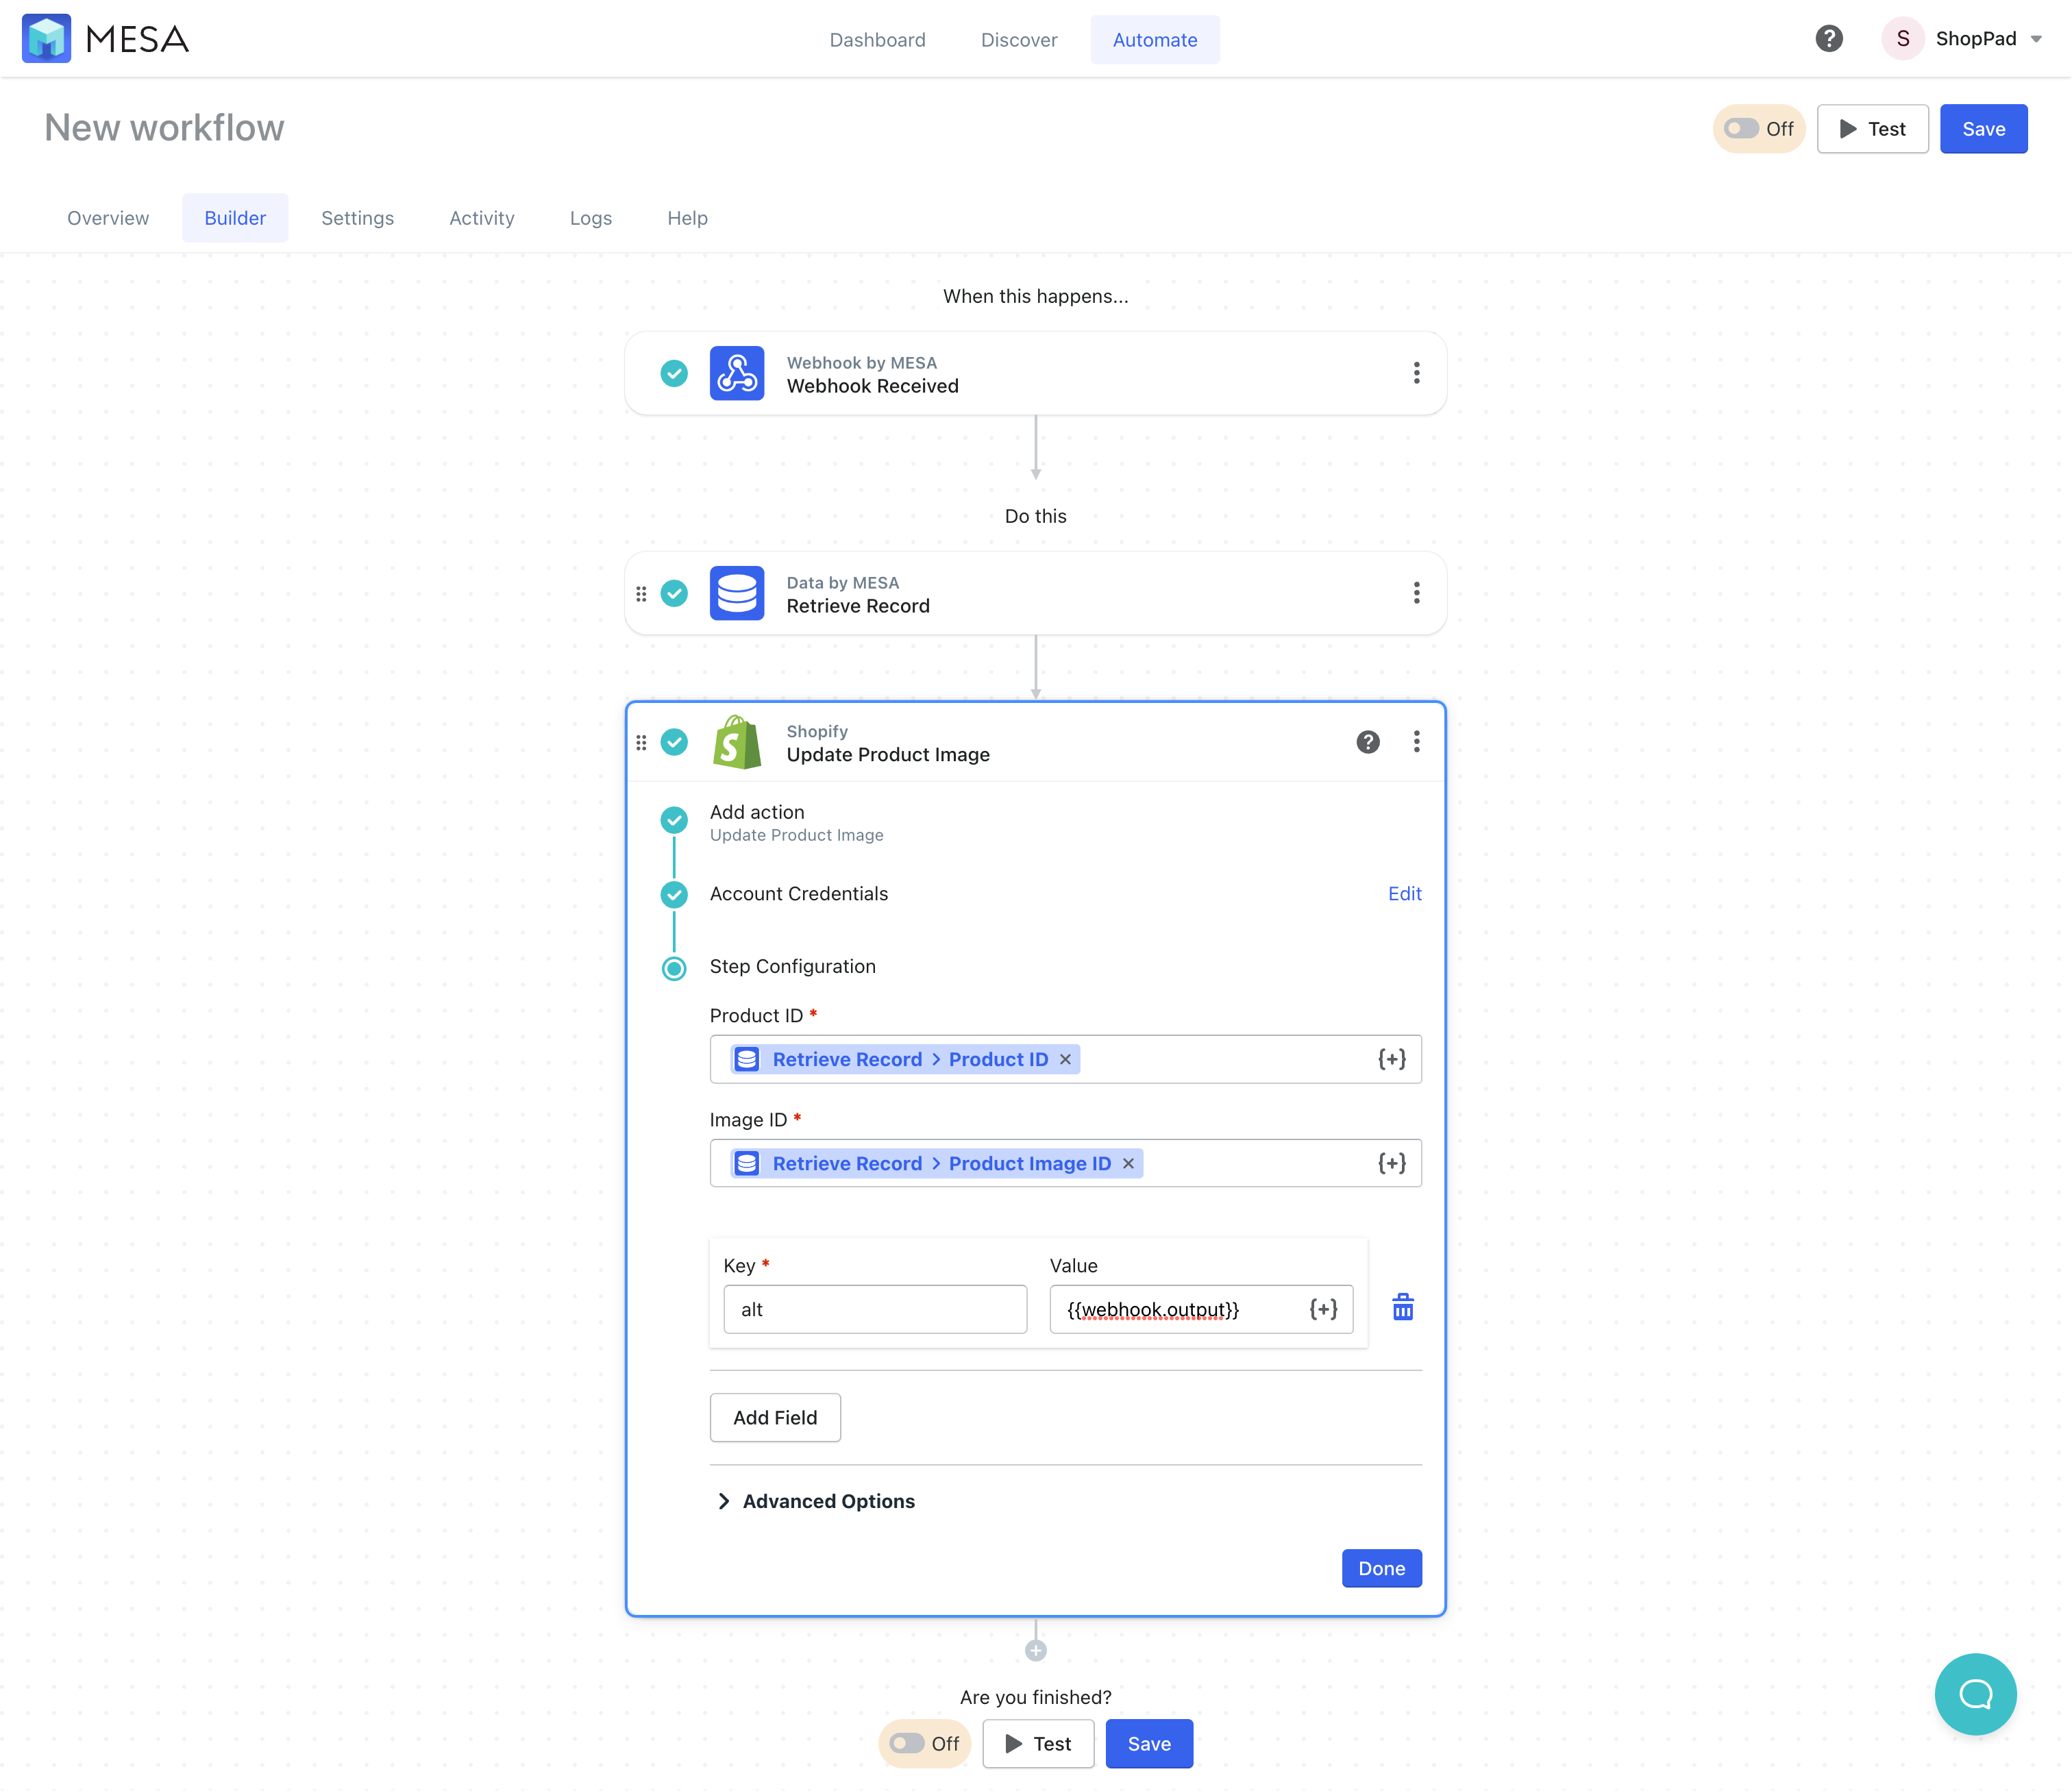
- Next, copy the Webhook URL
Scroll back to the trigger step and copy the webhook URL.
- Then, return to your first workflow and expand the API step Advanced Options
Next, click the Add Header button and specify the Key as
Authorizatonand the Value as your personal token value which can be found here.
Then, click the checkbox to “Specify a custom Request Body” to reveal the field.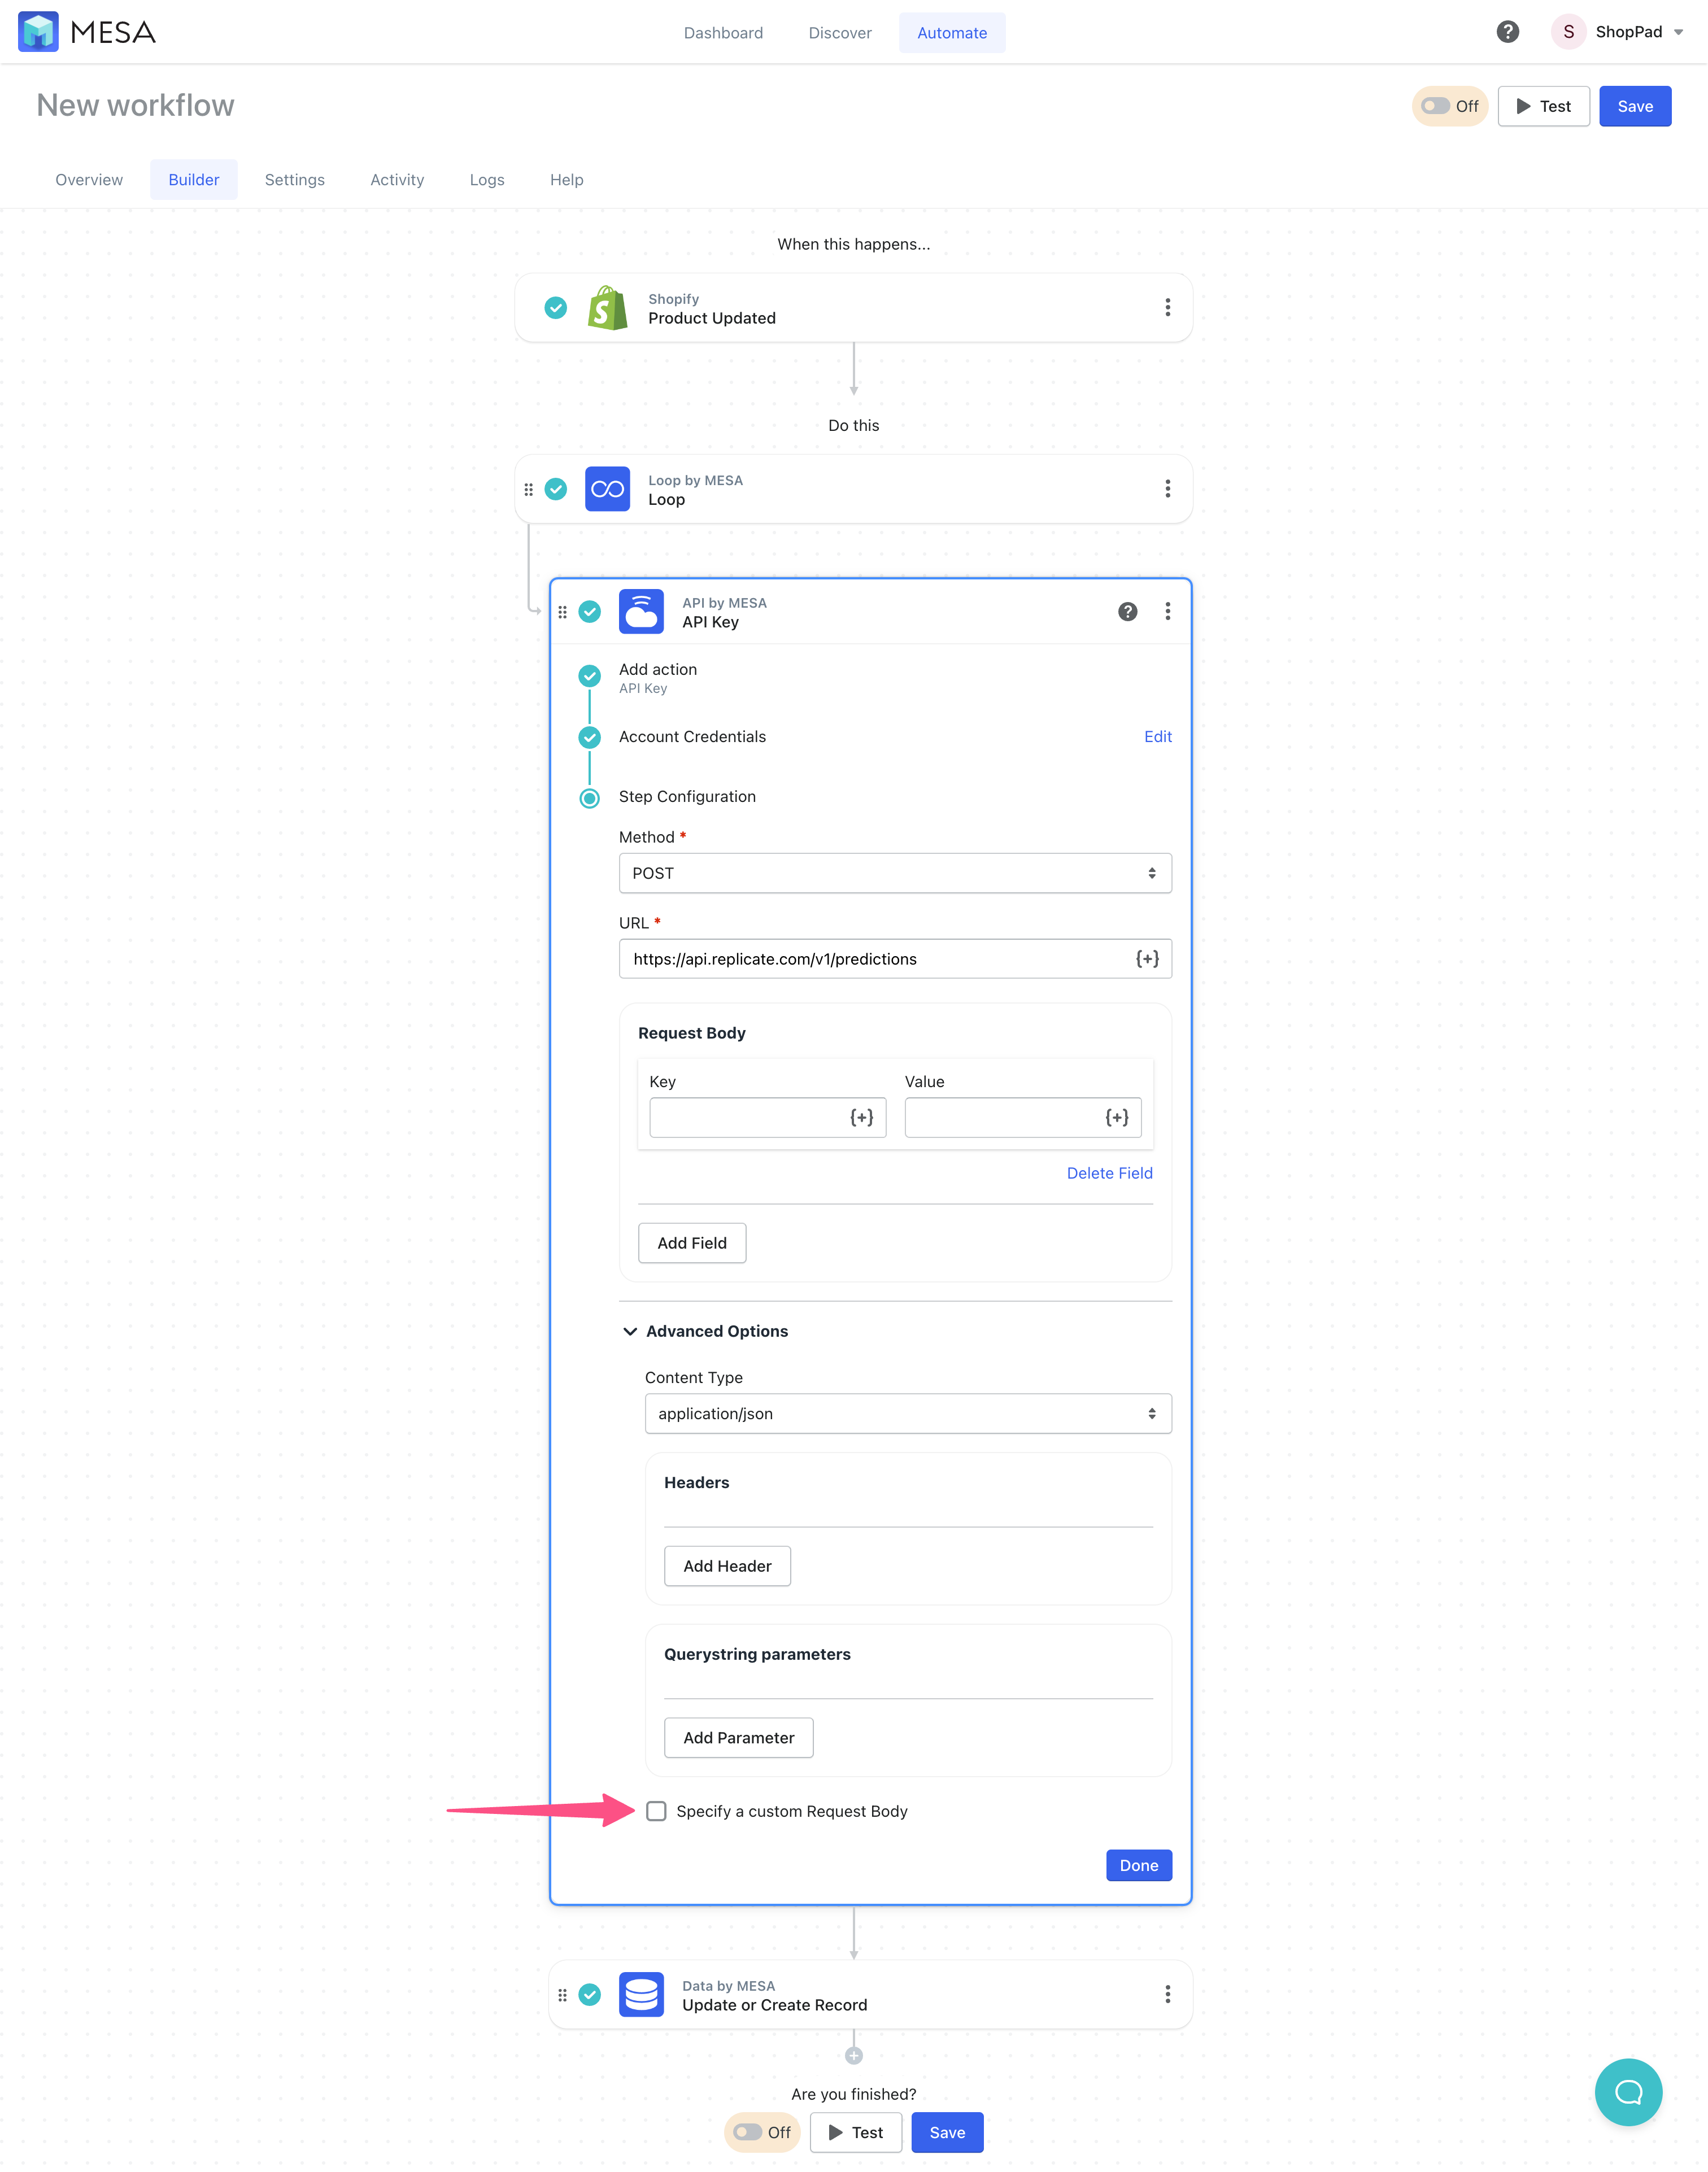
- Paste the following payload snippet:
This combines the webhook URL from our workflow step and our API authorization for img2prompt. Additionally, we’re adding the Shopify product image source as a variable so the API knows what to analyze.
{"webhook": "https://webhooks.getmesa.com/v1/mesa-dev/trigger-webhook/6436b8031ace5d19ab72a251/6436b80739d4257bcd257f32.json?apikey=t35t156eqSUtQar23AbSfaMjIXQ1DsVz5wi7","version": "50adaf2d3ad20a6f911a8a9e3ccf777b263b8596fbd2c8fc26e8888f8a0edbb5", "input": {"image": "{{image.src}}"}}
The is a sample snippet so update this with your webhook URL highlighted above.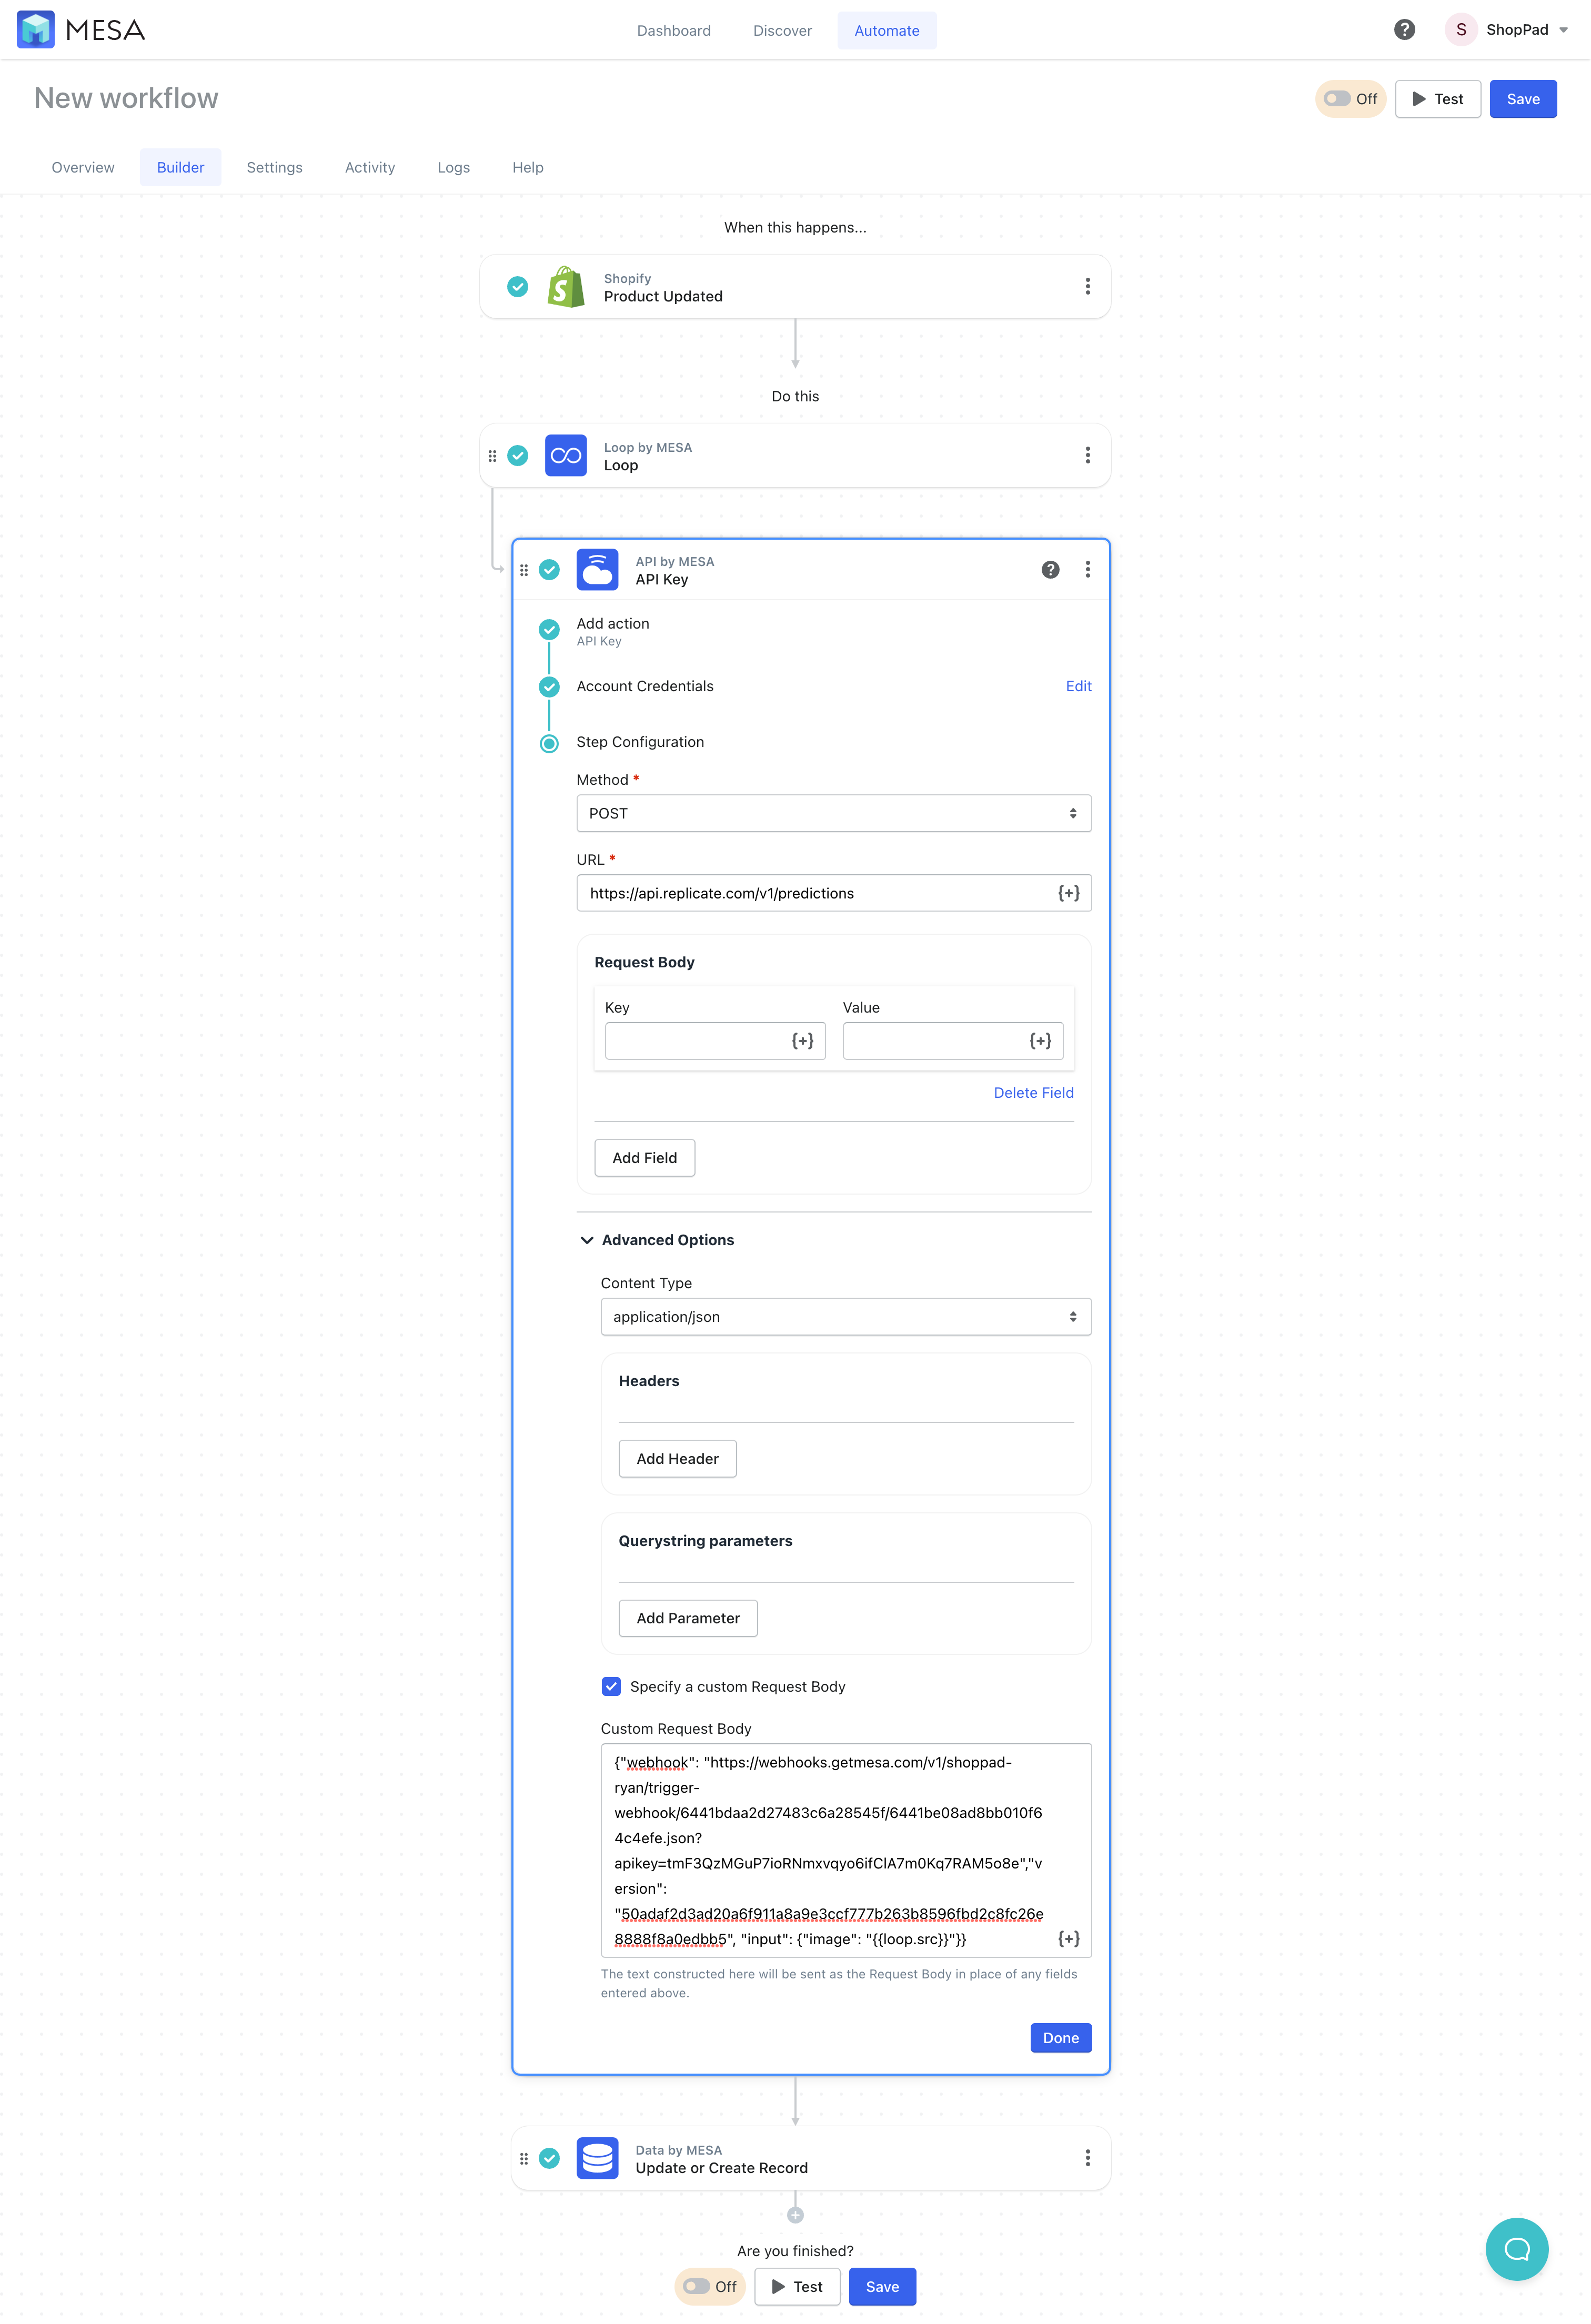
Tips & tricks for writing product alt descriptions
Alt tags, also known as “alt attributes” or “alt text,” provide an essential description of your product images, ensuring that they’re accessible to search engines and visually impaired users. Implementing well-crafted alt tags for every product image is vital for various reasons.
Here are some tips and tricks to keep in mind when writing alt tags, along with their importance:
- Be descriptive and accurate: Describe the image straightforwardly, focusing on the key elements of the product. This helps search engines understand the image content and improves your chances of ranking higher in search results.
- Use relevant keywords: Incorporate relevant and targeted keywords into your alt tags, but avoid keyword stuffing. This practice enhances your SEO efforts and helps search engines associate your images with the appropriate search queries.
- Keep it concise: Aim for alt tags that are around 125 characters or less. Lengthy descriptions can be cumbersome for screen readers and may not be as effective for SEO purposes.
- Avoid redundancy: Refrain from using phrases like “image of” or “picture of,” as they are unnecessary and add no value. Search engines and screen readers already recognize the content as an image.
- Don’t forget about formatting: Use hyphens to separate words in your alt tags, as this improves readability for both search engines and screen readers.
By following these tips and understanding the importance of alt tags, you’ll be well on your way to optimizing your product images for better SEO and user experience.
Importance of product image alt tags
First and foremost, alt tags contribute to improved SEO. By giving search engines context regarding your images, you improve your website’s overall SEO performance, potentially resulting in higher rankings in search results.
Another key aspect of alt tags is their role in accessibility. They ensure that your website is accessible to visually impaired users, as screen readers rely on these descriptions to convey the image’s content. This not only benefits your users but also demonstrates your commitment to inclusivity and compliance with accessibility standards.
Furthermore, alt tags play a significant role in enhancing the user experience. In instances where images fail to load or are blocked, alt tags offer users a text description of the image, providing context and improving their experience on your website. This can lead to higher engagement and lower bounce rates, ultimately contributing to your store’s success.
Lastly, well-written alt tags can boost your content’s shareability on social media platforms. Some platforms, such as Pinterest, utilize alt tags as default descriptions when images are shared. By ensuring your alt tags are descriptive and engaging, you can increase the likelihood of your content being shared and reach a wider audience.
Workflow wrap-up
In conclusion, optimizing your Shopify store with well-crafted alt tags for product images is a vital aspect of ecommerce success. By leveraging AI and following the tips and tricks shared in this article, you can create accurate, keyword-rich, and concise alt tags that contribute to improved SEO, accessibility, user experience, and social media engagement.
Remember, every detail counts in the competitive world of ecommerce, and taking the time to enhance your product image alt tags will not only help your store stand out but also create a more inclusive and enjoyable experience for your users.
So, embrace the power of AI and start optimizing your Shopify product alt tags today for a brighter and more successful ecommerce future.


