How To Auto-tag Shopify Orders With UTM Parameters
Ecommerce managers and developers are always seeking smart ways to streamline operations, save resources, and enhance productivity. One such technique that is often overlooked, but holds immense potential, is the effective use of UTM parameters to auto-tag Shopify orders. Use UTM parameters to gain insights into traffic sources, customer behavior, and marketing performance.
But what if we took it a step further? What if you could automatically tag your Shopify orders based on UTM parameters to better track, categorize, and serve your orders?
This blog post is dedicated to demonstrating the ‘how-to’ of auto-tagging Shopify orders using UTM parameters with the help of MESA. By the end, you’ll learn a smarter way to manage orders, save time, and make data-driven decisions.
So, let’s dive in!
Want to do more with auto-tagging? Try MESA today and start building smarter automations.
Topics:
Shopify order tagging with UTM codes
Be sure to follow the latest step-by-step instructions below as the steps have been updated since it’s original video recording.
By understanding how Shopify manages tags, you’re ready to dive into how MESA can help you auto-tag your Shopify orders based on UTM parameters. Combine UTM parameters with Shopify order tags to automate order management and uncover valuable insights.
Step-by-step guide to auto-tagging Shopify orders
Time needed: 10 minutes
To get started, be sure to add MESA on your Shopify store. Then, follow these step-by-step instructions.
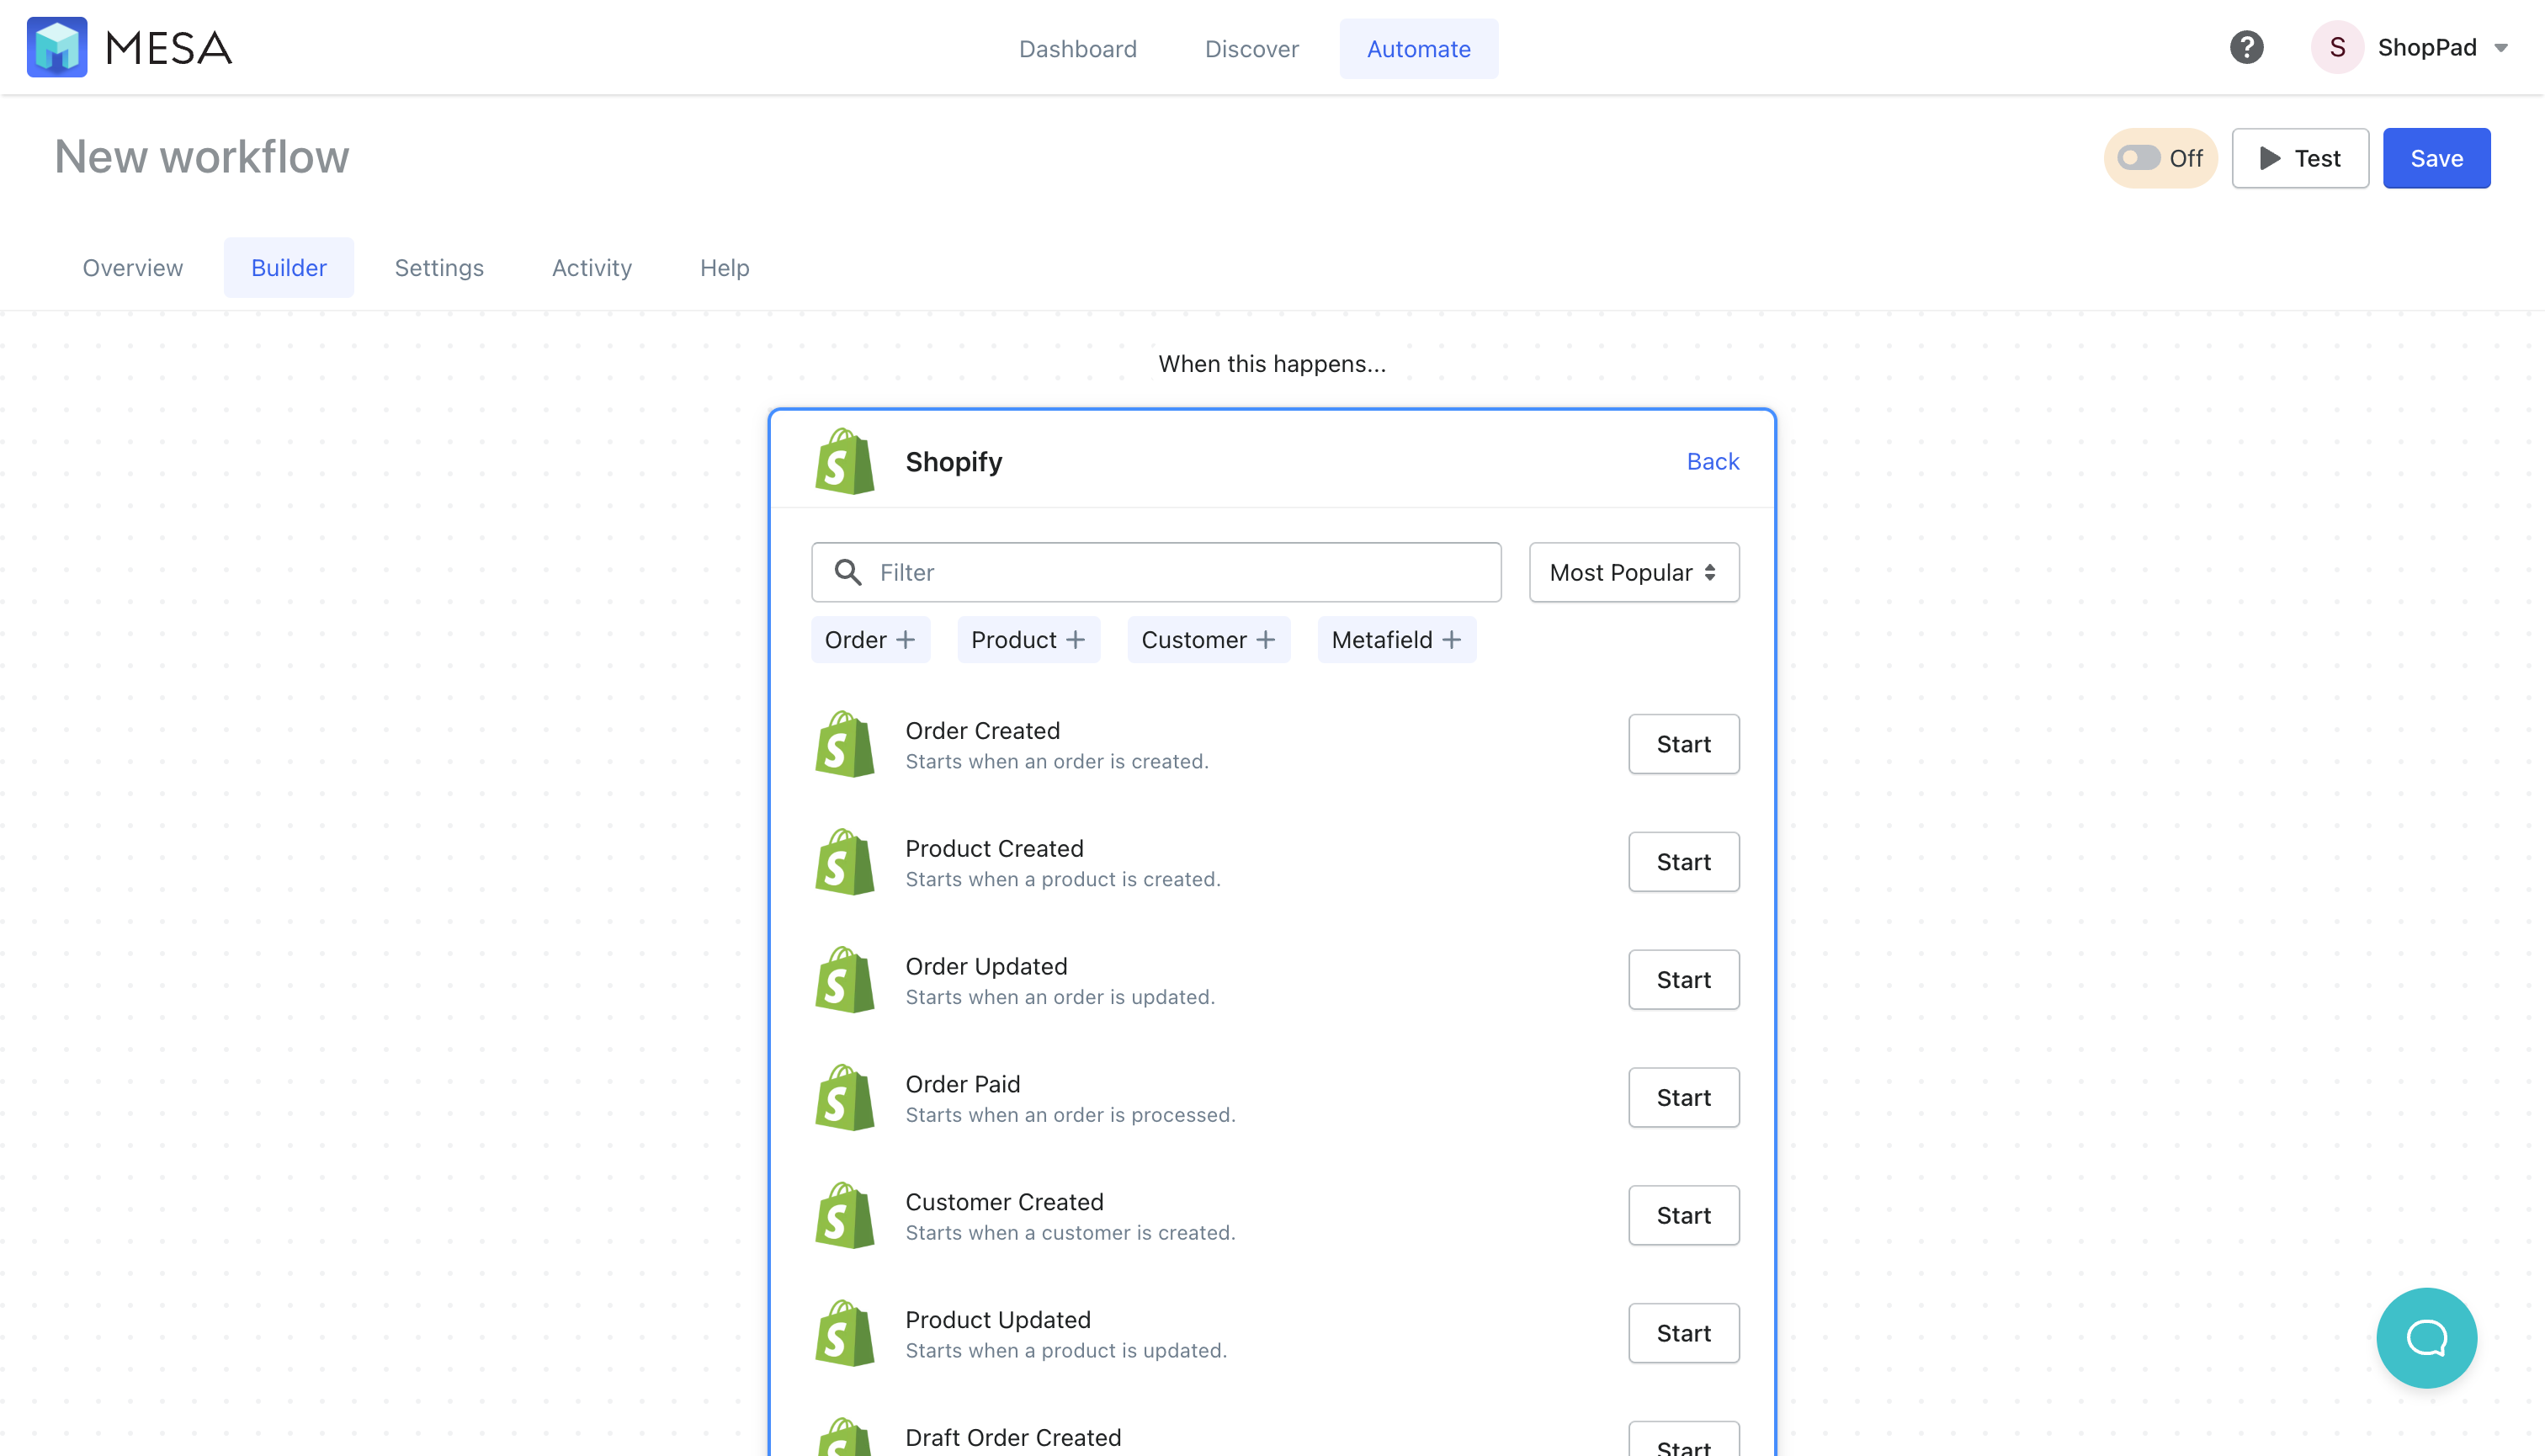
- First, choose the Shopify > Order Created trigger.
When creating this new workflow, select the Shopify app first then, choose the Order Created action.
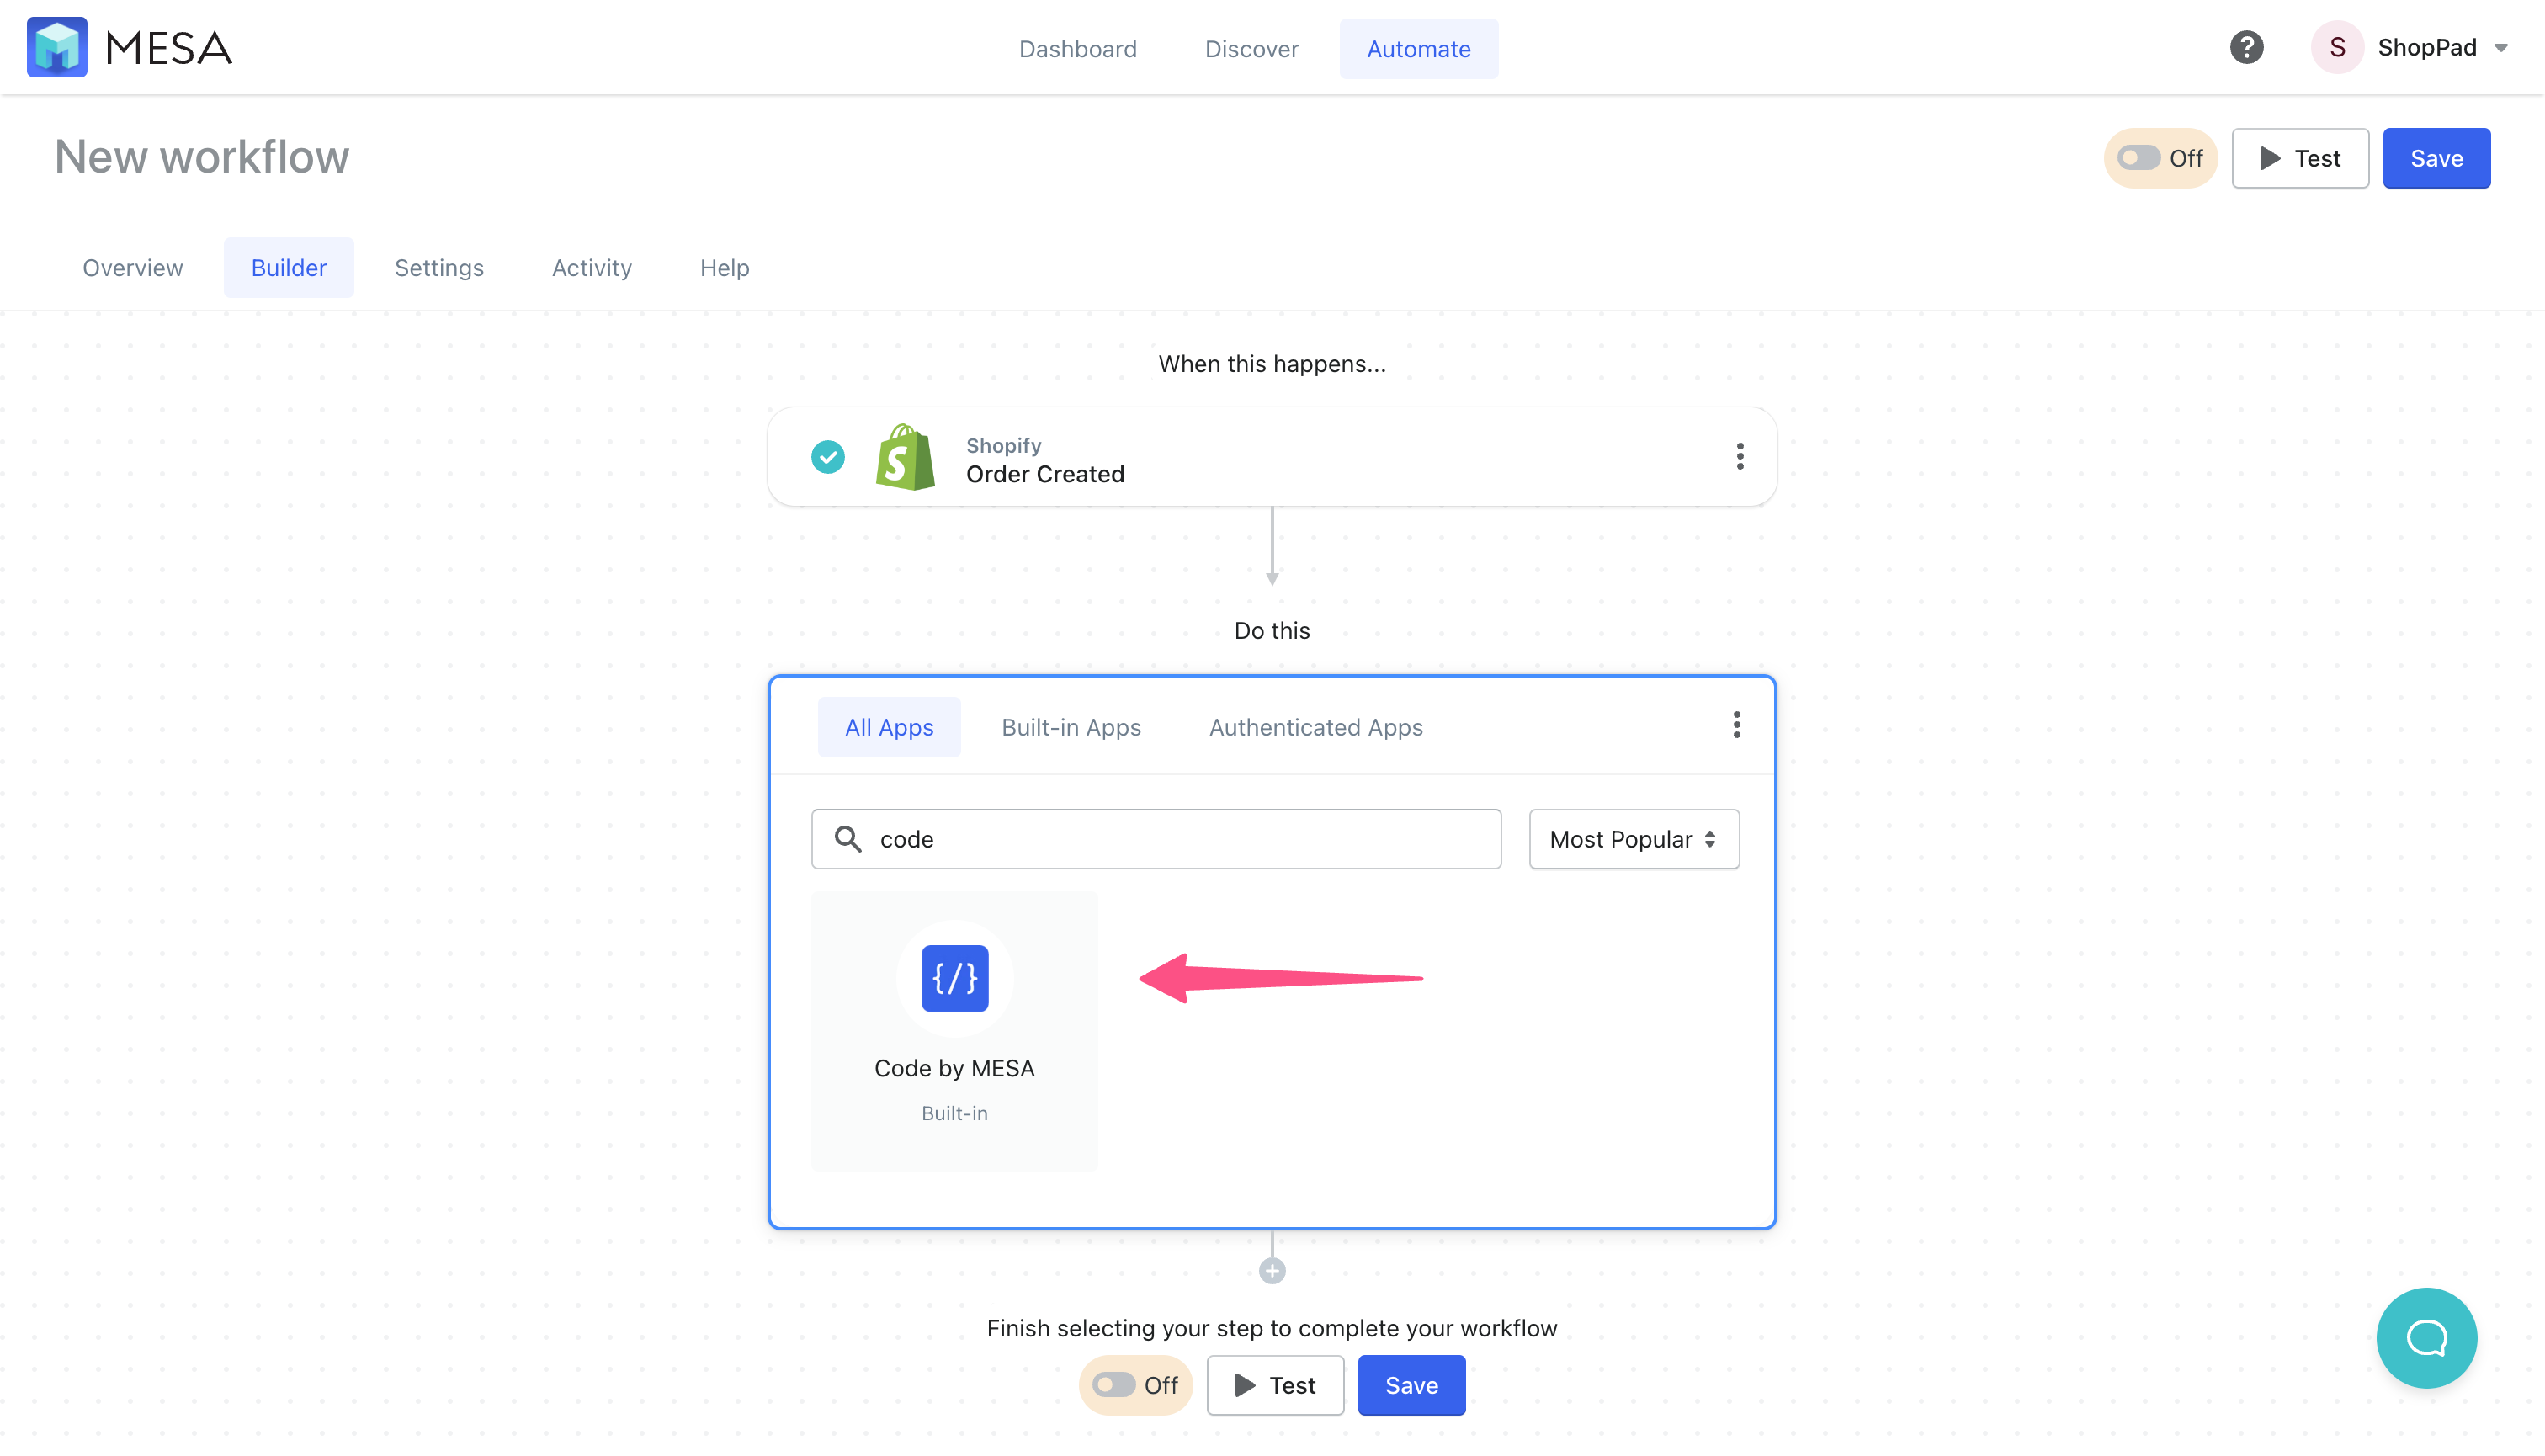
- Next, add the Code built-in tool
This is a built-in workflow tool unique to MESA. It supports custom code that can be executed within a workflow without having to host the code.
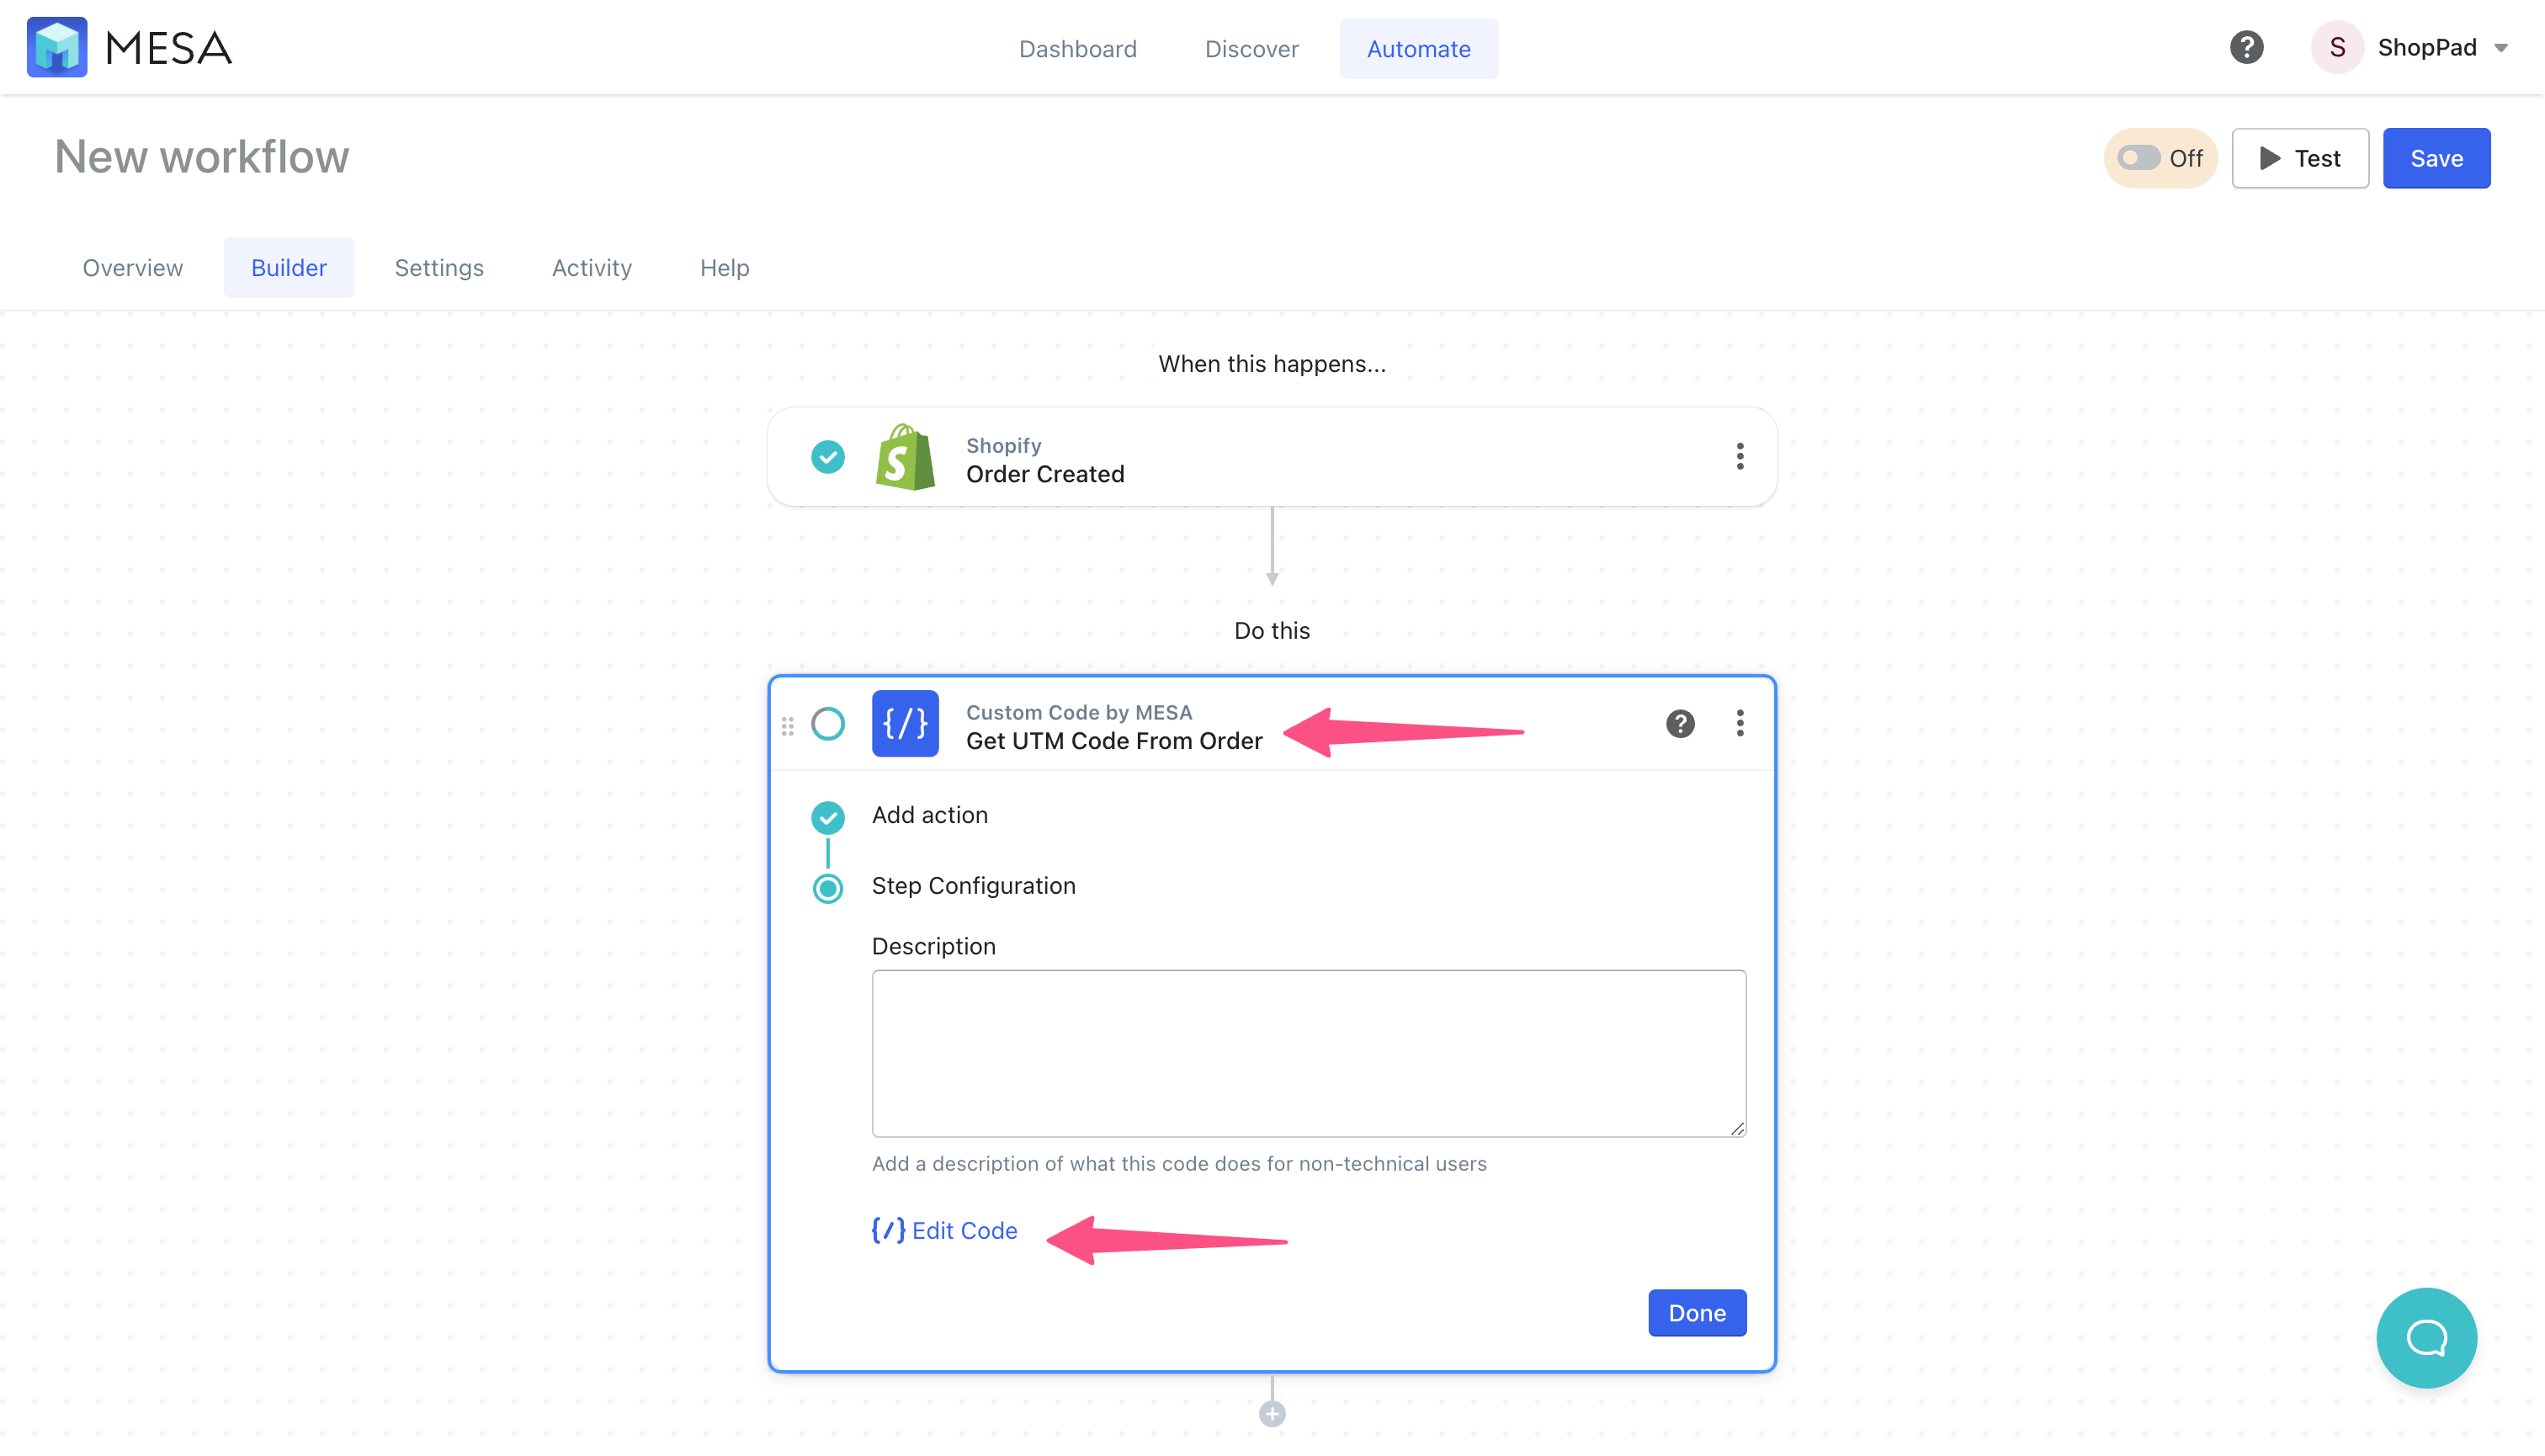
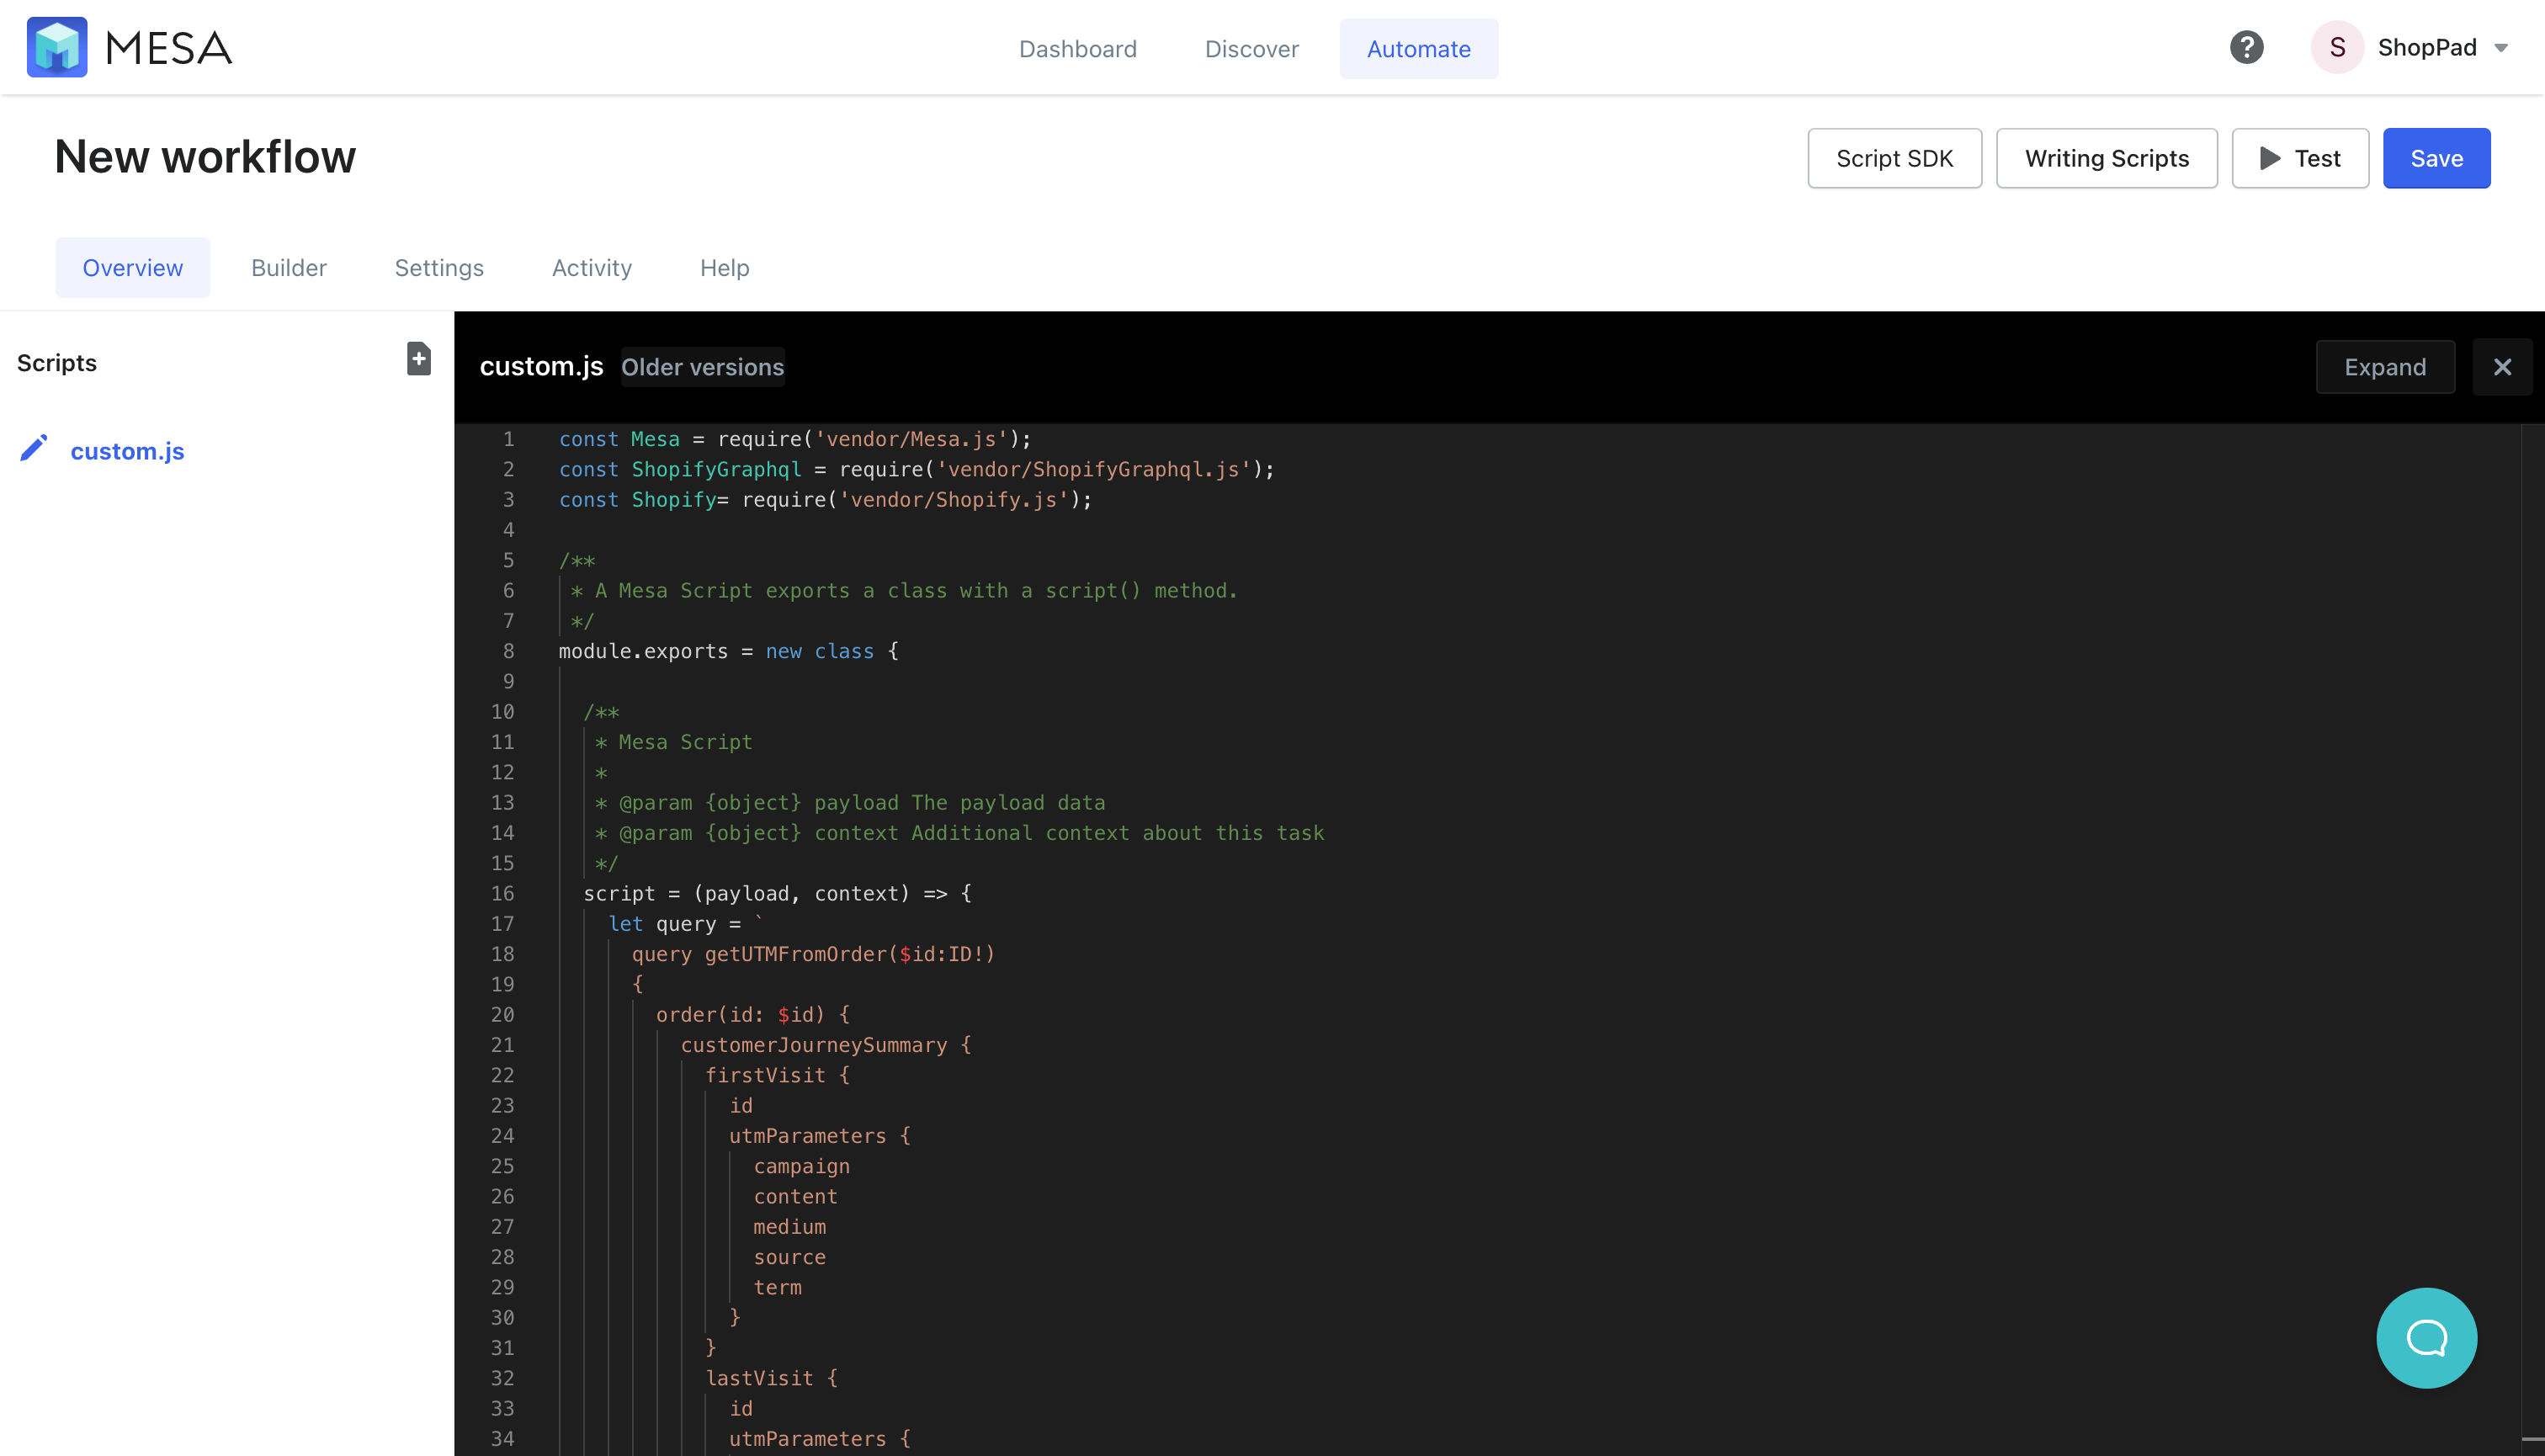
- Click “Edit Code” to add the snippet
We recommend renaming the step so you know what the code step does. Or add a description so it’s clear to you later that this step is about getting the UTM codes.
- Copy and paste this code snippet to replace existing file contents
The easiest method it to select the all the code then paste over it with the following snippet. Be sure to Save your changes. Then, close the file when you’re done.
const Mesa = require('vendor/Mesa.js');
const ShopifyGraphql = require('vendor/ShopifyGraphql.js');
const Shopify= require('vendor/Shopify.js');

module.exports = new class {

  script = (payload, context) => {
    let vars = context.steps;
    let query = `
      query orderCustomerJourney($id:ID!) {
        order(id: $id) {
          customerJourneySummary {
            moments(first: 10, reverse: true) {
              nodes {
                occurredAt
                ... on CustomerVisit {
                  landingPage
                  source
                  utmParameters {
                    campaign
                    medium
                    source
                  }
                 }
             }
          }
       }
     }
   }
  `;

  const r = ShopifyGraphql.send(query, {
    "id": "gid://shopify/Order/" + vars.shopify.id,
  });

  let moments = r.data.order.customerJourneySummary.moments.nodes;
  payload = {
    "first_visit": moments[moments.length - 1],
    "last_visit": moments[0],
  }

  Mesa.trigger.setTaskExternalData({
    "label": JSON.stringify(payload),
  })

    Mesa.output.next(payload);
  }
}
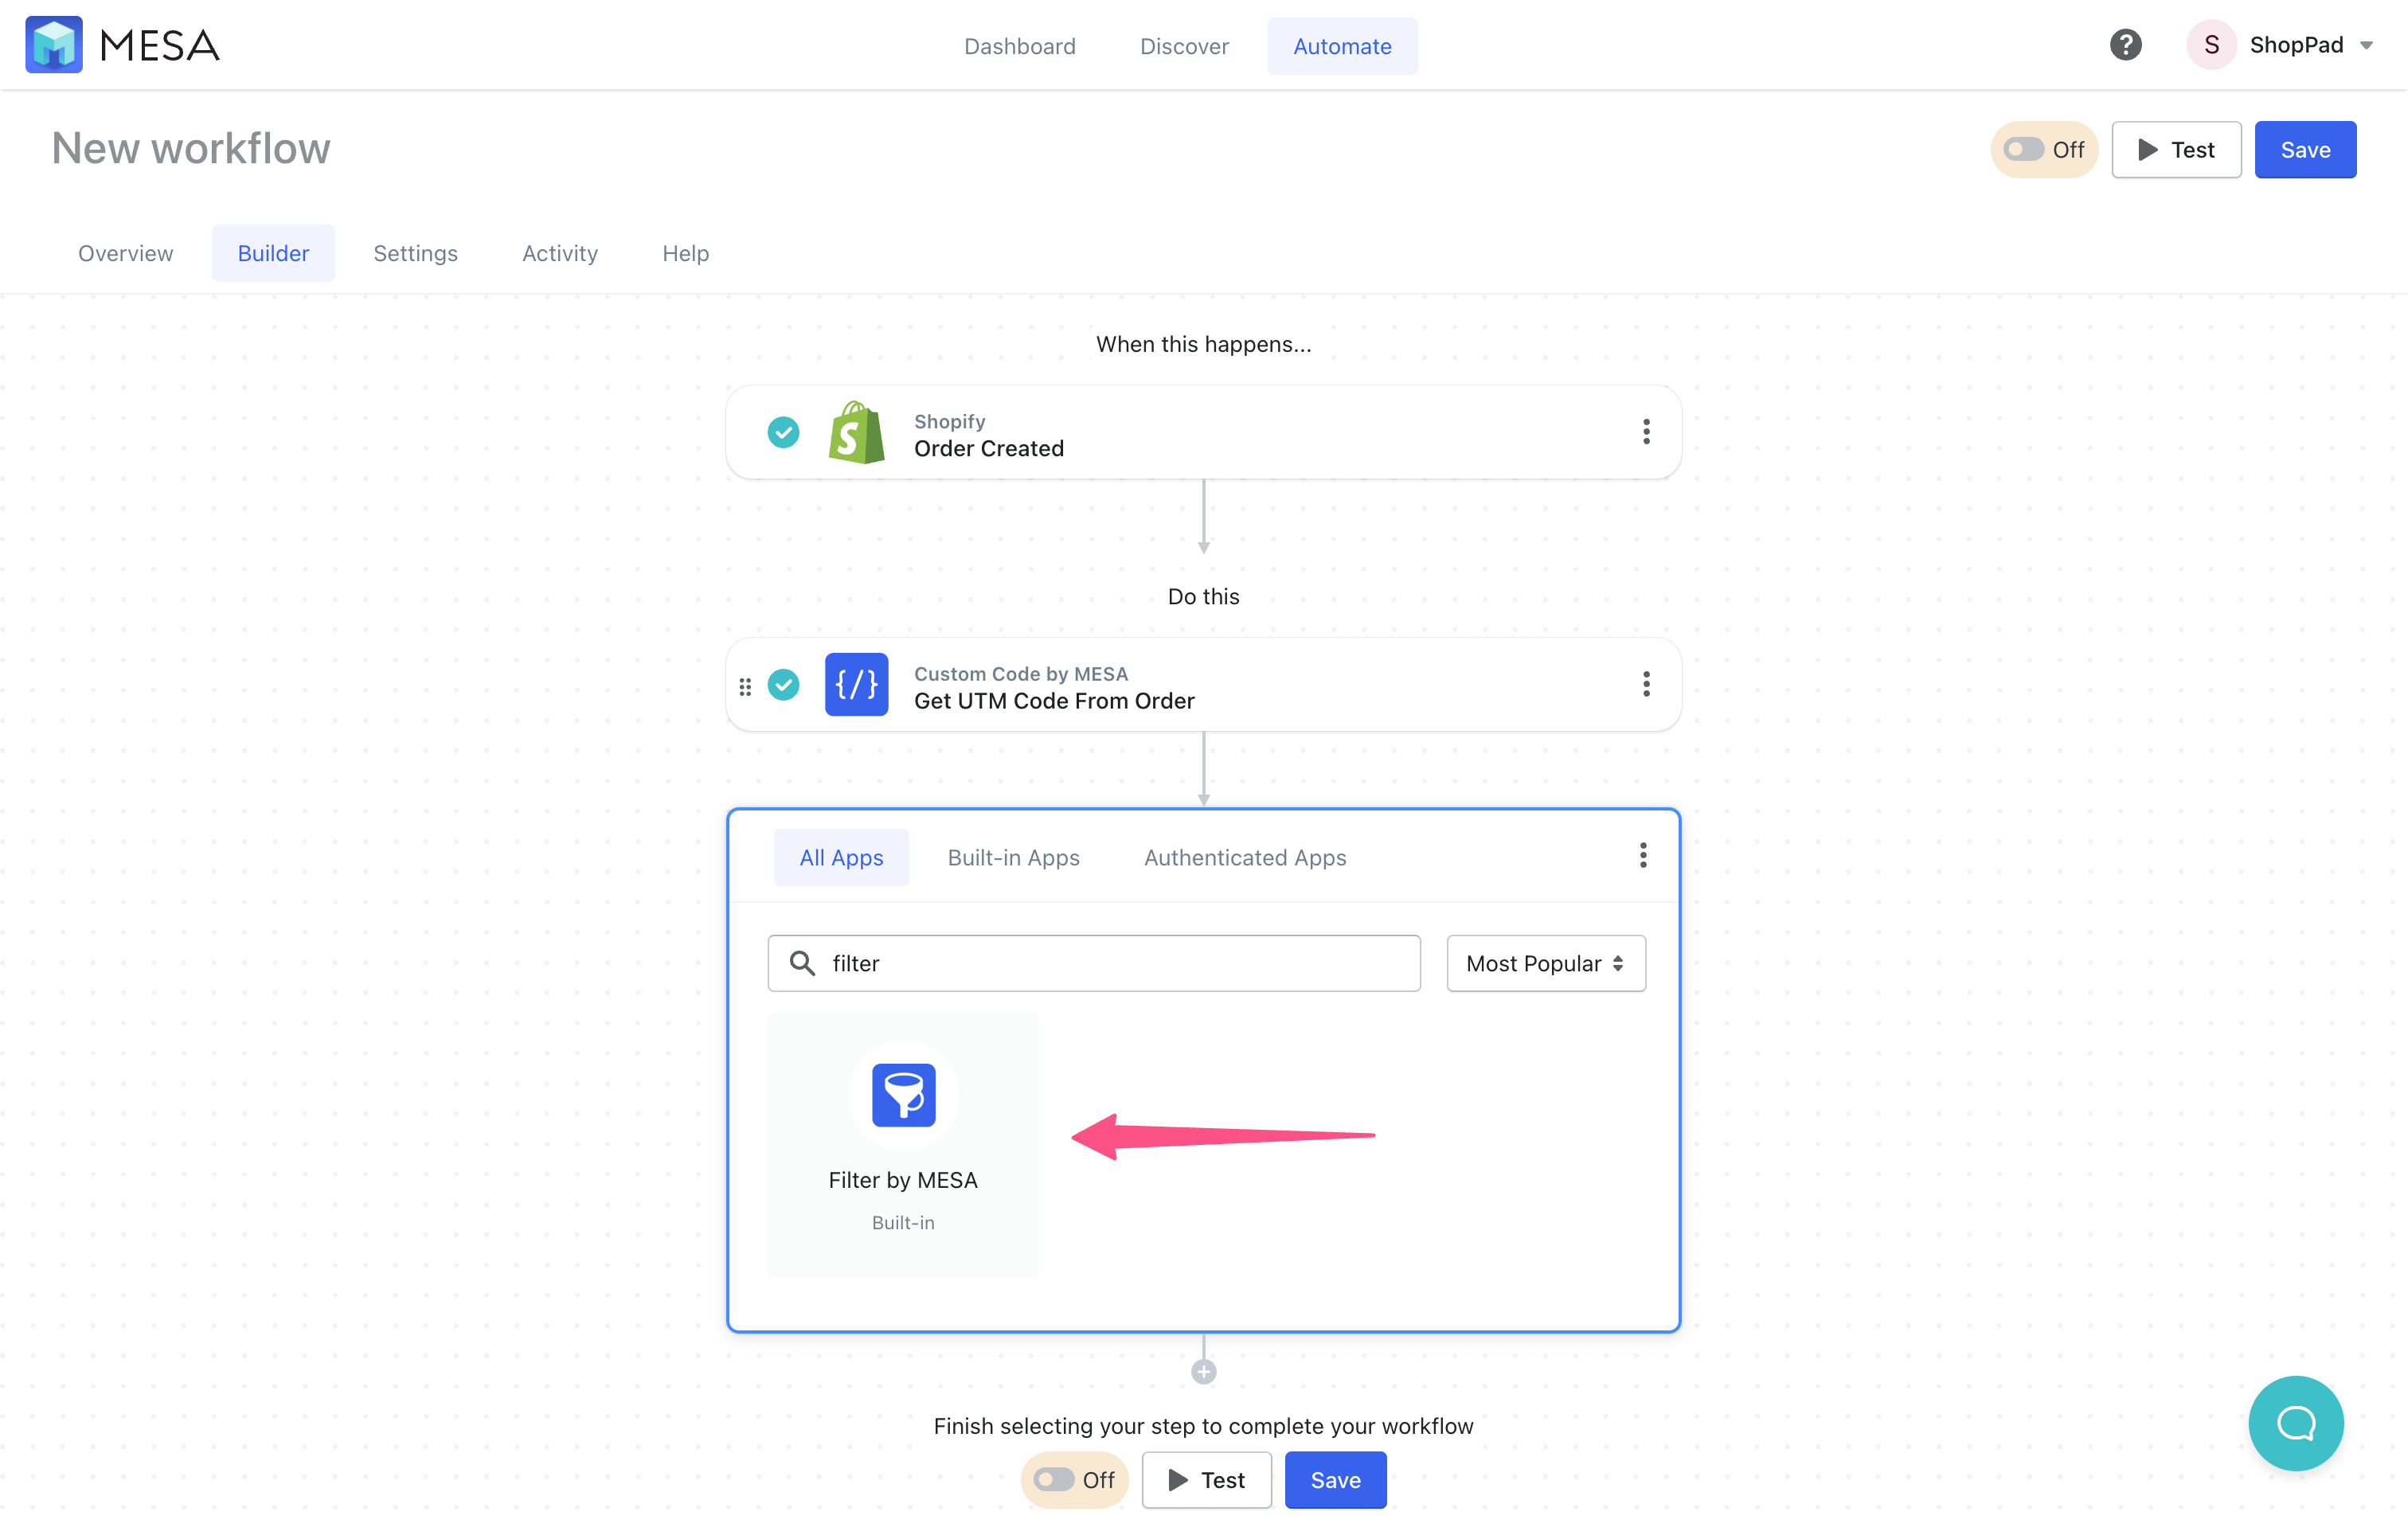
- Next add the step, Filter
Search then, select the filter tool to add it to your workflow.
- Look for the code variable that matches the UTM campaign
Enter the following code variable for the filtered value:
{{custom.conversion.order.customerJourneySummary.lastVisit.utmParameters.campaign}}
Then, using the filter conditional field, check if it is equal the UTM campaign name that you want tagged.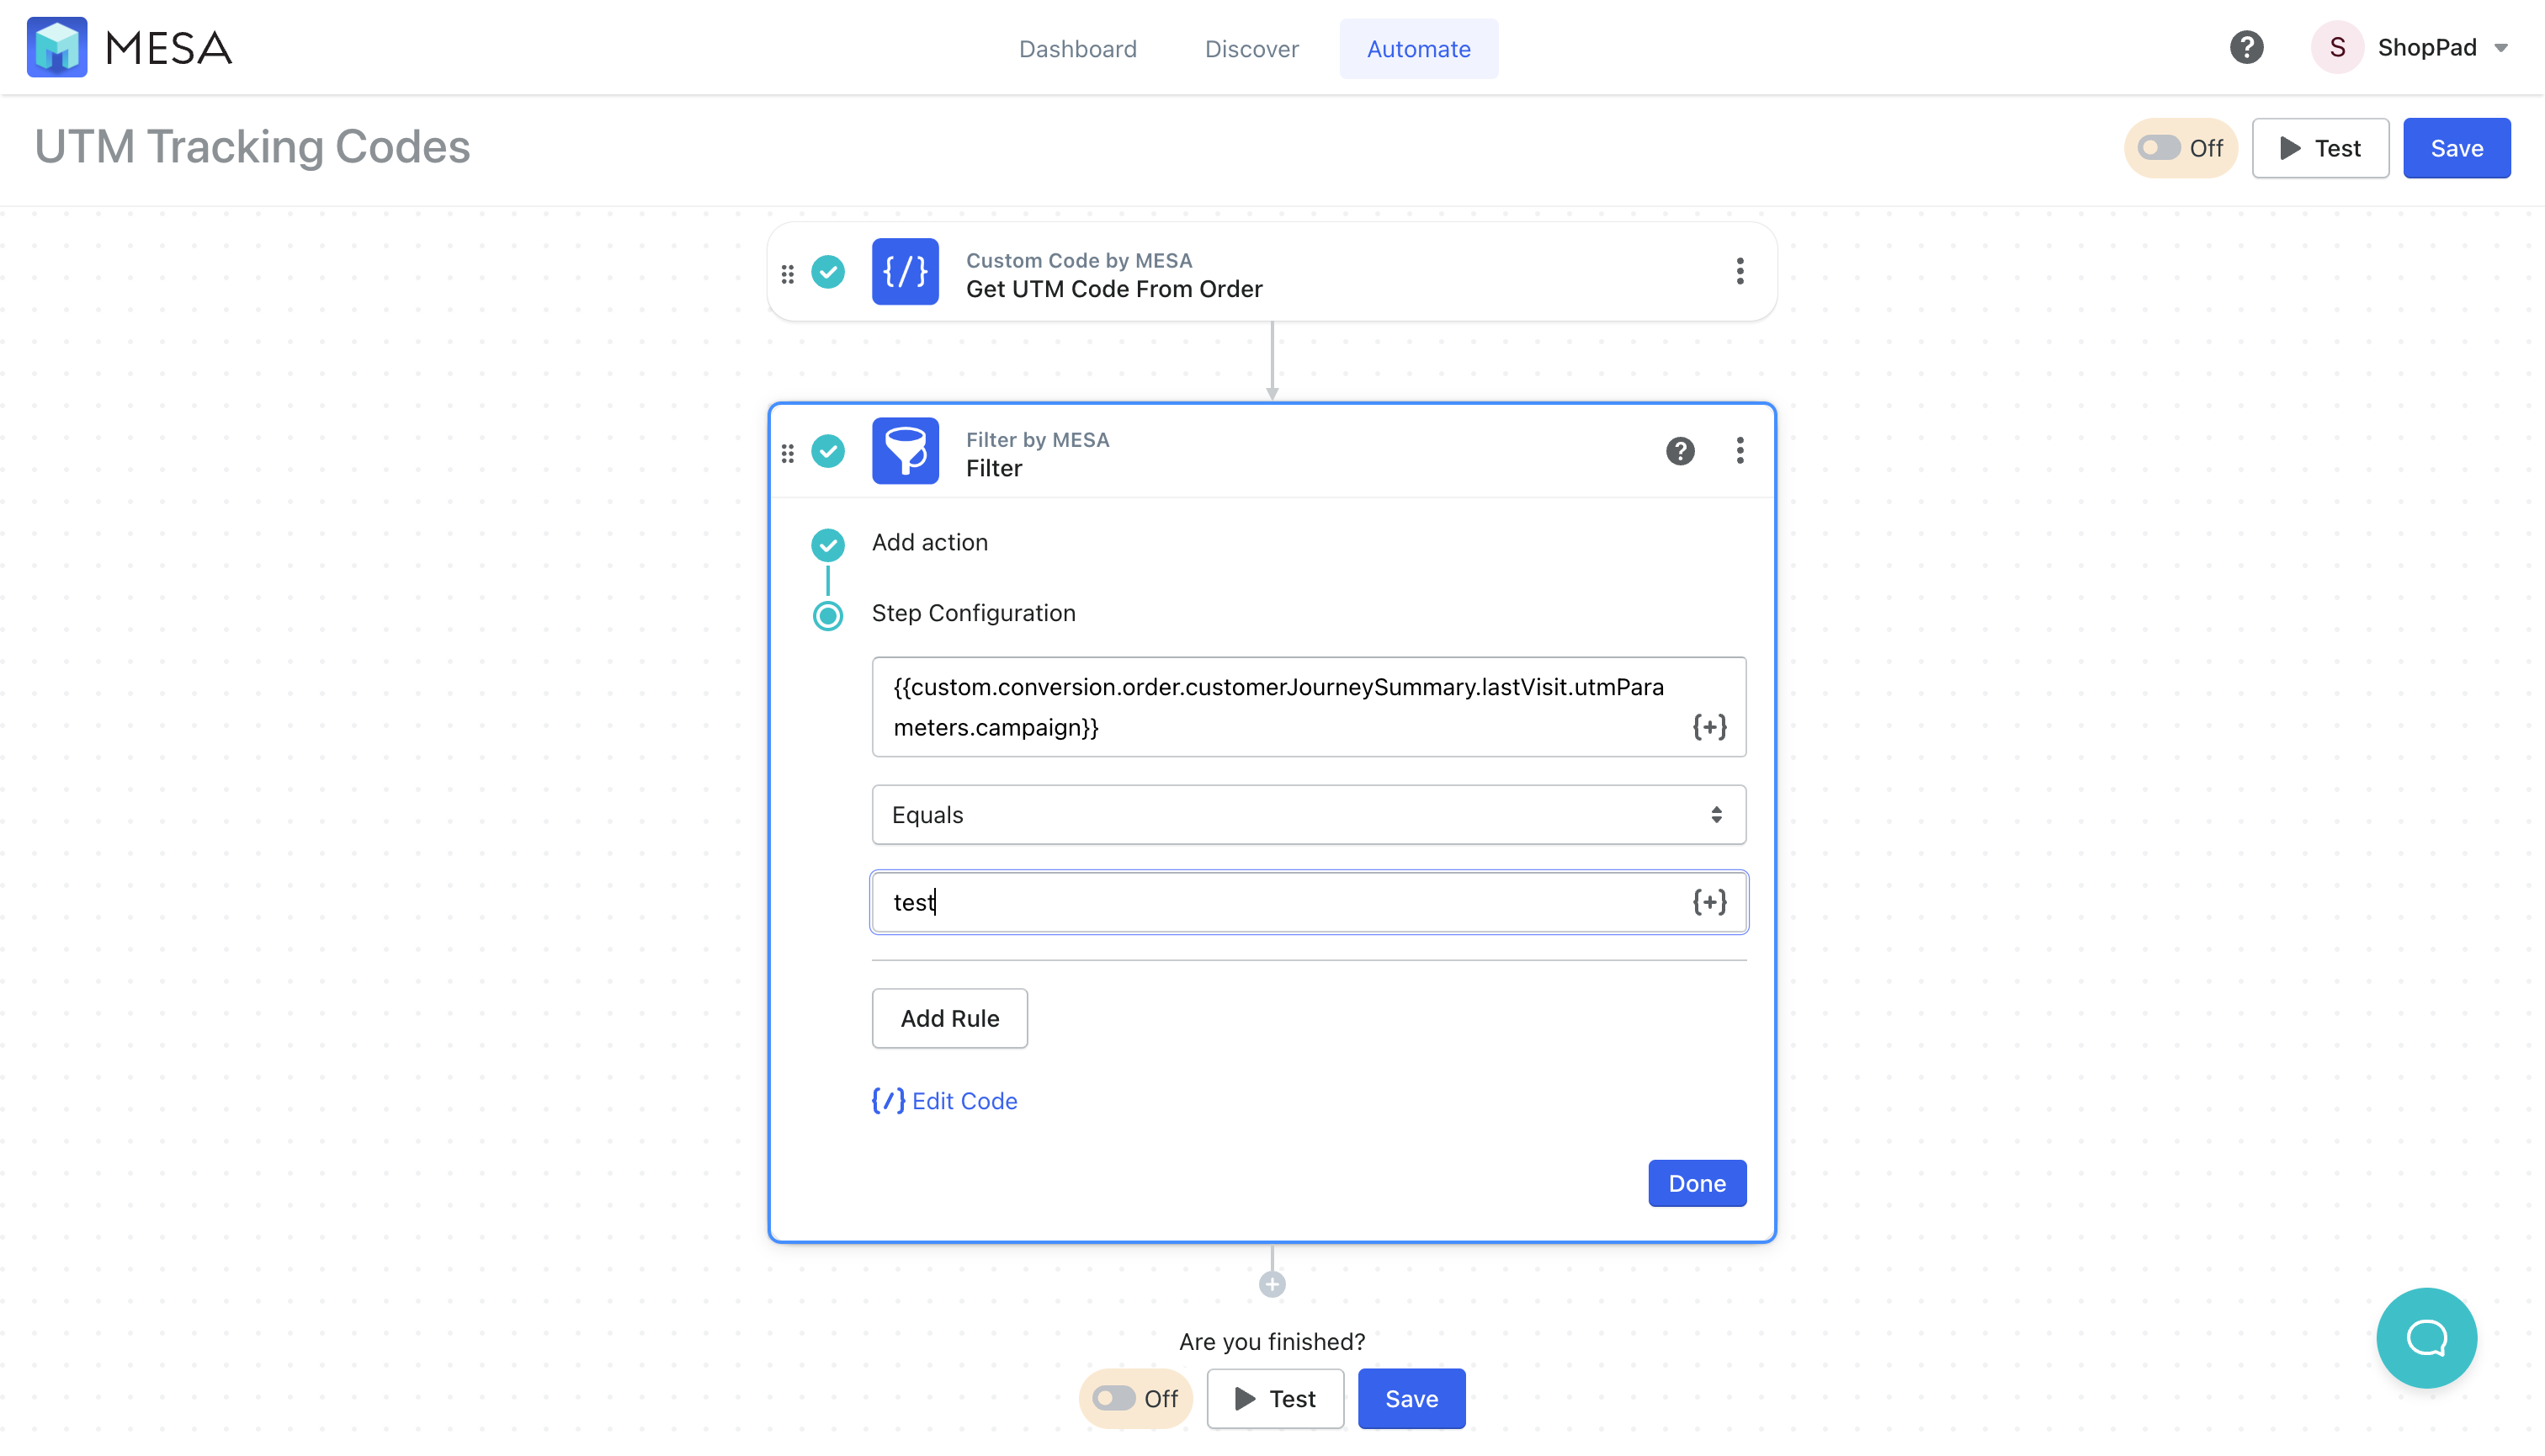
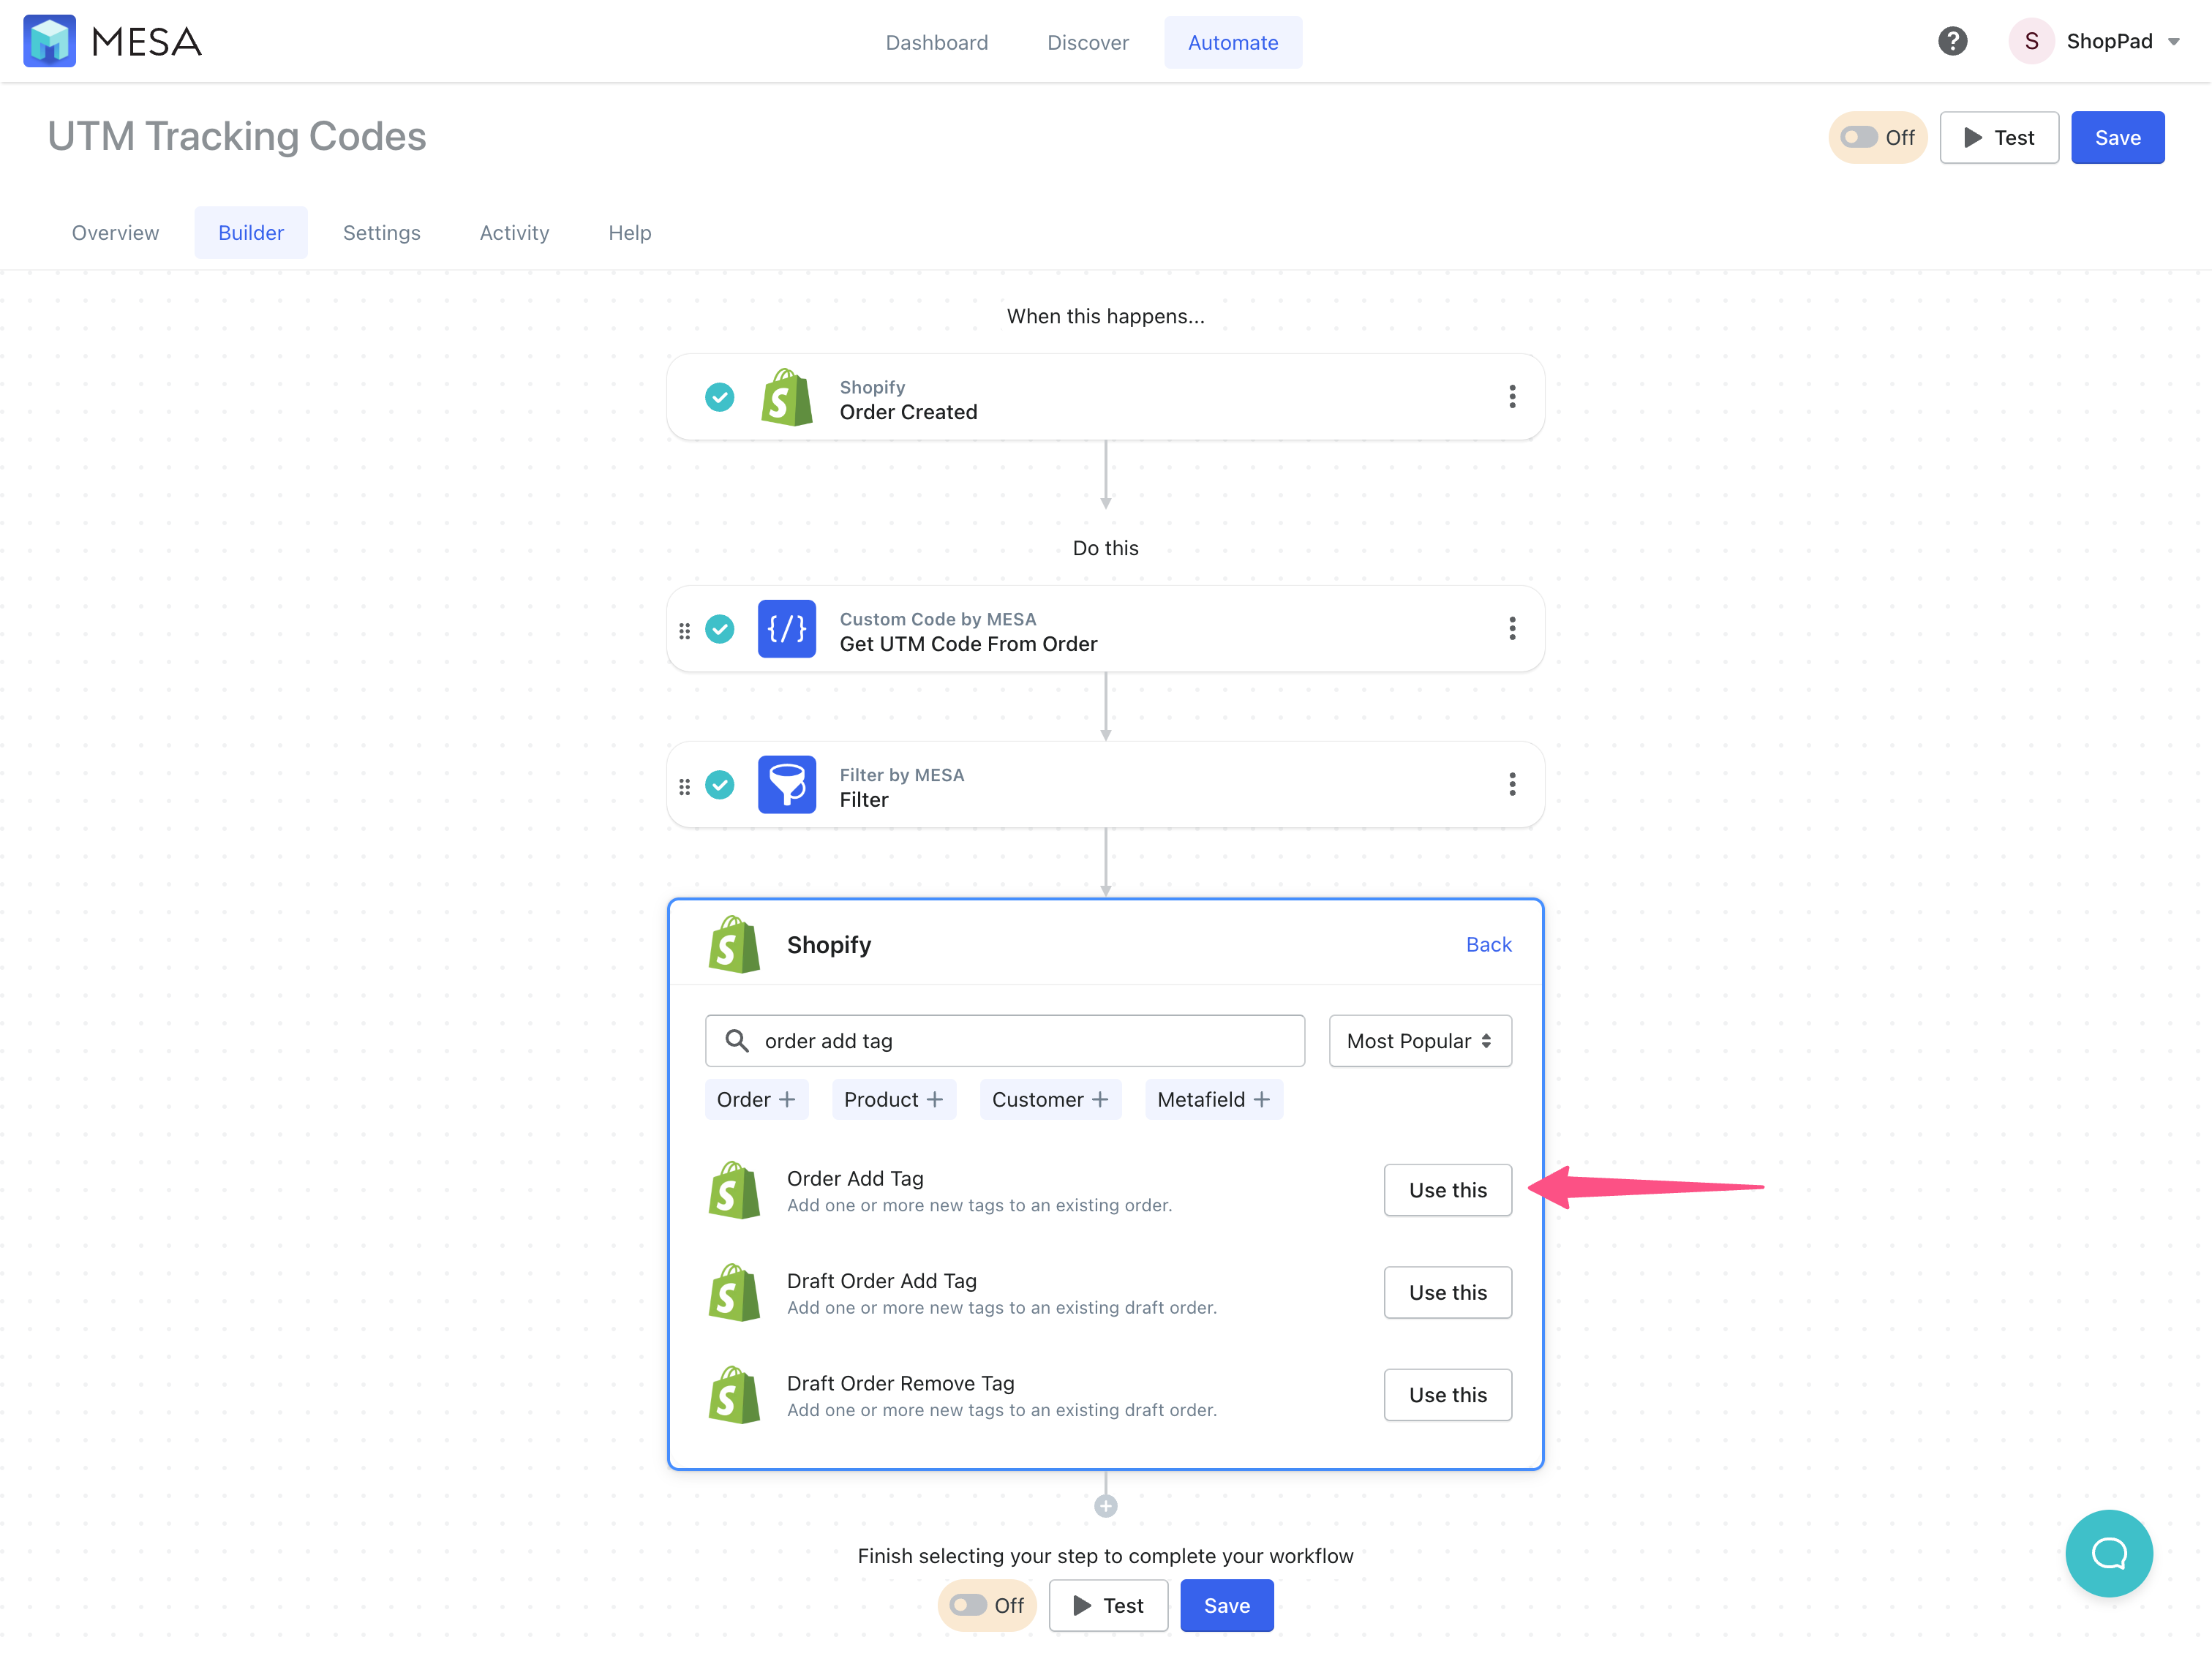
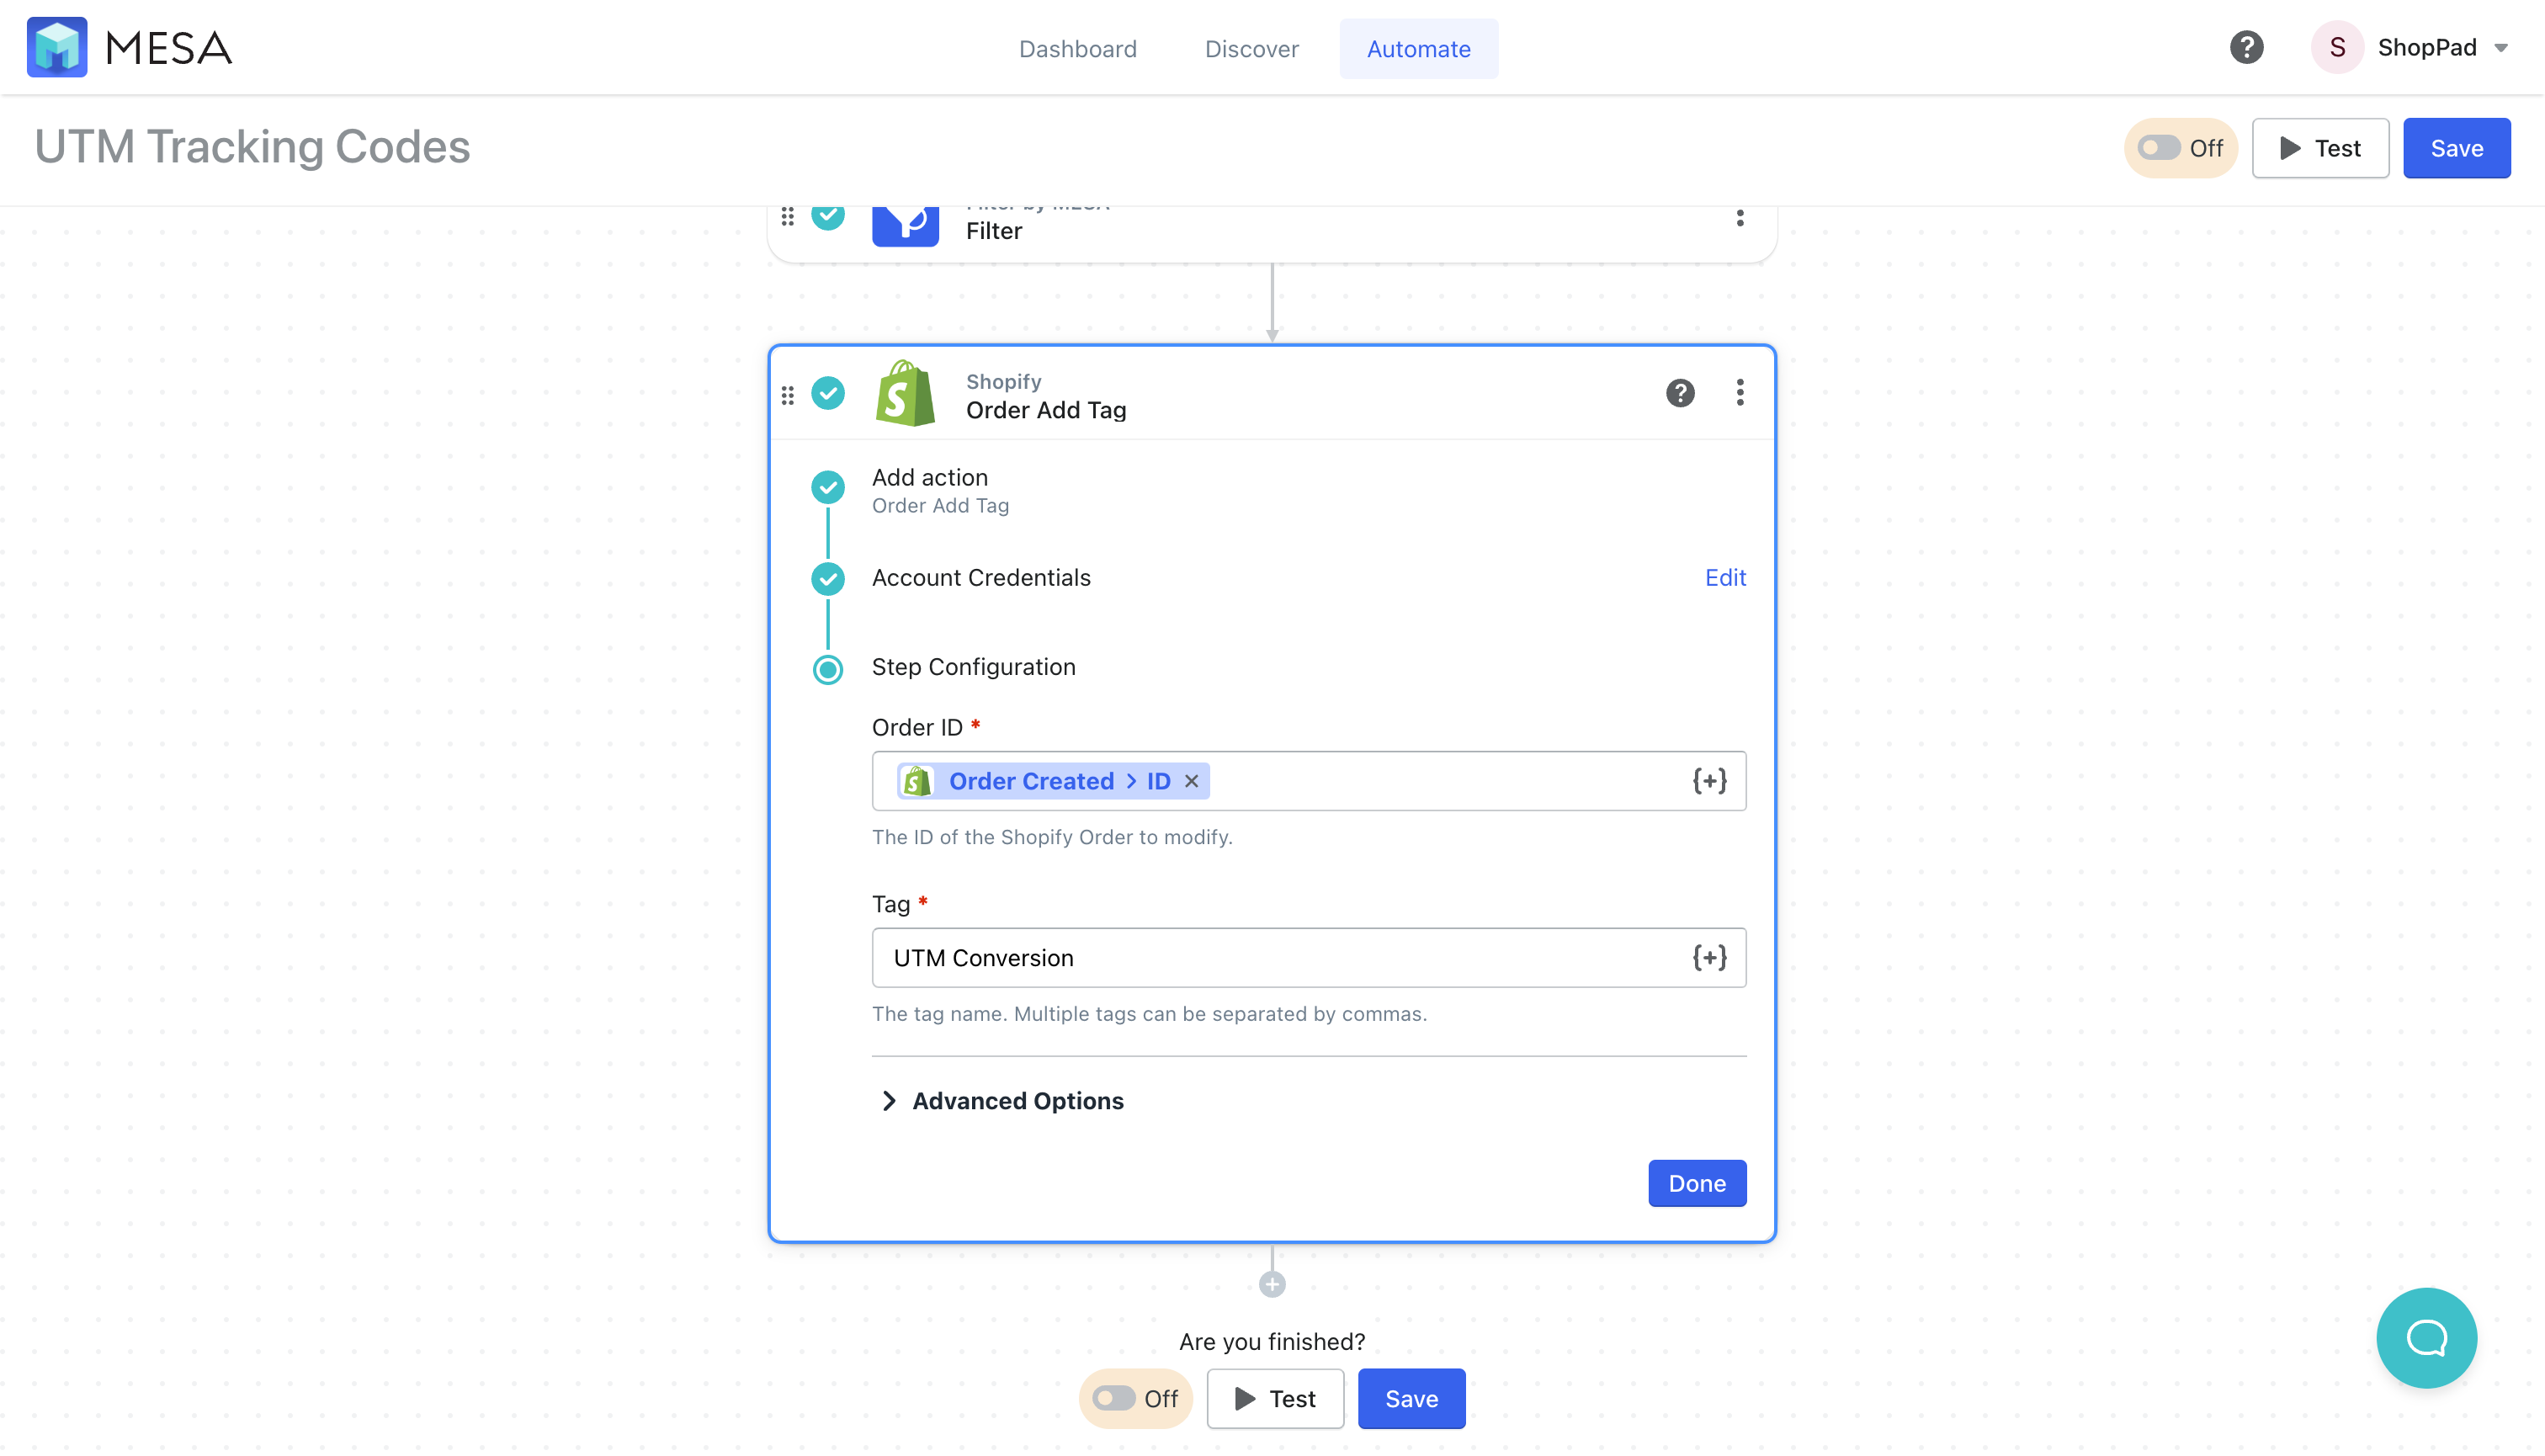
- Add the Shopify > Order Add Tag action
Add the Shopify app then, choose the Order Add Tag action by clicking the Use this button.
- Lastly, add the tag name to the value
This will add whatever tag you want to the Shopify order.
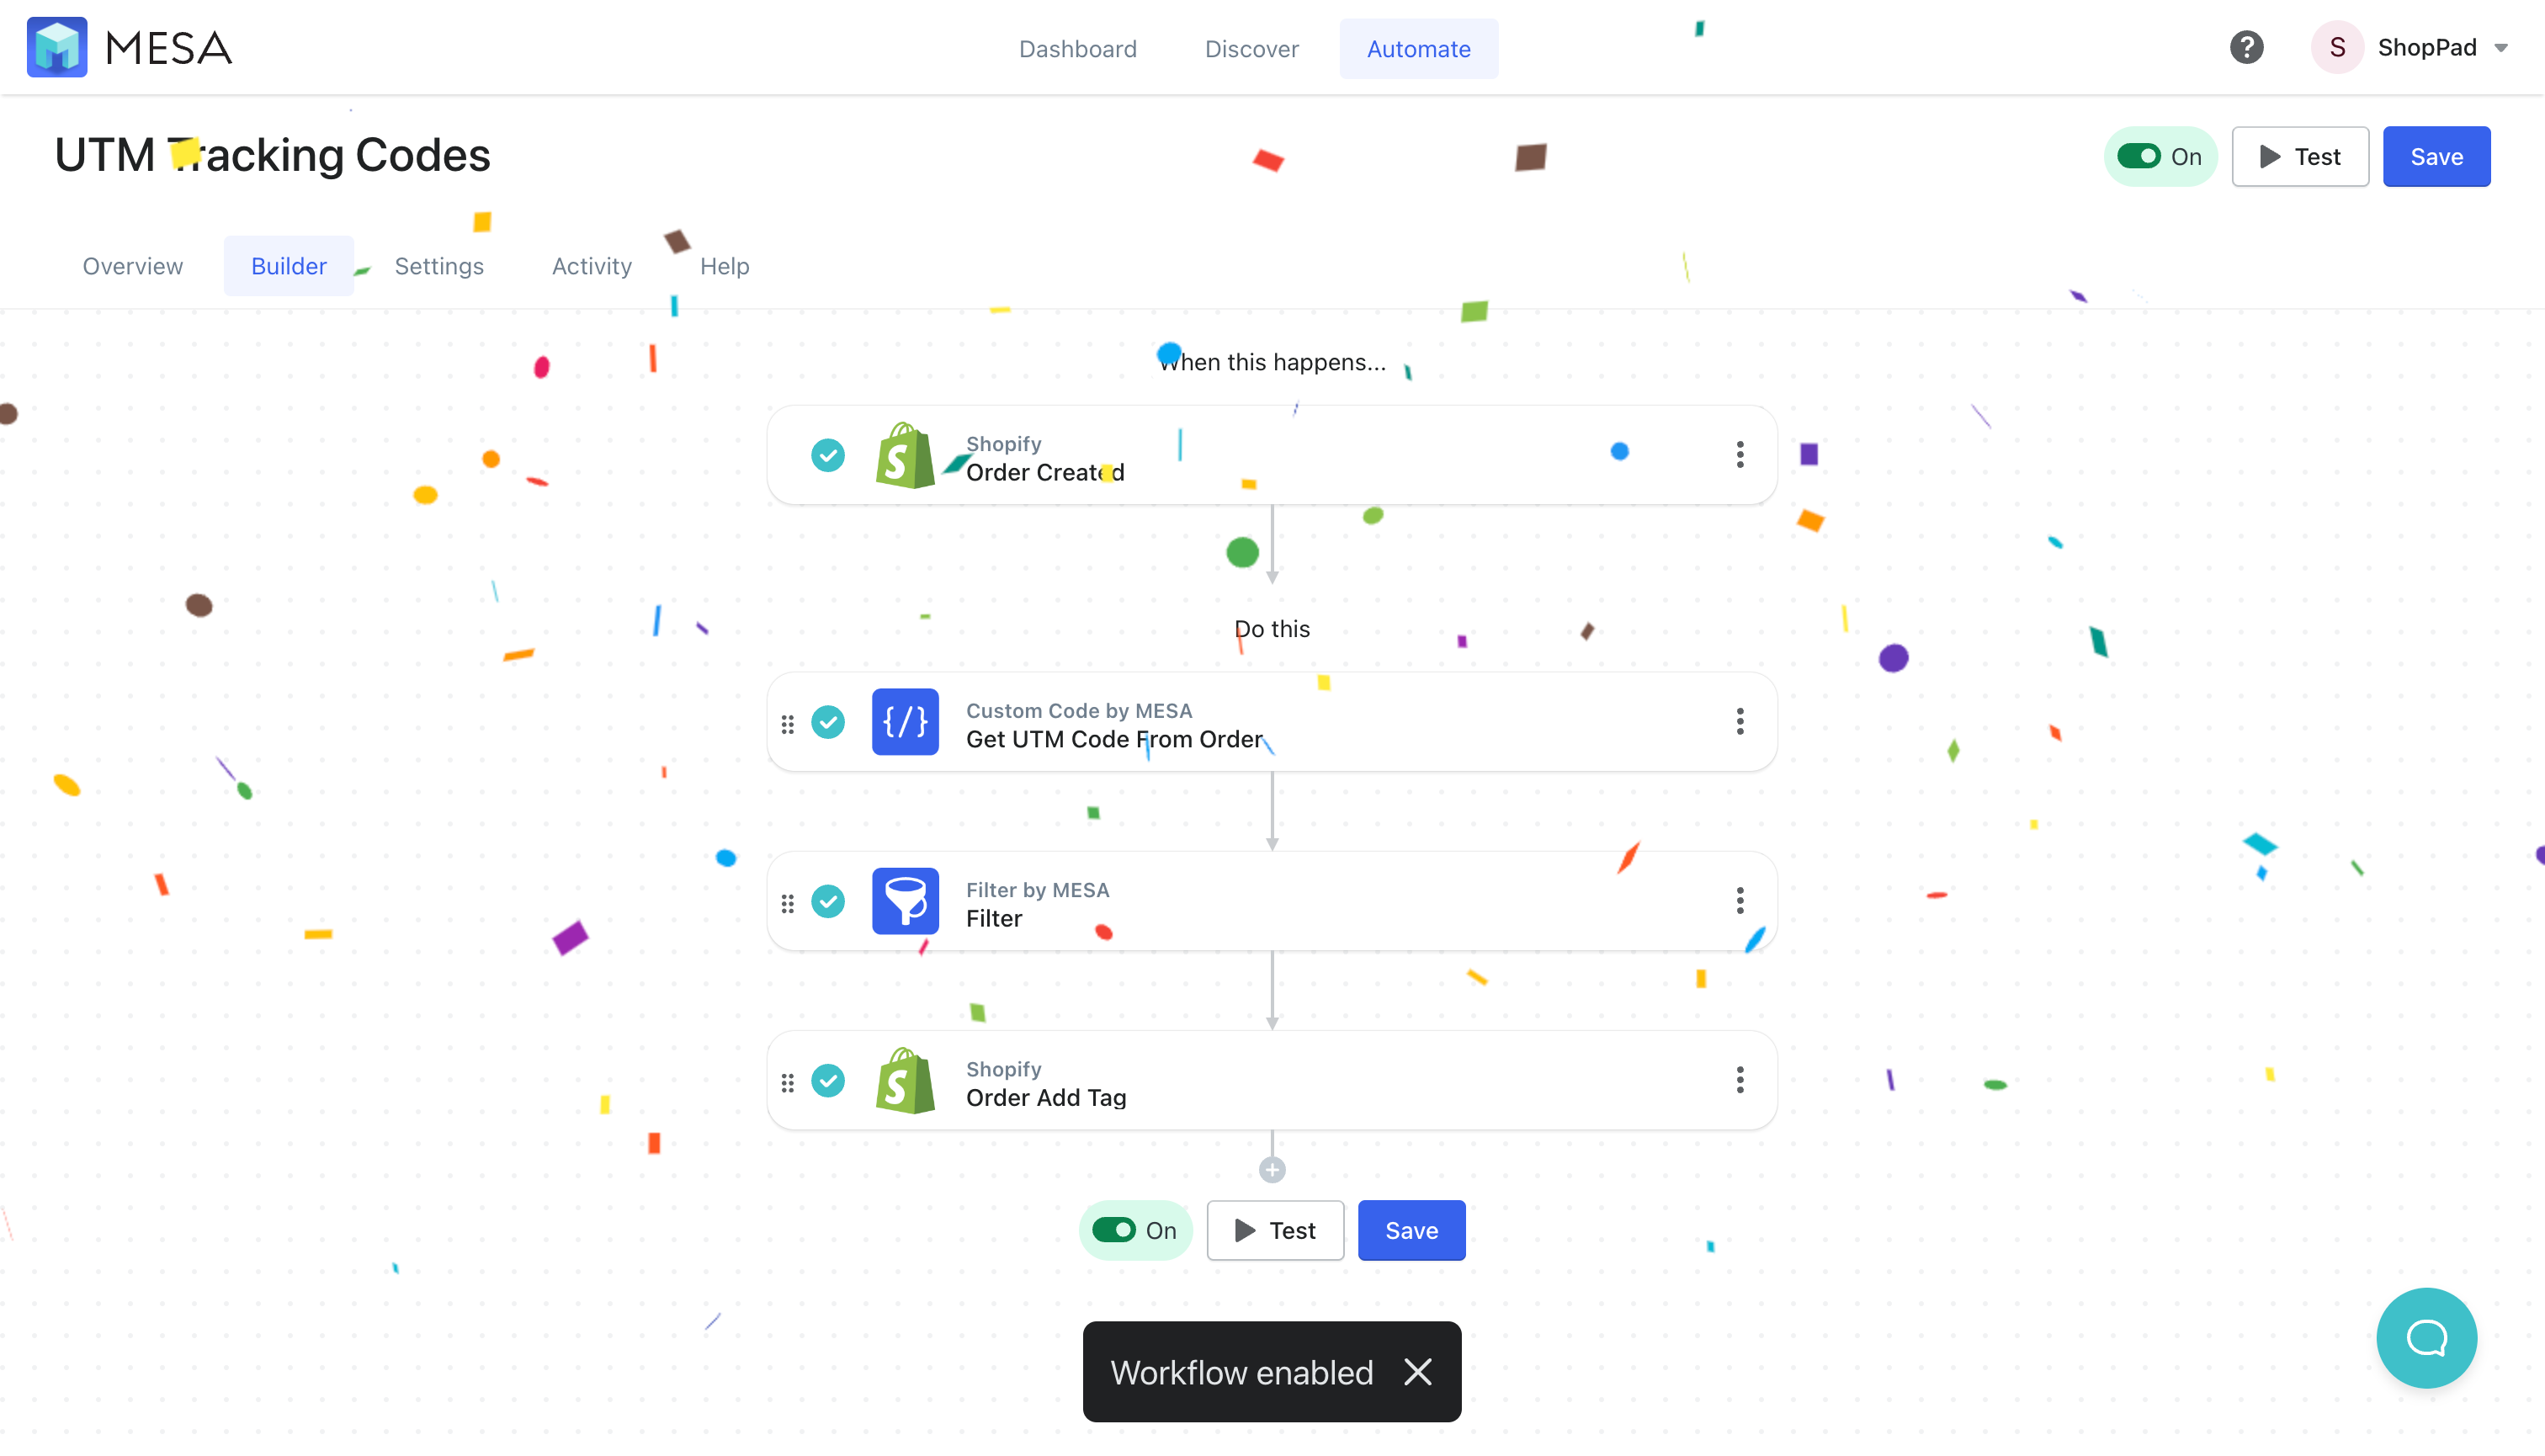
- Finally, save then name your workflow.
Be sure to turn your workflow to On. That’s it!
Basics of UTM parameters
Understanding the ins and outs of UTM parameters is the first step towards effectively utilizing them for auto-tagging your Shopify orders. UTM (Urchin Tracking Module) codes attach to URLs to track traffic source, medium, and campaign name. This enables Google Analytics to provide you with detailed insights about where your site’s traffic is coming from.
To put it simply, UTM parameters are the tags that you add to your URL.
When someone clicks on the URL, the tags are sent back to Google Analytics and tracked. UTM parameters typically look something like this: https://www.yourstore.com/?utm_source=newsletter&utm_medium=email&utm_campaign=spring_sale
In this example, the UTM parameters begin after the question mark (?) and provide the following details:
utm_source=newsletter: The traffic came from the newsletter.utm_medium=email: The medium used was email.utm_campaign=spring_sale: The campaign associated with the link is the spring sale.
UTM parameters are highly valuable in the realm of ecommerce and specifically within your Shopify store for a few reasons:
- Identify successful campaigns: UTM parameters help identify which marketing campaigns are driving the most traffic or sales to your Shopify store. This allows you to allocate resources and budget more effectively.
- Understand customer behavior: By tracking where your customers are coming from, you gain a deeper understanding of your customer behavior and preferences.
- Refine marketing strategy: The data collected via UTM parameters can help you optimize your marketing strategy. For example, if you find that one source is driving more traffic than others, you might decide to invest more in that source.
With a solid understanding of UTM parameters, you are one step closer to creating a seamless auto-tagging system for your Shopify orders.
Next, let’s delve into how Shopify manages tags and how it will play a crucial role in this process.
How Shopify manages tags
Shopify tags are a versatile, powerful tool to help categorize and manage various elements of your online store, including customers, orders, and products. Tags are keywords or phrases that you can add to each order to help identify them based on a variety of characteristics. This can include anything from the origin of the order (like a specific marketing campaign) to the customer’s preferences, delivery details, and much more.
These tags can be extremely beneficial for several reasons:
1. Improved Order Management: Tagging orders can help you quickly identify and group them based on specific characteristics, making the management process more efficient. For instance, if you have orders that require special attention, such as personalized products, they can be easily identified and managed accordingly.
2. Enhanced Reporting: Shopify can create reports based on these tags, allowing you to gain insights into specific subsets of your orders. This can help you identify trends, such as popular products or successful campaigns, and make data-driven decisions for your store.
3. Automated Workflows: Perhaps one of the most powerful uses of tags is their ability to trigger specific automated workflows. For example, you can set up automation that sends an email to your customer service team whenever an order is tagged with “Customer Support Needed”, or one that alerts your supplier when an order is tagged with “dropship”.
Additional tips to make the most of UTM parameters
While the automation of tagging Shopify orders with UTM parameters through MESA presents an effective way to streamline order management, there are additional tips to get the most out of this process:
1. Consistent Naming Convention: To avoid confusion and ensure smooth tracking, maintain a consistent naming convention for your UTM parameters. For instance, decide if you are going to use dashes, underscores, or camel case, and stick to it.
2. Use UTM Parameters for All Marketing Campaigns: To have a comprehensive understanding of your marketing efforts, make sure to use UTM parameters for all campaigns across various channels, including email, social media, paid advertising, etc.
3. Leverage the UTM ‘Content’ and ‘Term’ Parameters: While not discussed in depth earlier, ‘Content’ and ‘Term’ parameters can provide further insights. For instance, the ‘Content’ parameter can help differentiate ads or links that point to the same URL, and the ‘Term’ parameter could be used for tracking keywords during a paid AdWords campaign.
4. Use UTM Parameters with Influencer Marketing: If you’re working with influencers, provide them with a specific UTM-coded URL. This can help track the traffic and conversions that each influencer is driving.
5. Make use of MESA’s other automation features: While this article focuses on auto-tagging based on UTM parameters, MESA has many other automation capabilities. Look into automating other processes like inventory updates, customer communication, and more.
6. Analyze and Act on UTM Data: Regularly check your Google Analytics data to identify trends and make data-driven decisions. For example, if you notice a specific source is driving a lot of high-value orders, you may decide to increase your efforts on that platform.
7. Test, Tweak, Repeat: Continuously test the effectiveness of your UTM parameters and adjust as necessary. Over time, you’ll get a feel for what works best for your store and can make adjustments to optimize results.
Remember, the true power of UTM parameters and MESA’s automation capabilities lies in their ability to provide you with actionable data. Use this data to understand customer behavior, track marketing performance, and ultimately, make more informed decisions that boost your store’s performance.
Conclusion
The world of ecommerce can be complex and challenging, but with tools like UTM parameters and MESA, you can unlock new efficiencies and insights in your operations. Auto-tagging your Shopify orders based on UTM parameters empowers you with a powerful method to track your marketing efforts, understand customer behaviors, and streamline order management.
We’ve explored how UTM parameters work, how Shopify uses tags, and how MESA can automate the tagging process. By leveraging these tools and techniques, you can take a significant step towards a more productive and data-driven ecommerce operation.
Remember, the key to success is understanding your customers and continually optimizing your strategies. With UTM parameters, MESA, and the tips shared in this post, you’ll be well-equipped to do just that.
So, it’s time to take action. Dive into the world of UTM parameters, implement auto-tagging in your Shopify store with MESA, and let the power of smart data transform your business!


