The Complete Shopify Flow Guide: Automate Your Shopify Store in 2026
-
- •
- Last updated: Jan. 27, 2026
- •
- 39 min read

Running a successful Shopify store means managing hundreds of repetitive tasks every day—tagging customers, updating inventory, sending notifications, processing orders. These tasks are essential, but they eat up valuable time you could spend growing your business.
That’s where Shopify Flow comes in.
This comprehensive guide walks you through everything you need to know about Shopify Flow: what it is, how to use it, when it’s the right solution, and when you might need something more powerful. Whether you’re just getting started with automation or looking to optimize your existing workflows, you’ll find practical, actionable guidance here.
In this guide, you’ll learn:
- What Shopify Flow is and which plans include it (spoiler: it’s free)
- NEW: How to use Sidekick AI to create workflows with natural language
- How to build your first workflow step-by-step
- 10 common use cases with real examples
- Advanced techniques and best practices
- Flow’s limitations and when to consider alternatives
- How to troubleshoot and optimize your workflows
What’s new in Winter 2026: Shopify just released major Flow updates including AI-powered workflow creation with Sidekick, workflow preview/testing capabilities, and a redesigned editor. We’ve updated this guide to reflect these improvements.
Let’s automate your Shopify store.
📘 Part of the Shopify Flow series
This guide is part of our comprehensive Shopify Flow series for merchants:
- The Complete Shopify Flow Guide: Automate Your Shopify Store (currently reading)
- Shopify Flow Examples: 15 Workflows to Automate Your Store
- 50+ Best Shopify Flow Templates to Install Right Now
- Shopify Flow Triggers: Complete Guide to Every Available Trigger
- Using Liquid in Shopify Flow: Complete Guide
- How to Extend Shopify Flow: Connect Any App in Both Directions
- Shopify Flow Alternatives: Best Automation Apps for Shopify
Table of Contents:
What is Shopify Flow?

Shopify Flow is a native automation app that helps store owners eliminate repetitive manual tasks by creating custom workflows. Think of it as a set of rules that automatically handle routine processes in your store—without requiring you to be there clicking buttons.
Previously exclusive to Shopify Plus subscribers, Flow became available to all Shopify merchants in 2023. It’s now one of the most widely used automation tools in the Shopify ecosystem, with thousands of stores running workflows for everything from order management to customer service.
At its core, Flow works with a simple trigger-based system:
- Something happens (a trigger) – like a new order or inventory change
- You check conditions (optional) – like “is the order over $100?”
- Flow takes action – like tagging the customer or sending a notification
This trigger → condition → action structure powers everything from simple notifications to complex multi-step workflows.
Key capabilities at a glance
Workflow creation
Build custom automation with a drag-and-drop visual interface. No coding required, though you can add custom JavaScript if needed.
Trigger-based automation
Choose from dozens of triggers based on Shopify events—orders, products, customers, inventory, and more—plus triggers from installed apps.
Conditional logic
Add if/then conditions to create smart workflows that respond differently based on your specific criteria.
Action library
Execute hundreds of different actions, from tagging orders to sending Slack notifications to updating Google Sheets.
Template library
Start with pre-built workflows for common use cases, then customize them to match your needs.
App integration
Connect with Shopify apps that support Flow connectors, extending automation beyond your store’s core functionality.
Who should use Shopify Flow?
Small stores (just starting out)
Flow is perfect for basic automation needs like order tagging, low-inventory alerts, and customer notifications. The free tier and simple interface make it accessible even if you’ve never automated anything before.
Growing stores (scaling up)
As order volume increases, Flow helps you maintain efficiency without hiring more staff. Automate customer segmentation, fraud prevention, and fulfillment routing to handle growth smoothly.
Established stores (running at scale)
Flow handles high-volume operations with workflows for VIP customer management, advanced inventory control, and integration with your tech stack. Though note: at a certain point, you might outgrow Flow’s capabilities (more on that later).
Specific roles:
- Store managers: Automate daily operational tasks
- Operations teams: Streamline order processing and fulfillment
- Customer service: Automatic ticket routing and response
- Marketing: Customer segmentation and campaign triggers
While Flow is powerful, it’s not the only option. If you’re curious about alternatives, see our detailed comparison of the best Shopify Flow alternatives, or jump ahead to our alternatives section later in this guide.
Is Shopify Flow free? Pricing & Plan availability
Yes, Shopify Flow is completely free and available on all Shopify plans (Basic and above). There’s no additional cost, no usage limits, and no premium tiers.
Previously, Flow was exclusive to Shopify Plus subscribers, creating a significant gap between what Plus merchants and everyone else could automate. In 2023, Shopify democratized access by making Flow available to all merchants, regardless of plan.
This was a game-changer for small and medium-sized stores that previously needed to pay for third-party automation apps to achieve similar functionality.
Which Shopify plans include Flow?
| Plan | Flow available | Monthly cost | Notes |
|---|---|---|---|
| Shopify Starter | ❌ No | $5/mo | Limited to social/marketplace sales |
| Shopify Basic | ✅ Yes | $39/mo | Full Flow access |
| Shopify | ✅ Yes | $105/mo | Full Flow access |
| Advanced Shopify | ✅ Yes | $399/mo | Full Flow access |
| Shopify Plus | ✅ Yes | $2,300+/mo | Full Flow access (historically had it first) |
The bottom line: If you’re on any standard Shopify plan (Basic or higher), you have full access to Flow at no extra charge.
What’s included in the free version?
Since Flow is completely free, there’s no “free vs. paid” feature comparison. You get everything:
- ✅ Unlimited workflows (create as many as you need)
- ✅ All Shopify triggers and actions
- ✅ Access to Flow connectors (for apps that support them)
- ✅ Custom code actions (run JavaScript in your workflows)
- ✅ Complete template library
- ✅ Visual workflow builder
- ✅ Workflow logs and history
Hidden costs to consider
While Flow itself is free, there are some indirect costs to be aware of:
Third-party app costs
Many powerful workflows require connecting with other apps (like Klaviyo, Google Sheets, or Slack). If those apps charge subscription fees, you’ll need to factor those in. Flow’s free, but your app ecosystem might not be.
Time investment
Building and maintaining workflows takes time—especially complex ones. The initial setup, testing, and ongoing optimization require human hours. For simple workflows, this is minimal. For advanced automation, it can be significant.
Learning curve
If you’re new to automation, expect to spend time learning Flow’s interface and logic. The drag-and-drop builder is intuitive, but understanding triggers, conditions, and actions takes practice.
Potential limitations
While Flow is free, some advanced automation needs may require more robust platforms like MESA. If you hit Flow’s technical limitations (which we’ll cover later), you might need to invest in an alternative tool.
Frequently asked questions
Yes, completely free on all Shopify plans (Basic, Shopify, Advanced, and Plus).
No. Flow was previously Plus-exclusive but became available to all merchants in 2023.
Flow is fully featured when free. However, it does have technical limitations—like which API endpoints are available and how many items you can process in loops. These aren’t “free vs. paid” limits; they’re platform constraints that apply to everyone.
No, Flow is not available on the Starter plan, which is designed for selling through social media and marketplaces rather than operating a full online store.
Now that you know Flow is free and available on your plan, let’s build your first workflow.
NEW: Create workflows with AI (Sidekick integration)
Winter 2026 update: Shopify just made Flow dramatically easier to use by integrating Sidekick AI. Instead of manually building workflows step-by-step, you can now describe what you want in plain English and let AI handle the setup.
How it works
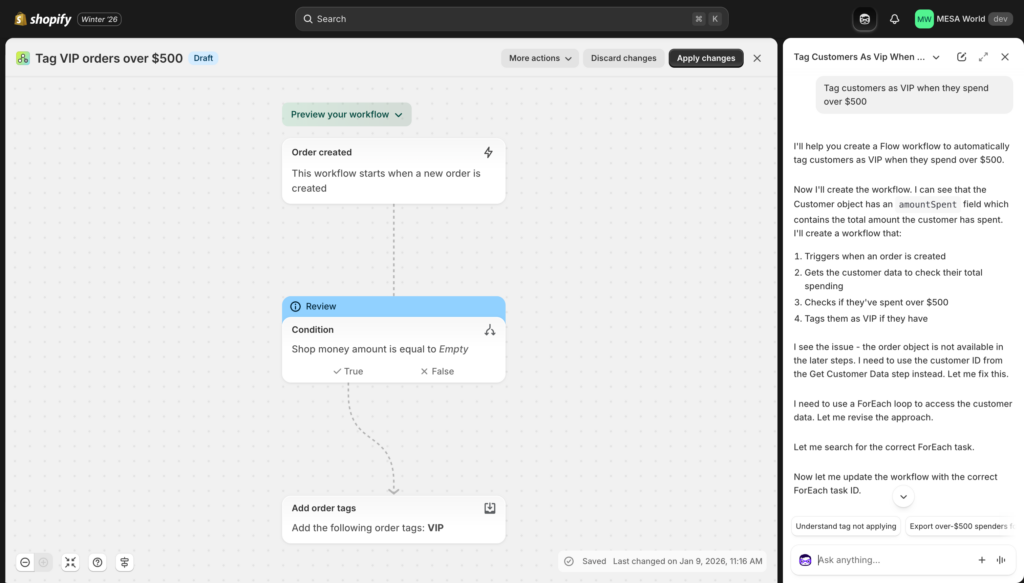
Simply tell Sidekick what you want to automate:
- “Tag customers as VIP when they spend over $500”
- “Send me a Slack notification when inventory falls below 10 units”
- “Automatically fulfill orders containing only digital products”
- “Add high-risk orders to a Google Sheet for review”
Sidekick analyzes your request, builds the complete workflow (trigger, conditions, actions), and presents it for your review. You can then customize it further or activate it immediately.
When to use Sidekick vs manual building
Use Sidekick for:
- Quick workflow creation (saves 5-10 minutes per workflow)
- Learning Flow’s capabilities (see how AI structures workflows)
- Complex logic you’re unsure how to build
- Getting started if you’re new to automation
Build manually for:
- Very specific, unique workflows
- Learning Flow deeply (hands-on experience)
- Workflows requiring precise control over every parameter
- When you already know exactly what you want
Pro tip: Use Sidekick to create the foundation, then manually refine the details. This combines speed with precision.
Sidekick makes Flow accessible to merchants who’ve never automated anything before, while speeding up workflow creation for experienced users. It’s a game-changer.
How to set up your first workflow (step-by-step)

The best way to understand Flow is to build something. This tutorial walks you through creating a simple but useful workflow: automatically tagging customers when they place their first order over $100.
Time required: 10 minutes
Difficulty: Beginner
What you’ll learn: The fundamentals that apply to all workflows
Step 1: Install Shopify Flow
If you don’t already see Flow in your Shopify admin, you’ll need to install it from the Shopify App Store.
- Navigate to the Shopify App Store
- Click “Add app”
- Confirm the installation in your Shopify admin
- Flow will appear in your left sidebar under “Apps”
Once installed, click on “Flow” in your Shopify admin to open the workflow dashboard.
Step 2: Create a new workflow
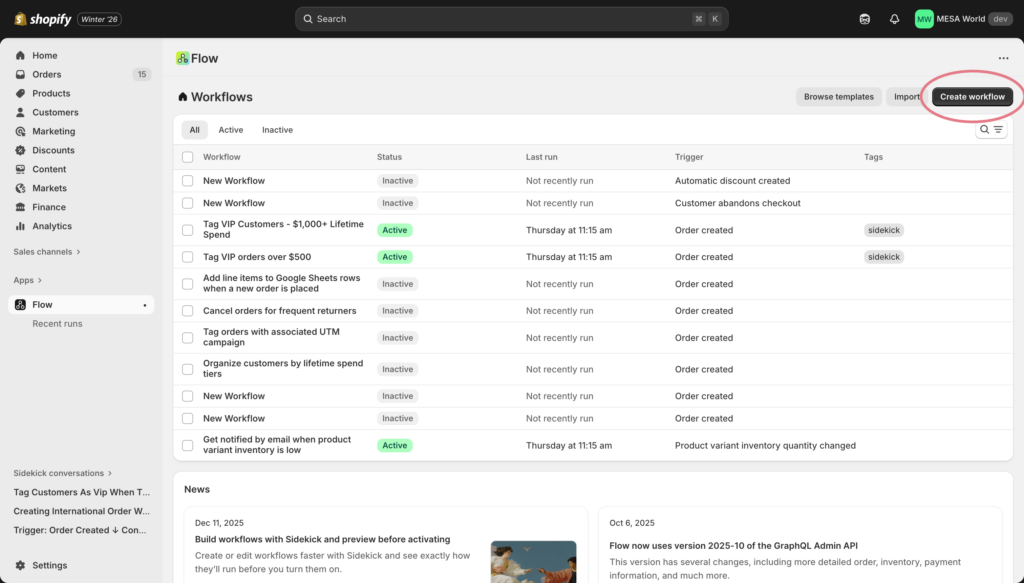
From the Flow dashboard, you have two options:
- Create workflow – Start from scratch
- Browse templates – Use a pre-built workflow
For this tutorial, we’ll start from scratch so you understand each component.
Click the dark “Create workflow” button in the top-right corner.
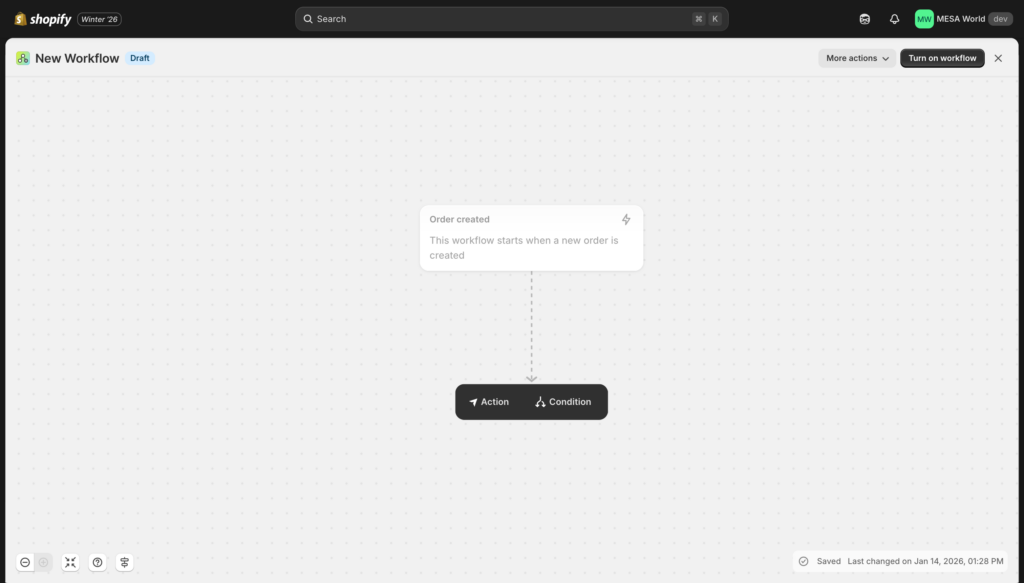
Step 3: Select your trigger

Every workflow starts with a trigger—the event that initiates your automation.
Click “Select a trigger” to see available options. You’ll see triggers organized by category:
- Shopify (orders, products, customers, inventory, etc.)
- Installed apps (any apps you’ve installed that support Flow connectors)
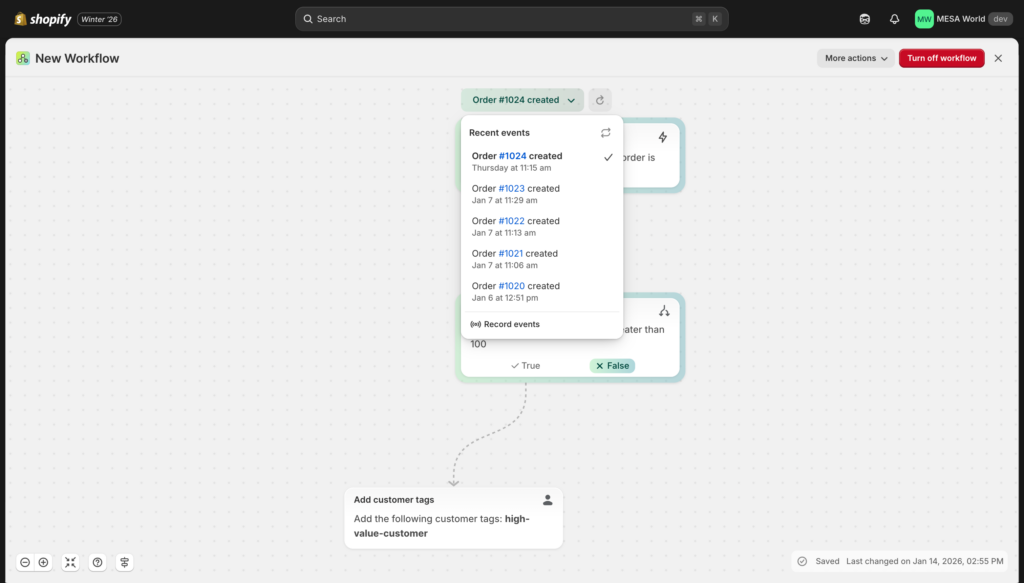
For our example, we need the workflow to start when an order is created:
- In the search box, type “order created”
- Select Order created from the Shopify Admin API section
- The trigger appears in your workflow builder
What just happened? You told Flow: “Watch for new orders. When one arrives, start this workflow.”
The trigger doesn’t do anything on its own yet—it just initiates the process. Now we need to add conditions and actions.
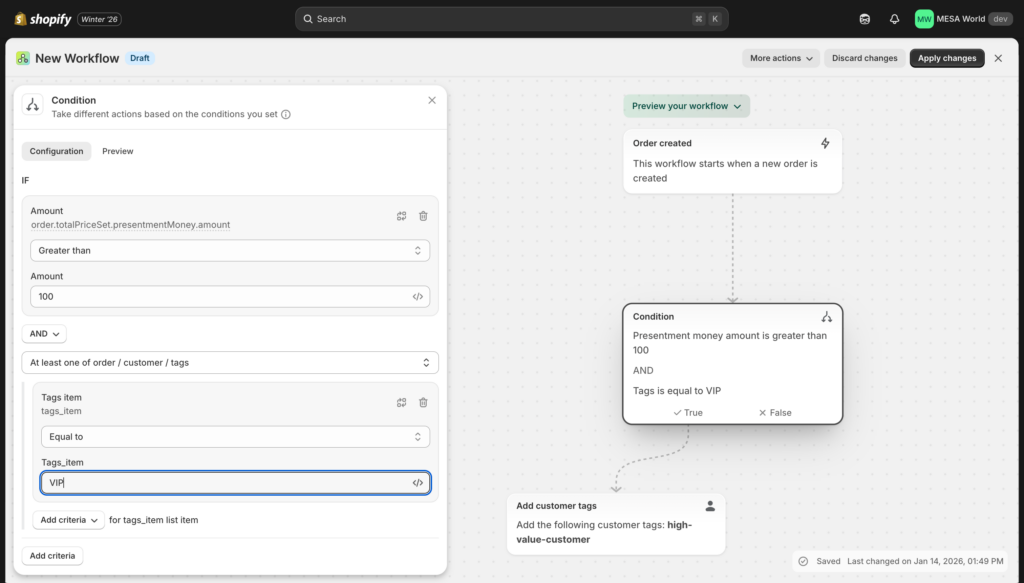
Step 4: Add a condition
Conditions let you create smart workflows that only act when specific criteria are met. In our case, we only want to tag customers when orders are over $100.
- Click the + icon below your “Order created” trigger
- Choose Condition from the dropdown
- In the condition builder, configure:
- Property: Order → Total price
- Operator: is greater than
- Value: 100
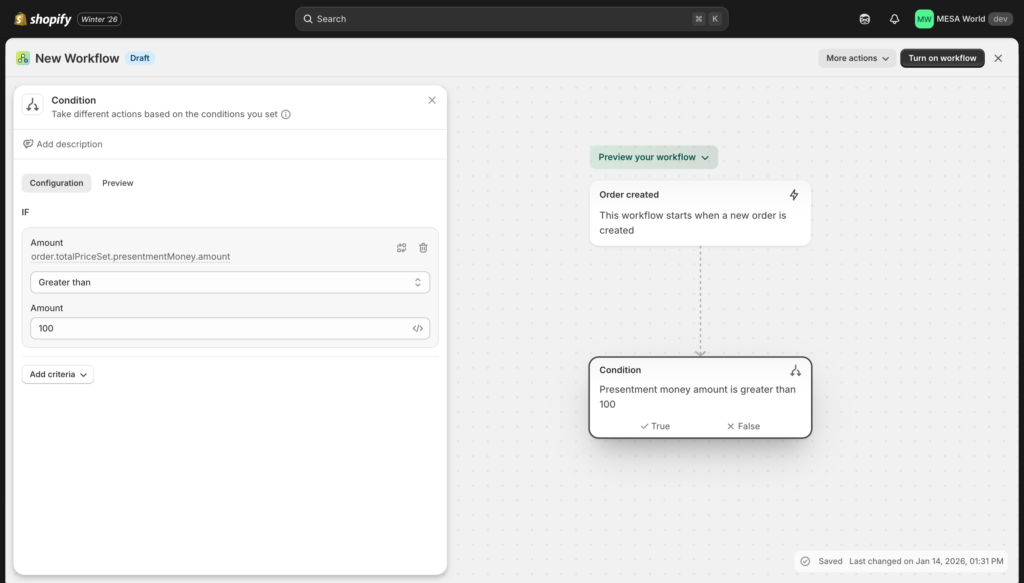
Reading your workflow: “When an order is created, check if the total is greater than $100. If yes, continue. If no, stop.”
Conditions are optional—you can skip straight to actions if you want something to happen for every trigger. But conditions make workflows much more powerful by adding logic.
Step 5: Add an action
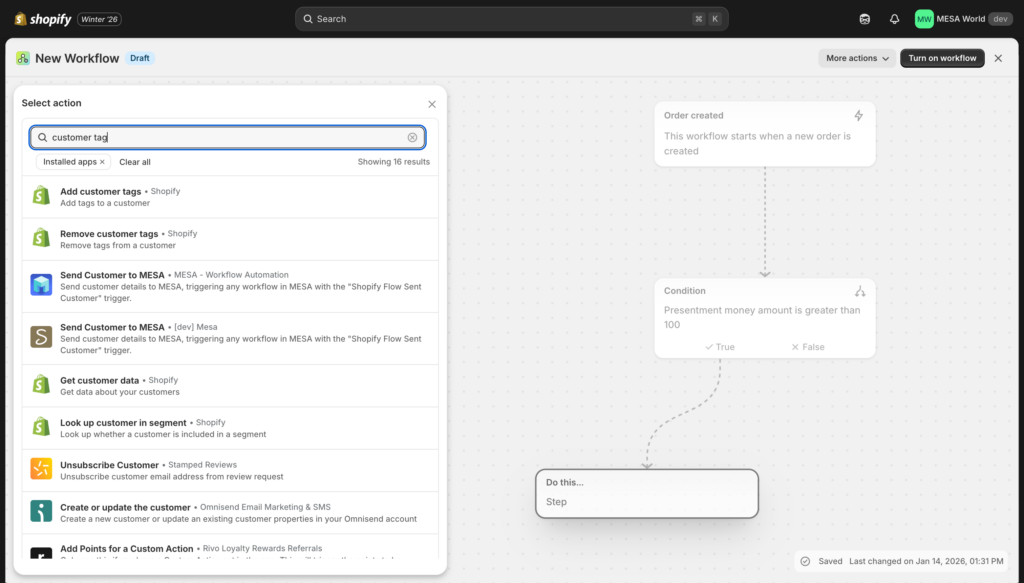
Actions are what Flow actually does. This is where automation happens.
Inside your condition (under the “Then” branch), click the + icon again and choose Action.
For our example:
- Search for “add customer tags”
- Select Add customer tags from the Shopify Admin API section
- In the tag field, type:
high-value-customer
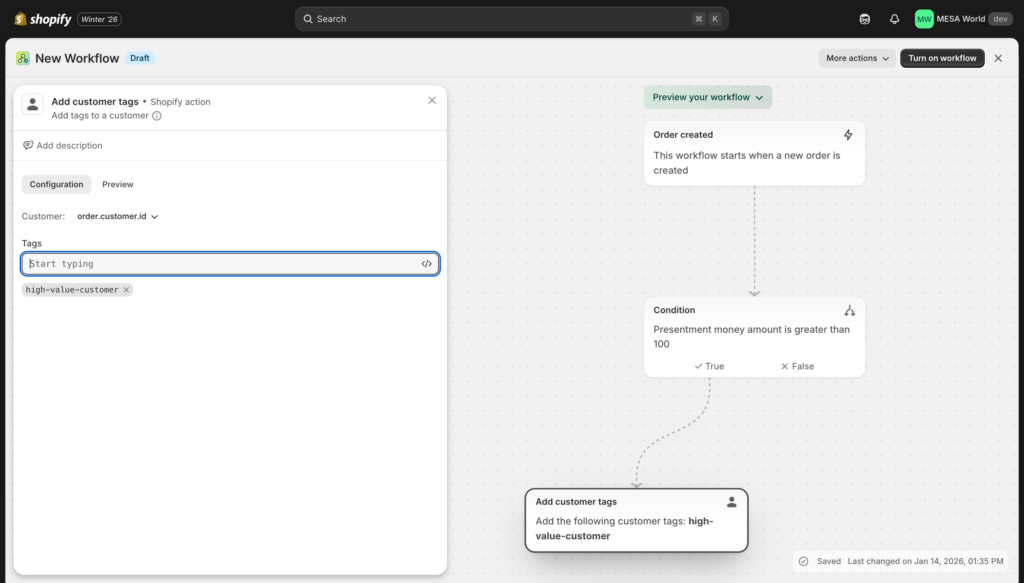
Pro tip: You can also use dynamic data here. Click the “Environment” button to see available variables from previous steps—like order total, customer name, product titles, etc. This lets you create dynamic tags like first-order-{{ order.created_at }}.
Step 6: Review and turn on
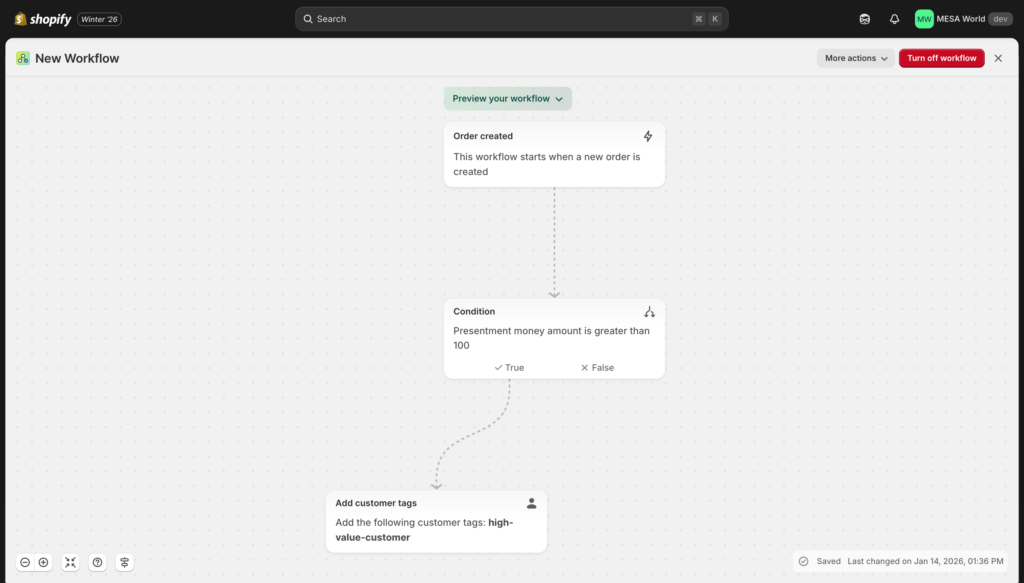
Before activating your workflow, review the logic:
- Trigger: Order created
- Condition: Total price > $100
- Action: Add “high-value-customer” tag to customer
Looks good? Click Turn on workflow in the top-right corner.
The toggle switch turns green, and your workflow is now live. Every time a customer places an order over $100, they’ll automatically get tagged as a high-value customer.
Step 7: Test your workflow
Important: Flow doesn’t have a true test environment (this is one of its limitations). Your workflow is now running on real orders.
To test safely:
- Place a test order over $100 in your store
- Check if the customer received the tag
- Review the workflow logs: Click on your workflow → View runs
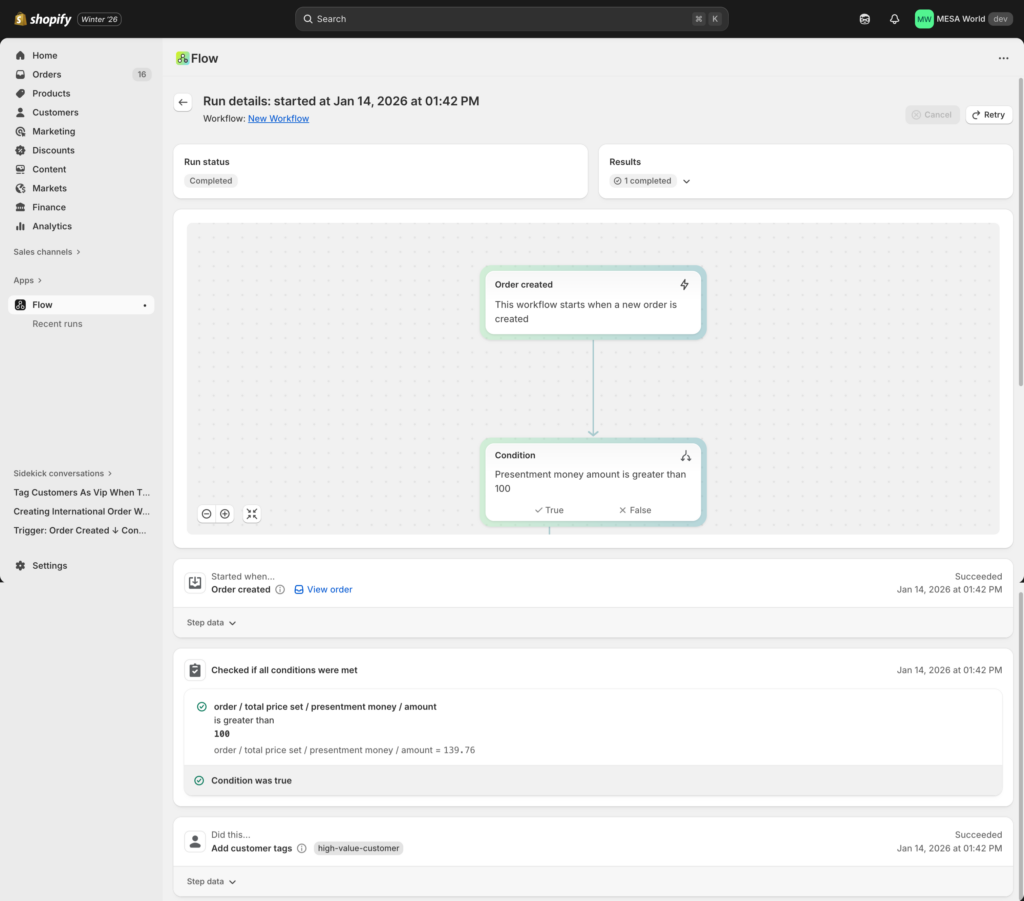
If something doesn’t work, click on the failed run to see what went wrong. Common issues:
- Condition not met (order was under $100)
- Customer already had the tag
- Timing issue (very rare)
What you just learned
Congratulations—you just built your first Shopify Flow workflow! This simple example demonstrates the fundamental structure of all workflows:
- Trigger – When something happens
- Condition – Check if criteria are met
- Action – Do something automatically
From here, you can add more complexity:
- Multiple conditions (AND/OR logic)
- Multiple actions (tag customer, send email, update Google Sheet)
- Nested conditions (if this, then check that)
- Custom code (JavaScript for advanced logic)
Want more workflow ideas? Check out our library of Shopify Flow templates or continue reading for 10 common use cases below.
Understanding Flow’s core components
Every Flow workflow consists of three main building blocks: triggers, conditions, and actions. Understanding how these work—and how to combine them—is the key to mastering automation.
Triggers: What starts your workflow
A trigger is an event that initiates a workflow. Without a trigger, nothing happens. With the right trigger, you can automate almost any repetitive task.
How triggers work: Flow monitors Shopify (and connected apps) for specific events. When an event occurs, Flow checks if any workflows use that event as a trigger. If yes, the workflow starts running.
Common trigger categories:
Order triggers
- Order created
- Order fulfilled
- Order paid
- Order cancelled
- Order risk analyzed
Product triggers
- Product created
- Product updated
- Product deleted
- Inventory quantity changed
Customer triggers
- Customer created
- Customer updated (limited—see limitations section)
- Customer deleted
Cart & Checkout triggers
- Cart created
- Checkout created
- Checkout abandoned (requires Shopify email app)
App-specific triggers
- Depends on which apps you have installed
- Only available if the app has a Flow connector
- Examples: Klaviyo campaign sent, Gorgias ticket created, Recharge subscription cancelled
Important limitation: Flow doesn’t support every Shopify API endpoint. Notably missing are real-time triggers for “Order Updated” and comprehensive “Customer Updated” events. This can be a dealbreaker for some use cases.
Deep dive: For a complete reference of all available triggers and when to use each, see our comprehensive guide to Shopify Flow triggers.
Conditions: Adding logic to your workflows
Conditions add “if/then” logic to workflows. They let you create smart automation that responds differently based on specific criteria.
Why use conditions? Without them, every trigger would execute every action. That’s rarely what you want. Conditions let you say: “Only do this if these criteria are met.”
Common operators:
- Equals – Exact match (product title equals “T-Shirt”)
- Contains – Partial match (order tags contain “wholesale”)
- Greater than – Numeric comparison (order total > 100)
- Less than – Numeric comparison (inventory quantity < 10)
- Starts with – Text begins with (customer email starts with “corporate”)
- Ends with – Text ends with (product SKU ends with “-XL”)
Combining multiple conditions:
AND logic (all must be true):
- Order total > $100
- AND customer tag contains “VIP”
- AND order is not a test order
OR logic (any can be true):
- Product title contains “T-Shirt”
- OR product title contains “Hoodie”
- OR product title contains “Sweatshirt”
Real-world example:
IF order total > $500
  AND customer is NOT tagged "wholesale"
  AND shipping country is "United States"
THEN send gift with order
Nested conditions: You can create complex logic by nesting conditions inside each other. This is powerful but can become difficult to manage—keep workflows as simple as possible.
Actions: What happens next
Actions are where automation actually does work. Once triggered (and conditions are met), actions execute automatically.
Common action categories:
Customer actions
- Add customer tags
- Remove customer tags
- Send email to customer
- Update customer metafields
Order actions
- Add order tags
- Remove order tags
- Add order note
- Cancel order
- Fulfill order
- Create draft order
Product actions
- Update product status (active/draft)
- Update inventory quantity
- Update product metafields
- Add product to collection
Notification actions
- Send staff notification email
- Post to Slack channel
- Send SMS (requires third-party app)
- Create support ticket in Gorgias
Data actions
- Add row to Google Sheets
- Send HTTP request (webhook)
- Run custom code
- Update Airtable
Multiple actions in one workflow: You can chain multiple actions together. For example:
- Add “VIP” tag to customer
- Send notification email to customer
- Post to Slack #high-value-orders channel
- Add row to Google Sheet for tracking
Actions execute in order, top to bottom. If one action fails, Flow continues with the remaining actions (no automatic rollback).
Using Liquid in Flow
Liquid is Shopify’s templating language. In Flow, it lets you insert dynamic data into your workflows—making them more powerful and personalized.
Why use Liquid? Instead of static text, you can reference actual data from the trigger or previous actions.
Simple examples:
Static text:
Tag: high-value-customer
Dynamic with Liquid:
Tag: spent-{{ order.total_price }}
Result: spent-125.50
Common Liquid variables:
{{ order.name }}– Order number (#1001){{ order.total_price }}– Order total (125.50){{ customer.first_name }}– Customer’s first name{{ product.title }}– Product name{{ order.created_at }}– Timestamp
Liquid filters for formatting:
{{ order.created_at | date: "%B %d, %Y" }}
Result: "January 15, 2026"

{{ order.total_price | money }}
Result: "$125.50"

{{ customer.email | upcase }}
Result: "[email protected]"
When Liquid becomes necessary:
- Personalizing email content
- Creating dynamic tags or metafields
- Building custom URLs
- Formatting data for external systems
- Conditional text based on variables
Liquid can get complex quickly. For detailed examples and advanced syntax, read our guide: Using Liquid in Shopify Flow.
Variables & Dynamic data
Every step in your workflow creates “variables”—data you can reference in later steps.

How it works:
- Your trigger fires (e.g., “Order created”)
- Flow loads all order data into variables
- You can access this data in conditions and actions
Accessing variables: Click the “</>” button when configuring actions. You’ll see a list of available data:
- Order details (total, customer, line items, etc.)
- Customer details (name, email, tags, etc.)
- Product details (if applicable)
- Data from previous actions
Example use case:
Trigger: Order created
Action 1: Get customer (loads customer data)
Action 2: Send email with subject "Thanks {{ customer.first_name }}!"
The variable picker makes this easy—you don’t need to memorize syntax.
10 popular Shopify Flow use cases
Here are the most common ways merchants use Flow to save time and improve operations. Each example includes the trigger, condition, and action needed to build it.
1. Auto-tag high-value customers
Goal: Identify and segment customers who place large orders.
Workflow:
- Trigger: Order created
- Condition: Order total price > $500
- Action: Add customer tag “VIP”
Why it’s useful: VIP customers can receive special treatment—exclusive discounts, priority support, or personalized outreach. Tagging them automatically ensures you never miss a high-value customer.
Variation: Add multiple tiers (spent-500, spent-1000, spent-5000) to create detailed segmentation.

2. Low inventory alerts
Goal: Get notified when products are running out of stock so you can reorder.
Workflow:
- Trigger: Inventory quantity changed
- Condition: Available quantity < 10
- Action: Send email to [email protected]
Why it’s useful: Prevents stockouts that lead to lost sales. Especially critical for fast-moving products or limited supply items.
Variation: Add product tags in the notification so you know which category needs attention (e.g., “LOW STOCK: Apparel”).
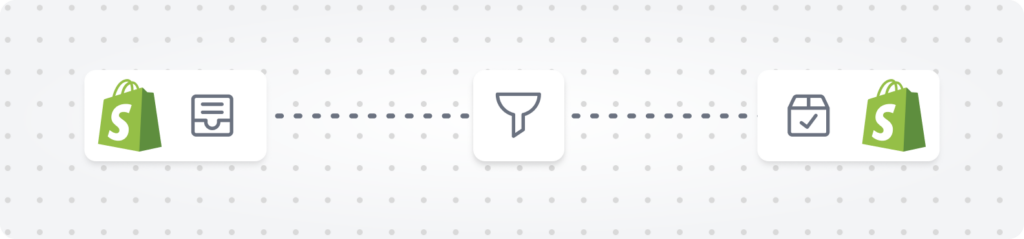
3. Fraud prevention
Goal: Automatically handle high-risk orders to prevent chargebacks.
Workflow:
- Trigger: Order risk analyzed
- Condition: Risk level = High
- Action 1: Add order tag “fraud-check”
- Action 2: Send staff notification
- Action 3: Cancel and refund order (optional, if policy allows)
Why it’s useful: Reduces manual review time and catches fraudulent orders before they’re fulfilled. Can save thousands in chargeback fees.
Variation: Instead of auto-canceling, just tag and notify so a human can review.
4. Reward repeat customers
Goal: Automatically send discount codes to loyal customers.
Workflow:
- Trigger: Order created
- Condition: Customer’s total orders > 5
- Action: Send email with 15% discount code
Why it’s useful: Encourages customer retention without manual tracking. Shows appreciation automatically.
Variation: Create tiered rewards (3rd order = 10% off, 5th order = 15% off, 10th order = 20% off).
Note: Requires Shopify email app or Klaviyo integration for email sending.
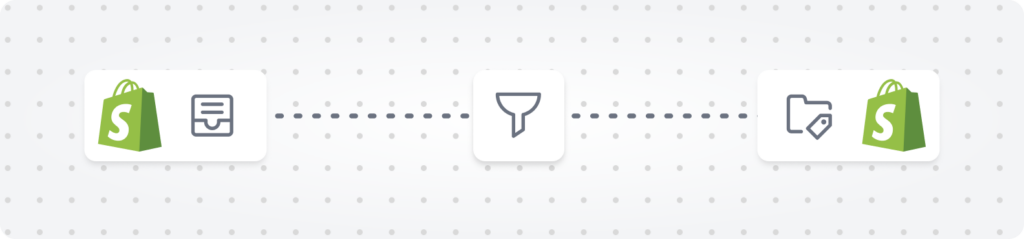
5. Organize orders by product type
Goal: Route orders to different fulfillment teams based on what was purchased.
Workflow:
- Trigger: Order created
- Condition: Order contains product tagged “apparel”
- Action: Add order tag “fulfillment-apparel”
Why it’s useful: Large stores with multiple fulfillment workflows can automatically route orders to the right team or location.
Variation: Create separate workflows for each product category (electronics, fragile-items, oversized, etc.).
6. Back-in-stock notifications
Goal: Alert your team when out-of-stock items become available again.
Workflow:
- Trigger: Inventory quantity changed
- Condition: Previous quantity = 0 AND new quantity > 0
- Action: Post to Slack #inventory channel
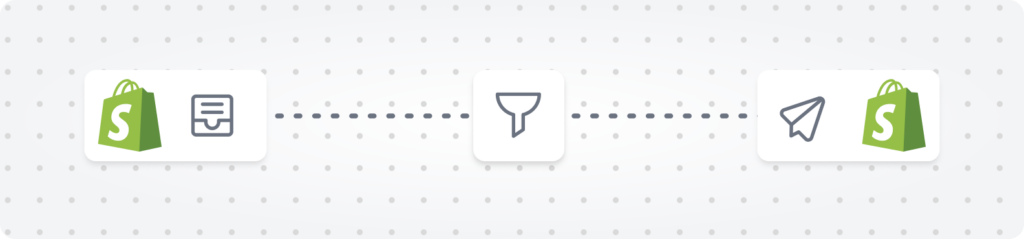
Why it’s useful: Helps marketing teams restart advertising for restocked items. Customer service can follow up with waitlist customers.
Limitation: Flow can’t send notifications directly to customers who signed up for alerts—you’d need a third-party app for that.
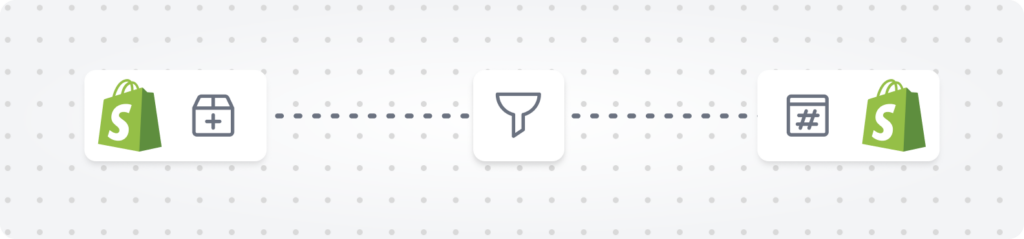
7. Auto-fulfill digital products
Goal: Instantly fulfill orders containing only digital products.
Workflow:
- Trigger: Order paid
- Condition: All line items tagged “digital”
- Action: Fulfill order
Why it’s useful: Customers get instant access to digital downloads. No manual fulfillment needed.
Variation: Combine with email action to send custom download instructions.
8. First-time customer welcome
Goal: Send a welcome message to new customers.
Workflow:
- Trigger: Customer created
- Action: Send welcome email
Why it’s useful: Makes great first impression. Can include brand story, product recommendations, or discount code.
Best practice: Keep the email focused on value, not just selling. Share your story or help them get started.

9. Abandoned cart recovery
Goal: Remind customers about items left in their cart.
Workflow:
- Trigger: Checkout created
- Condition: Checkout not completed after 2 hours
- Action: Send reminder email
Why it’s useful: Recovers lost sales. Abandoned cart emails have high conversion rates (15-25%).
Note: Requires Shopify email app. Subject line and timing are critical—test different approaches.
10. Export orders to Google Sheets
Goal: Automatically log orders in a Google Sheet for analysis or team visibility.
Workflow:
- Trigger: Order created
- Condition: (Optional) Order tag contains “wholesale”
- Action: Add row to Google Sheet with order details
Why it’s useful: Creates a live database of orders outside Shopify. Great for custom reporting, sharing with non-Shopify users, or feeding other tools.
Data to include: Order number, customer email, total, line items, date—use Liquid variables to format properly.
These are just starting points. The real power comes from combining and customizing workflows to match your unique business processes.
For more detailed workflow examples with step-by-step setup instructions and screenshots, see our complete guide: Shopify Flow Examples.
Working with Flow templates
Flow’s template library contains dozens of pre-built workflows designed by Shopify and the merchant community. Templates are a fast way to get started—you don’t need to build from scratch.
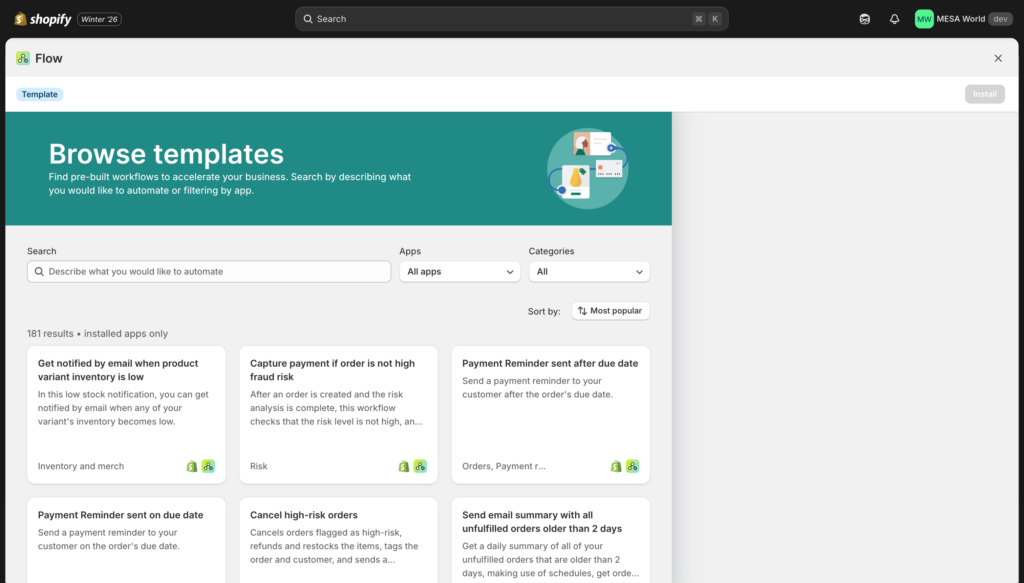
What the template library offers
Categories include:
- Customer loyalty & rewards
- Inventory management
- Order management
- Fraud prevention
- Staff notifications
- Product management
- Marketing automation
Each template includes:
- Pre-configured trigger, conditions, and actions
- Description of what the workflow does
- Suggested use cases
- Customization options
How to use a template
- From the Flow dashboard, click “Browse templates”
- Browse by category or search for specific functionality
- Click on a template to preview the workflow
- Click “Install” to add it in your store
- Customize the workflow to match your needs
- Turn it on
Important: Don’t just activate templates blindly. Always review and customize them first—your store has unique requirements.
Customizing templates
After adding a template, edit it to match your specific needs:
Common customizations:
- Adjust condition thresholds (change “order total > $100” to your preferred amount)
- Modify tags or labels to match your naming conventions
- Change notification recipients (email addresses, Slack channels)
- Add additional actions (tag customer, update Google Sheets)
- Adjust Liquid variables in email templates
Example: The “Reward loyal customers” template might send a 10% discount. You could customize it to:
- Change to 15% for your brand
- Adjust the threshold from 5 orders to 3 orders
- Add a personalized message with customer’s first name
- Include product recommendations based on purchase history
Top templates to start with
“Auto-tag customers by location”
Automatically tag customers based on their shipping address. Useful for regional marketing campaigns or shipping policies.
“Alert staff of high-risk orders”
Notify your team when Shopify flags an order as potentially fraudulent. Includes order details and risk level.
“Low inventory notification”
Email your inventory manager when stock falls below a threshold. Prevents stockouts.
“Thank repeat customers”
Send a personalized thank you email to customers on their 3rd, 5th, or 10th order.
“Tag orders with expensive items”
Automatically tag orders containing high-value products for special handling during fulfillment.
For our curated list of the best Flow templates with detailed use cases and customization tips, read: Best Shopify Flow Templates.
Advanced Flow techniques
Once you’re comfortable with basic workflows, these advanced techniques unlock more powerful automation.
Custom code actions
Flow includes a JavaScript environment that lets you run custom code within workflows. This is useful when Flow’s built-in actions don’t quite do what you need.
When to use custom code:
- Complex calculations (tax adjustments, profit margins)
- Data transformation (reformatting for external APIs)
- Advanced string manipulation
- Custom business logic that doesn’t fit standard conditions
Example: Calculate order profit margin
// Access order data from environment
const orderTotal = order.total_price;
const orderCost = order.line_items.reduce((sum, item) => {
  return sum + (item.variant.cost * item.quantity);
}, 0);

const profitMargin = ((orderTotal - orderCost) / orderTotal) * 100;

// Output can be used in subsequent actions
return { profitMargin: profitMargin.toFixed(2) };
Limitations of Flow’s code environment:
- Basic JavaScript only (ES6 supported)
- No npm packages or external libraries
- 10-second execution timeout
- Limited memory
- Can’t directly modify Shopify data (must use actions)
For truly complex logic, you might need more advanced platforms like MESA that offer a full JavaScript custom code with helper libraries and extended capabilities.
HTTP requests & webhooks
The “Send HTTP request” action lets Flow communicate with external systems—essentially turning Flow into an integration platform.
Common use cases:
- Update your CRM when orders are placed
- Send data to analytics platforms
- Trigger workflows in other automation tools
- Post to custom APIs you’ve built
Basic structure:
URL: https://api.yourcrm.com/contacts
Method: POST
Headers:
  Authorization: Bearer YOUR_API_KEY
  Content-Type: application/json
Body:
{
  "email": "{{ customer.email }}",
  "name": "{{ customer.first_name }} {{ customer.last_name }}",
  "order_total": {{ order.total_price }}
}
Important considerations:
- You need to know the API endpoint and authentication method
- Test thoroughly—failed HTTP requests won’t retry automatically
- Some APIs have rate limits
- Response handling is limited (Flow can’t process complex API responses)
When HTTP requests become a limitation: If you’re frequently connecting external systems or need to process API responses, Flow’s capabilities become restrictive. Tools like MESA offer better proxy handling and error management for complex integrations.
Connecting non-Shopify apps
Flow works best with apps that have built-in “Flow connectors”—pre-configured triggers and actions. But what about apps that don’t?
Your options:
1. Use HTTP requests (webhooks)
If the app has an API, you can use Flow’s HTTP request action to send data. This requires API knowledge and careful setup.
2. Use Zapier or Make as middleware
Flow can trigger a webhook → Zapier catches it → Zapier connects to your app. Adds complexity and cost, but works.
3. Contact the app developer
Request they build a Flow connector. Many developers are responsive to requests, especially for popular apps.
4. Use a more flexible platform
Some automation platforms (like MESA) have pre-built integrations with 100+ apps, eliminating the need for custom API work.
The reality: Flow’s app ecosystem is limited by connector availability. This is one of its biggest constraints compared to other automation platforms.
For strategies on extending Flow’s capabilities and working around its limitations, see: How to Extend Shopify Flow.
For Each loops
Loops let you perform actions on multiple items—like processing every line item in an order or every product in a collection.
When to use loops:
- Iterate through order line items
- Process multiple products at once
- Handle batch operations
Example: Tag every product in an order
Trigger: Order created
Loop: For each line item in order
  Action: Add tag to product
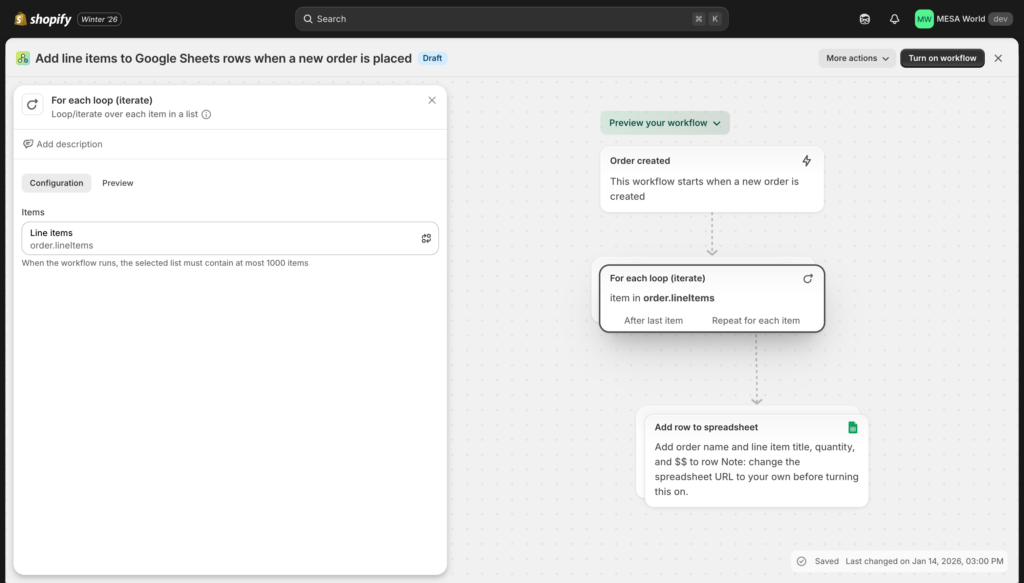
Critical limitation: Flow can only process 100 items per loop. If an order has 101 line items, Flow stops at 100.
This is a hard platform limit. For stores with high-quantity orders (wholesale, bulk, etc.), this can be a showstopper. More advanced platforms like MESA handle 1,000+ items per loop.
Shopify Flow limitations (and when to consider alternatives)
Flow is powerful for basic automation, but it’s not designed for complex workflows or enterprise-scale operations. Understanding its limitations helps you make informed decisions about when it’s the right tool—and when it’s not.
Technical limitations
UPDATE – Winter 2026: Shopify addressed one of Flow’s biggest limitations by adding workflow preview/testing. However, several constraints remain:
Limited trigger coverage
Flow doesn’t support all Shopify API endpoints. Notably missing:
- Real-time “Order Updated” trigger (you can only trigger on creation, fulfillment, or payment)
- Comprehensive “Customer Updated” trigger
- Many metafield events
- Some app-specific events
Impact: If your workflow needs to respond to order changes (address corrections, item additions, note updates), Flow can’t do it natively.
Testing environment ✅ Added – Winter 2026
Flow includes workflow preview functionality—test workflows with sample data before going live without affecting real orders or customers. This was Flow’s biggest pain point and has been resolved.
Cancel workflow runs ✅ Added – Winter 2026
You can now stop workflows mid-execution by canceling individual runs or multiple runs at once. This provides better control over automation and prevents unwanted actions from completing.
Loop limitations
Flow’s “For Each” loops max out at 100 items. If you need to process more, the workflow stops.
Impact: Wholesale stores, bulk orders, or batch processing workflows hit this wall. For example, if you want to tag every product in a 150-item order, Flow can only handle the first 100.
Connector dependency
Flow only integrates with apps that have built Flow connectors. If an app doesn’t support Flow natively, you’re stuck using HTTP requests or workarounds.
Impact: Limited integration options compared to platforms with pre-built connections. For example, Flow has only 1 Google Sheets action, while MESA offers more Google Sheets actions (read, write, update, append, clear, format).
Basic code environment
Flow’s custom code actions run basic JavaScript with a 10-second timeout and no external libraries.
Impact: Complex calculations, data transformations, or advanced logic are difficult or impossible. No access to npm packages or helper libraries.
Daily schedule minimum
Scheduled workflows can only run once per day at minimum. You can’t schedule hourly or minute-based workflows.
Impact: If you need frequent polling (checking inventory every hour, for example), Flow can’t do it. This limits use cases like price monitoring or frequent data syncs.
No data persistence
Flow can’t store data between workflow runs. Each workflow execution is isolated.
Impact: You can’t build running totals, track state across orders, or maintain counters without external systems (like Google Sheets as a database).
Integration challenges
Here’s how Flow’s integration depth compares to MESA for popular apps:
| App | Flow triggers & actions | MESA triggers & actions |
|---|---|---|
| Google Sheets | 1 action (add row) | 6+ actions (read, write, update, append, clear, format) |
| Klaviyo | 2 actions | 141 triggers & actions |
| Gorgias | Basic connector | 40+ triggers & actions |
| Asana | 1 action | 166 triggers & actions |
| Slack | 6 actions | Multiple advanced options |
The pattern: Flow offers basic connectivity. Other platforms offer deep integration with extensive functionality.
Signs you’ve outgrown Flow
Note: Flow’s Winter 2026 updates (preview testing, Sidekick AI, workflow cancellation) addressed several pain points. However, you might still need a more powerful platform if:
✓ Your apps don’t have Flow connectors
If most of your tech stack doesn’t integrate with Flow, you’re fighting an uphill battle.
✓ You’re processing 100+ items frequently
Loop limits are blocking critical workflows.
✓ You need workflows to run more than daily
Hourly or minute-based automation is essential for your operations.
✓ You require data persistence
Tracking state, maintaining counters, or building reports needs stored data.
✓ You need expert support
Complex workflows require hands-on help that Shopify can’t provide.
✓ Flow’s code environment is too restrictive
You need access to external libraries, longer execution times, or advanced features.
✓ You’re spending too much time working around Flow’s limitations
Constantly using workarounds means the tool isn’t right for your needs.
What’s improved: Flow’s new testing capability and AI-powered workflow creation significantly lower the barrier to entry and reduce setup time. These improvements make Flow viable for more use cases than before.
Graduating to MESA
Many merchants start with Flow and upgrade to MESA as their automation needs grow. This is a natural progression—Flow is great for getting started, but MESA is designed for scale.
What MESA offers that Flow doesn’t:
| Capability | Flow | MESA |
|---|---|---|
| Testing environment | ✅ Preview mode (new!) | ✅ Full test mode with mock data |
| App integrations | Only Flow connectors | 100+ pre-built integrations |
| Loop processing | 100 items max | 1,000+ items |
| Schedule frequency | Daily minimum | Every minute |
| Code environment | Basic JavaScript | Full JavaScript SDK + modules |
| Data storage | ❌ None | ✅ Built-in automation database |
| Error handling | Basic | Advanced retry logic & alerts |
| Cancel workflows | ✅ Yes (new!) | ✅ Yes |
| Support | Shopify help docs | US-based experts + custom workflow setup |
| Pricing | Free | Starts at $12/month |
Who should consider MESA:
- Stores outgrowing Flow’s technical limits
- Merchants needing deep app integrations (Klaviyo, Gorgias, Google Sheets, etc.)
- Teams requiring testing before deployment
- Businesses with complex, multi-step workflows
- Operations that need data persistence or hourly/minute-based automation
Client example:
MESA was the only solution that could handle the complex requirements for managing our store.
Madhappy
The bottom line: Flow is perfect for 80% of basic automation needs. If you’re in the 20% that needs more, MESA is the natural next step.
Learn more about the differences: Shopify Flow vs MESA Comparison
Shopify Flow alternatives
Flow isn’t the only automation option for Shopify merchants. Here’s how it compares to other popular platforms and when you might choose each.
Quick comparison: Flow vs Popular alternatives
| Platform | Best for | Starting price | Learning curve | Shopify focus |
|---|---|---|---|---|
| Shopify Flow | Basic Shopify automation | Free | Easy | Native |
| MESA | Advanced Shopify automation | $12/mo | Easy | Shopify-first |
| Zapier | Multi-platform integration | $20/mo | Medium | Platform-agnostic |
| Make (Integromat) | Complex workflows, developers | $9/mo | Hard | Platform-agnostic |
| Alloy Automation | Complex ecommerce workflows | Custom | Medium | Ecommerce-focused |
When to choose each platform
Choose Shopify Flow if:
- You’re just getting started with automation
- Your needs are entirely within Shopify
- You want free, basic automation
- You’re comfortable with Flow’s limitations
- Your apps have Flow connectors
Choose MESA if:
- You need more than Flow offers but want to stay Shopify-focused
- Your apps don’t have Flow connectors (MESA has 100+ pre-built integrations)
- You need testing environments and better error handling
- You want expert support from actual humans
- You’re processing high volumes or complex workflows
Choose Zapier if:
- You’re connecting Shopify with many non-ecommerce apps (Slack, Google Workspace, Airtable, etc.)
- You need automation across multiple platforms beyond just Shopify
- You’re comfortable with a task-based pricing model
- You don’t need Shopify-specific features
Choose Make (Integromat) if:
- You have technical resources (developers)
- You need maximum flexibility and control
- You’re building very complex, multi-step scenarios
- You want visual workflow building with advanced logic
Choose Alloy if:
- You’re an enterprise brand with complex requirements
- You need white-glove integration services
- Budget isn’t a primary concern
- You want custom-built workflows maintained by their team
Detailed head-to-head comparisons
Want to dive deeper into specific comparisons?
Deep dive articles:
- Shopify Flow vs MESA: Complete Feature Comparison – Best if you’re deciding between free Flow and paid MESA
- Shopify Flow vs Zapier: Which is Better? – Best if you’re unsure whether you need Shopify-focused or platform-agnostic
- The Best Shopify Flow Alternatives – Comprehensive overview of all options
Can you use multiple platforms together?
Yes! Many merchants use Flow for simple tasks and another platform for complex workflows:
Common combination: Flow + MESA
- Flow handles basic order tagging, simple notifications
- MESA handles complex integrations, loops, testing
- Benefit: Use free Flow where it works, pay for MESA only for advanced needs
Common combination: Flow + Zapier
- Flow handles Shopify-only automation
- Zapier connects Shopify to external platforms (CRM, accounting, etc.)
- Benefit: Best of both worlds—native Shopify + broad connectivity
There’s no rule saying you must choose just one. Mix and match based on what each platform does best.
Best practices & Common gotchas
Learn from others’ mistakes—here’s what to know before building complex workflows.
Testing your workflows
UPDATE – Winter 2026: Flow now includes workflow preview functionality! You can test workflows before going live without affecting real store data.
The new preview feature lets you:
- Test workflows with sample data before activation
- See exactly what would happen without triggering real actions
- Adjust logic and conditions risk-free
- Verify your workflow works as intended
How to use preview:
- Build your workflow in the Flow editor
- Click “Preview” before turning it on
- Flow shows you what would happen with recent relevant data
- Review the results and adjust if needed
- Turn on the workflow when ready
Additional testing strategies:
Even with preview, these best practices still apply for comprehensive testing:
- Start with test orders: Create orders specifically for testing. Use a unique tag like “test-order” so you can identify them.
- Add safety conditions: Build in conditions that prevent actions on real customers during testing (e.g., “customer email contains ‘[email protected]'”)
- Test incrementally: Build one piece at a time. Don’t create a 10-step workflow and turn it on blind.
- Use workflow logs: After testing, check the logs to verify everything executed as expected.
- Don’t test during high-traffic periods: If something goes wrong, you don’t want it affecting hundreds of real orders.
Pro tip: Create a “testing” customer account with a unique email. Use this customer for all test orders, and add a condition to your workflows: “customer email does NOT equal [email protected].” This prevents test runs from affecting real customers.
Before Winter 2026: Testing was Flow’s biggest limitation—you had to test on production data. The new preview feature addresses this major pain point, making Flow much safer to use.
Documentation & Organization
NEW – Winter 2026: Flow’s editor has been redesigned with a vertical layout that provides more workspace for building large, complex automations. The new interface makes it easier to see your entire workflow at once.
As you build more workflows, organization becomes critical. Here’s how to keep things manageable:
Name workflows clearly
❌ “Workflow 1”
✅ “Auto-tag VIP customers (orders > $500)”
Good names describe what the workflow does and when. Your future self will thank you.
Add internal notes
Flow lets you add notes to explain logic. Use them liberally:
- Why you chose specific thresholds
- Who requested the workflow
- What problem it solves
- Known limitations or edge cases
Maintain a master list
Keep a spreadsheet or document listing:
- All active workflows
- What each does
- Who owns it
- Last modified date
- Dependencies (which apps it requires)
Use consistent naming conventions
- Tags: Use consistent patterns (e.g., “customer-vip”, “order-wholesale”, “product-low-stock”)
- Actions: Name custom code actions descriptively
- Variables: Use clear variable names in Liquid
Error handling
Flow’s error handling is basic. Workflows fail silently—you won’t get alerts unless you build them.
Best practices:
1. Check logs regularly
Set a calendar reminder to review workflow runs weekly. Look for:
- Failed actions
- Workflows that aren’t running
- Unexpected results
2. Add notification actions
For critical workflows, add a final action: “Send email to [email protected] confirming success.” If you don’t get the email, something failed.
3. Build redundancy for critical workflows
If a workflow is business-critical, consider:
- Backup notifications through multiple channels (email + Slack)
- Manual review checkpoints
- Secondary workflows that check if the first one ran
4. Understand common failure points
- HTTP requests fail if APIs are down
- Email actions fail if recipient addresses are invalid
- Custom code fails if it hits the timeout or has syntax errors
- Conditions fail silently if data is missing (e.g., checking a metafield that doesn’t exist)
Performance considerations
Don’t create too many workflows doing similar things
Each active workflow monitors for its trigger. Dozens of workflows all watching “Order created” can slow things down. Combine similar workflows when possible.
Example:
❌ Bad: 5 separate workflows all triggered by “Order created”, each checking different conditions
✅ Good: 1 workflow triggered by “Order created” with nested conditions
Combine actions when possible
Instead of creating separate workflows for “tag customer” and “send email”, combine them into one workflow with two actions.
Be careful with loops
Processing 100 items takes time. If you’re running loops frequently on large orders, workflows can get slow.
Consider frequency
Don’t spam customers with notifications. If multiple workflows can send emails, make sure they don’t all fire at once or conflict.
Common mistakes to avoid
❌ Not testing workflows before going live
Always create test orders to verify logic. Don’t assume everything works.
❌ Creating conflicting workflows
Two workflows trying to tag the same customer differently will cause confusion. Document what each workflow does.
❌ Assuming all API endpoints are available
Flow doesn’t support every Shopify event. Check the trigger list before planning complex workflows.
❌ Over-complicating workflows
Simpler is better. If a workflow has 10 nested conditions, it’s probably doing too much.
❌ Not monitoring workflow logs
Workflows fail silently. Check logs weekly or you’ll miss problems.
❌ Forgetting about timezone differences
Scheduled workflows run in your store’s timezone. If your team is distributed globally, this can cause confusion.
❌ Using webhooks without understanding API responses
HTTP requests can fail for many reasons (authentication, rate limits, invalid data). Test thoroughly and add error handling.
❌ Ignoring Flow’s limitations until it’s too late
If you’re planning complex automation, research Flow’s constraints early. Don’t build your entire strategy around it only to discover it can’t handle your needs.
Getting help with Shopify Flow
Official Shopify resources
Shopify Help Center
help.shopify.com – Search for “Shopify Flow” to find official documentation, setup guides, and troubleshooting articles.
Flow Documentation
Shopify maintains Flow-specific docs covering triggers, actions, and common workflows. Access through the Help Center or directly in the Flow app.
Shopify Community Forums
community.shopify.com – Ask questions and learn from other merchants. Search first—your question has probably been asked before.
Shopify Support (Chat/Email)
Shopify can answer basic questions about Flow functionality, installation, and general use. However, their support team can’t:
- Design custom workflows for you
- Debug complex workflow logic
- Help with third-party app integrations
- Write custom code
When you need expert help
For complex automation, you’ll need more than Shopify’s support team can provide.
Shopify Experts Directory
shopify.com/partners/directory – Find developers and agencies who specialize in Flow and automation. Look for partners with automation experience.
What experts can help with:
- Custom workflow design for unique business processes
- API integrations with external systems
- Complex conditional logic and data transformation
- Troubleshooting failing workflows
- Optimizing existing workflows for performance
MESA support (alternative platform)
If you’re using MESA instead of (or alongside) Flow, you get:
- US-based support team via chat and email
- Expert workflow setup assistance (not just troubleshooting)
- Custom workflow development service
- Dedicated launch manager for complex implementations
Many merchants find that hands-on expert support more than justifies MESA’s cost compared to struggling with Flow alone.
Learning resources
Our comprehensive guides:
- Shopify Flow Triggers Reference – Complete list of all available triggers and when to use each
- Shopify Flow Examples Library – 20+ real-world workflow examples with step-by-step setup
- Using Liquid in Shopify Flow – Master Liquid templating for dynamic workflows
- Shopify Flow Templates Guide – Curated list of best templates with customization tips
- Extending Flow’s Capabilities – Advanced techniques and workarounds
YouTube & Video tutorials
Search “Shopify Flow tutorial” on YouTube for visual walkthroughs. Shopify’s official channel has helpful intro videos.
Shopify’s Official Blog
They occasionally publish case studies and examples of creative Flow uses: shopify.com/blog
Start automating your Shopify store today
You now have everything you need to master Shopify Flow—from basic setup to advanced techniques, common use cases to strategic limitations.
Here’s what we covered:
- Flow is completely free on all Shopify plans (Basic and above)
- Building workflows follows a simple trigger → condition → action structure
- Templates provide pre-built workflows you can customize
- Flow works best for Shopify-focused automation within its technical constraints
- Advanced needs may require graduating to more powerful platforms like MESA
The key takeaway: Start simple, build incrementally, and automate what matters most.
Don’t try to automate everything at once. Pick one repetitive task that wastes time daily, build a workflow to handle it, and expand from there.
Next steps
Choose your path based on where you are:
For Flow beginners
You’re just getting started with automation and want to learn the basics.
Your action plan:
- Install Shopify Flow from the App Store
- Start with a pre-built template (browse by category)
- Customize your first workflow for your store
- Turn it on and monitor the results
- Gradually add more workflows as you gain confidence
Recommended first workflows:
- Low inventory alerts (never run out of stock)
- Auto-tag high-value orders (segment customers)
- Staff notifications for important events
For current Flow users
You’re already using Flow and want to optimize or expand your automation.
Your action plan:
- Audit existing workflows—are they still working as intended?
- Review workflow logs for failures or issues
- Explore advanced techniques (custom code, loops, HTTP requests)
- Add more sophisticated workflows to save additional time
- Evaluate if you’re hitting Flow’s limitations
Optimization checklist:
- ✓ Consolidate similar workflows
- ✓ Add better error handling and notifications
- ✓ Document workflow logic for team members
- ✓ Test edge cases you haven’t considered
- ✓ Review conditions—are thresholds still appropriate?
👉 View Advanced Flow Examples →
For advanced automation needs
You’ve hit Flow’s limitations and need more powerful capabilities.
Your action plan:
- List the specific limitations blocking your workflows
- Evaluate whether workarounds exist or if you need a new platform
- Compare Flow alternatives based on your requirements
- Test MESA or another platform with a free trial
- Migrate critical workflows first, keep simple ones in Flow
Signs you need more than Flow:
- ✓ Apps you need don’t have Flow connectors
- ✓ You’re hitting the 100-item loop limit
- ✓ Testing on production data creates too much risk
- ✓ You need workflows to run more frequently than daily
- ✓ Complex integrations require expert API knowledge
👉 Compare Flow vs MESA →
👉 View All Flow Alternatives →
Ready for more powerful automation?
If you’ve outgrown Shopify Flow’s capabilities, MESA offers everything Flow does—plus the advanced features growing stores need.
What you get with MESA:
- ✅ 100+ pre-built app integrations (not limited to Flow connectors)
- ✅ Process 1,000+ items per loop (vs. Flow’s 100-item limit)
- ✅ Schedule workflows every minute (vs. Flow’s daily minimum)
- ✅ Full JavaScript SDK with helper functions and modules
- ✅ Built-in automation database for data persistence
- ✅ Advanced error handling with automatic retries
- ✅ US-based expert support via chat and email
- ✅ Custom workflow development service
- ✅ Dedicated launch manager for complex implementations
Pricing: Starts at $20/month with a 7-day free trial
Join brands like GLDN, MUD/WTR, Bartesian, and Madhappy who graduated from Flow to MESA.
Try MESA free for 7 days
No credit card required. Install, test, and see the difference.
Compare features side-by-side
See the detailed breakdown of Flow vs MESA capabilities, integrations, and support.