You know automation could save you hours every week. You've opened Shopify Flow, stared at that blank canvas, and thought: "Where do I even start? What's actually possible here?"
Flow's visual builder is powerful, but without concrete examples, it's like having a fully equipped kitchen without any recipes. You can see the ingredients and tools, but you're not sure what you can actually cook.
This guide solves that problem. You're about to see exactly what 15 real Shopify merchants have built with Flow—from simple order tagging that takes 5 minutes to set up, to sophisticated fraud prevention systems that save thousands in chargebacks every month.
What you'll find in this guide
Each example in this guide includes everything you need to build it yourself today:
- Visual workflow diagrams showing exactly how the automation flows from trigger to action
- Step-by-step setup instructions with the exact triggers, conditions, and actions to configure
- Business impact metrics so you know which examples deliver the biggest ROI
- Customization tips to adjust each workflow for your specific business
- Flow vs MESA comparison showing what you can do natively versus what requires advanced capabilities
- Difficulty ratings (Beginner ⭐ | Intermediate ⭐⭐ | Advanced ⭐⭐⭐) so you can progress at the right pace
The examples are organized by category—order management, inventory control, customer engagement, fulfillment operations, and marketing automation—so you can jump straight to the workflows that matter most for your store right now.
How to use this guide
Don't try to implement everything at once. The merchants who see the best results start with just one example addressing their biggest time drain, test it thoroughly over a week, then gradually layer in additional workflows.
Here's the recommended approach:
- Scan the categories and identify your biggest operational pain point
- Start with a beginner example to build confidence with Flow's interface
- Follow the step-by-step setup exactly as written
- Test with Flow's preview function using historical order data
- Monitor the first 10-20 workflow runs to ensure everything works correctly
- Customize the conditions based on your results (adjust dollar thresholds, tag names, etc.)
- Add another example next week and repeat the process
By the end of the month, you'll have 4-5 workflows running smoothly, saving you 10+ hours weekly.
What to expect
These are examples you build, not templates you install. While Shopify offers pre-built templates you can install with one click (covered in our Shopify Flow Templates guide), this article shows you what's possible when you build workflows from scratch. This gives you complete control over the logic, conditions, and actions.
You don't need coding skills. Beginner and intermediate examples use Flow's visual interface with dropdowns and simple conditions. Advanced examples may include Liquid code snippets, but we provide copy-paste examples you can use as-is—no programming knowledge required.
Some examples require MESA. Flow is powerful, but it has limitations—no scheduled triggers, no external app connections beyond what has Flow connectors, no historical data queries. Where Flow can't handle an example, we show you exactly how MESA extends those capabilities. You'll always see what's possible with free Flow first, then understand when upgrading to MESA makes sense.
Ready to see what you can build? Let's start with beginner examples that take just minutes to implement.
Beginner examples
Start here if you're new to Shopify Flow. These examples take 5-15 minutes to build, use simple triggers and conditions, and deliver immediate value. No coding required—just follow the step-by-step instructions using Flow's visual interface.
Example 1: Tag high-value orders ⭐
What it does: Automatically tags orders over $500 as "VIP" so your team knows which orders deserve special attention, expedited processing, or personalized thank-you notes.
Business impact:
- Time saved: 3-4 hours/week (eliminates manual order value checking)
- Response speed: Team responds 3x faster to high-value opportunities
- Customer experience: Better service for top 15% of orders
- Revenue impact: 8-12% increase in AOV from improved VIP treatment
Step-by-step setup:
- Create new workflow in Shopify Flow
- Select trigger: Order → Order created
- Add condition: Check a condition
- Variable:
Order total - Operator:
is greater than - Value:
500
- Variable:
- Add actions (in the "true" path):
- Action 1: Add order tags
- Tag:
VIP
- Tag:
- Action 2: Add customer tags
- Tag:
High-Value
- Tag:
- Action 3: Send internal email
- Recipient:
[email protected] - Subject:
New VIP Order - ${{ order.totalPrice }} - Body:
Customer {{ order.customer.firstName }} placed a {{ order.totalPrice }} order. Order #{{ order.name }}
- Recipient:
- Action 1: Add order tags
- Save and turn on the workflow
Customization tips:
- Adjust threshold: Change
$500to match your average order value. Aim for the top 10-15% of orders. If your AOV is $75, try $200. If it's $250, try $750. - Geographic variations: Add second condition for international orders: "Shipping country is not [your country]" AND "Total > $300" (lower threshold for international).
- Prevent duplicates: Add condition "Customer does not have tag: High-Value" to avoid tagging repeat VIP customers multiple times.
- Product-specific VIP: Add condition "Product title contains [luxury brand]" to flag premium product orders regardless of price.
Flow vs MESA:
| Feature | Flow | MESA |
|---|---|---|
| Basic order tagging | ✅ Simple threshold check | ✅ Simple threshold check |
| Email notifications | ✅ Plain text only | ✅ HTML formatted with order details |
| Slack/SMS alerts | ❌ Internal email only | ✅ Slack channels + SMS to manager |
| CRM updates | ❌ Not available | ✅ Update Salesforce/HubSpot contact |
| Dynamic thresholds | ❌ Fixed $500 year-round | ✅ Adjust by season, product category, region |
| Customer tier calculation | ❌ Manual tag only | ✅ Auto-calculate Silver/Gold/Platinum based on LTV |
| Account assignment | ❌ Manual | ✅ Assign specific account manager by region/tier |
Try this MESA template: Tag customers as VIP after $500 spend
Example 2: Low stock inventory alerts ⭐
What it does: Sends email notification when any product variant drops below 10 units, giving you time to reorder before selling out completely.
Business impact:
- Time saved: 2-3 hours/week (eliminates manual inventory checking)
- Stockout prevention: 85-95% reduction in out-of-stock incidents
- Revenue protected: $3,000-8,000/month in prevented lost sales
- Customer satisfaction: Fewer "notify me when back in stock" frustrations
Step-by-step setup:
- Create new workflow in Shopify Flow
- Select trigger: Product → Product variant inventory quantity changed
- Add first condition: Check a condition
- Variable:
Quantity - Operator:
is less than - Value:
10
- Variable:
- Add second condition (nested under first): Check a condition
- Variable:
Quantity prior - Operator:
is greater than or equal to - Value:
10
- Variable:
- Add actions (when both conditions are true):
- Action 1: Add product tags
- Tag:
Low-Stock
- Tag:
- Action 2: Send internal email
- Recipient:
[email protected] - Subject:
LOW STOCK ALERT: {{ product.title }} - Body:
Product: {{ product.title }}\nVariant: {{ productVariant.title }}\nCurrent inventory: {{ quantity }}\nSKU: {{ productVariant.sku }}
- Recipient:
- Action 1: Add product tags
- Save and turn on the workflow
Why the second condition matters:
Without checking "Quantity prior ≥ 10," you'd receive alerts every time inventory decreases:
- Drops from 9 → 8 units: Alert sent ❌
- Drops from 8 → 7 units: Alert sent ❌
- Drops from 7 → 6 units: Alert sent ❌
With the second condition, you only get ONE alert when inventory crosses the threshold from 10 → 9 units. This prevents inbox flooding.
Customization tips:
- Variable thresholds: Create multiple workflows with different thresholds for different product types:
- Fast-movers: Alert at 25 units
- Medium-movers: Alert at 10 units
- Slow-movers: Alert at 5 units
- Collection-based alerts: Add condition "Product is in collection: [Bestsellers]" to set higher thresholds for popular items
- Exclude discontinued: Add condition "Product does NOT have tag: Discontinued" to avoid alerts for items you're phasing out
- Include product image: Use Flow's variable picker to add
{{ product.image }}to email for visual identification
Flow vs MESA:
| Feature | Flow | MESA |
|---|---|---|
| Fixed threshold alerts | ✅ Set to specific number (10 units) | ✅ Set to specific number |
| Variable thresholds | ⚠️ Requires multiple workflows | ✅ Different per product/collection in one workflow |
| Sales velocity calculation | ❌ Not available | ✅ Alert based on "days of stock remaining" |
| Supplier integration | ❌ Manual reorder process | ✅ Auto-email suppliers with calculated quantities |
| Seasonal adjustment | ❌ Fixed threshold year-round | ✅ Increase thresholds Oct-Dec automatically |
| Multi-location support | ⚠️ Separate workflow per location | ✅ Consolidated alerts across locations |
| Reorder task creation | ❌ Email only | ✅ Create Asana/Clickup tasks with reorder details |
Try this MESA template: Send Slack message when Shopify inventory runs low
Example 3: Welcome first-time customers ⭐
What it does: Automatically tags customers on their first purchase and triggers welcome email sequence, creating a positive first impression that drives repeat purchases.
Business impact:
- Repeat purchase rate: 25-30% higher for welcomed customers
- Time saved: 1-2 hours/week (no manual customer segmentation)
- Brand loyalty: Foundation for lifecycle marketing
- Email engagement: 40-50% open rates on welcome emails vs 15-20% on regular campaigns
Step-by-step setup:
- Create new workflow in Shopify Flow
- Select trigger: Order → Order created
- Add condition: Check a condition
- Variable:
Customer → Total orders - Operator:
is equal to - Value:
1
- Variable:
- Add actions (when condition is true):
- Action 1: Add customer tags
- Tag:
First-Time-Buyer
- Tag:
- Action 2: Add order tags
- Tag:
First-Purchase
- Tag:
- Action 3: (Optional) If your email platform has Flow connector:
- Trigger Klaviyo list: "Welcome Sequence"
- OR Add to Mailchimp audience: "New Customers"
- Action 1: Add customer tags
- Save and turn on the workflow
Step-by-step setup (without email platform connector):
If your email platform doesn't have a Flow connector, use this approach:
- Follow steps 1-4 above (tag customer and order)
- In your email platform (Klaviyo, Mailchimp, Omnisend):
- Create a segment: "Customers with tag: First-Time-Buyer"
- Set up automated welcome series triggered by this segment
- Flow adds the tag → Email platform detects tag → Welcome series sends automatically
Customization tips:
- Product-based segmentation: Add additional tags based on first purchase category:
- IF "Product type = Apparel" → Tag "First-Purchase-Apparel"
- IF "Product type = Home Goods" → Tag "First-Purchase-Home"
- Use these tags to send category-specific welcome content
- Include purchase date: Tag customers with "First-Purchase-[Month]-[Year]" for anniversary campaigns
- Order value segmentation: Add condition checking if first order > $100, tag "First-Purchase-High-Value" for VIP onboarding track
- Exclude wholesale: Add condition "Customer does NOT have tag: Wholesale" to avoid sending retail welcome emails to B2B customers
Flow vs MESA:
| Feature | Flow | MESA |
|---|---|---|
| First order detection | ✅ Simple condition | ✅ Simple condition |
| Customer tagging | ✅ Included | ✅ Included |
| Email platform trigger | ⚠️ Only if app has Flow connector | ✅ Klaviyo, Mailchimp, Omnisend, etc. |
| Product-based segmentation | ⚠️ Requires multiple workflows | ✅ Dynamic segmentation in one workflow |
| Personalized content | ⚠️ Limited variables | ✅ Include first product purchased, recommendations |
Try these MESA templates
Example 4: Tag orders by sales channel ⭐
What it does: Automatically tags every order with its source channel (Instagram, Facebook, Online Store, POS, Amazon, etc.) for clean reporting on which platforms drive the most revenue.
Business impact:
- Time saved: 1-2 hours/week (eliminates manual channel tagging)
- Marketing insights: Clear data on which channels produce highest AOV and conversion
- Resource allocation: Optimize ad spend based on actual revenue by channel
- Fulfillment routing: Route orders from different channels to appropriate workflows
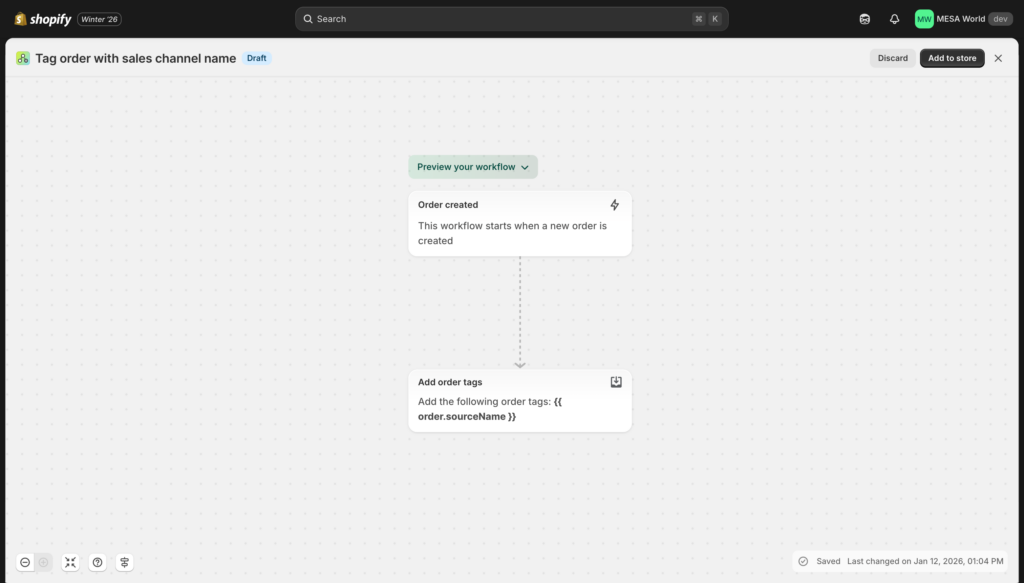
Step-by-step setup:
- Create new workflow in Shopify Flow
- Select trigger: Order → Order created
- Add action (no condition needed):
- Add order tags
- Tag:
Source-{{ order.sourceName }}
- Save and turn on the workflow
How it works:
Flow's {{ order.sourceName }} variable automatically contains the channel name:
Source-webfor online store ordersSource-posfor point-of-sale ordersSource-instagramfor Instagram ShoppingSource-facebookfor Facebook ShopSource-amazonfor Amazon marketplace- And so on for every sales channel you use
Customization tips:
- Standardize naming: Some channels have inconsistent names. Create separate workflows for each major channel:
- IF
Source name = "instagram"→ Tag:Channel-Instagram - IF
Source name = "pos"→ Tag:Channel-POS - This gives you cleaner, more readable tags
- IF
- Add channel-specific workflows: Once orders are tagged by channel, create follow-up workflows:
- Orders tagged "Channel-POS" → Send in-store purchase thank you
- Orders tagged "Channel-Instagram" → Request Instagram story tag from customer
- Orders tagged "Channel-Amazon" → Special packing slip for marketplace orders
- Combine with fulfillment routing: Route Instagram orders to warehouse with branded packaging, POS orders to local fulfillment
Flow vs MESA:
| Feature | Flow | MESA |
|---|---|---|
| Basic channel tagging | ✅ Simple variable insertion | ✅ Simple variable insertion |
| Tag standardization | ⚠️ Multiple workflows needed | ✅ Mapping rules in one workflow |
| Channel-specific actions | ⚠️ Separate workflows per channel | ✅ Conditional logic in one workflow |
| Analytics integration | ❌ Tags only | ✅ Push to MixPanel, Google Sheets for dashboard |
| Historical data | ❌ Only tags new orders | ✅ Backfill tags for historical orders |
| Attribution tracking | ❌ Channel only | ✅ Capture UTM parameters, landing pages |
Example 5: Hide out-of-stock products ⭐
What it does: Automatically unpublishes products from your online store the moment inventory hits zero, preventing frustrated shoppers from attempting to buy unavailable items.
Business impact:
- Time saved: 2-3 hours/week (no manual product visibility management)
- Conversion rate: 8-12% improvement (cleaner catalog without dead ends)
- Customer experience: Fewer "out of stock" frustrations and support tickets
- Lost sales prevention: Customers find available alternatives instead of bouncing
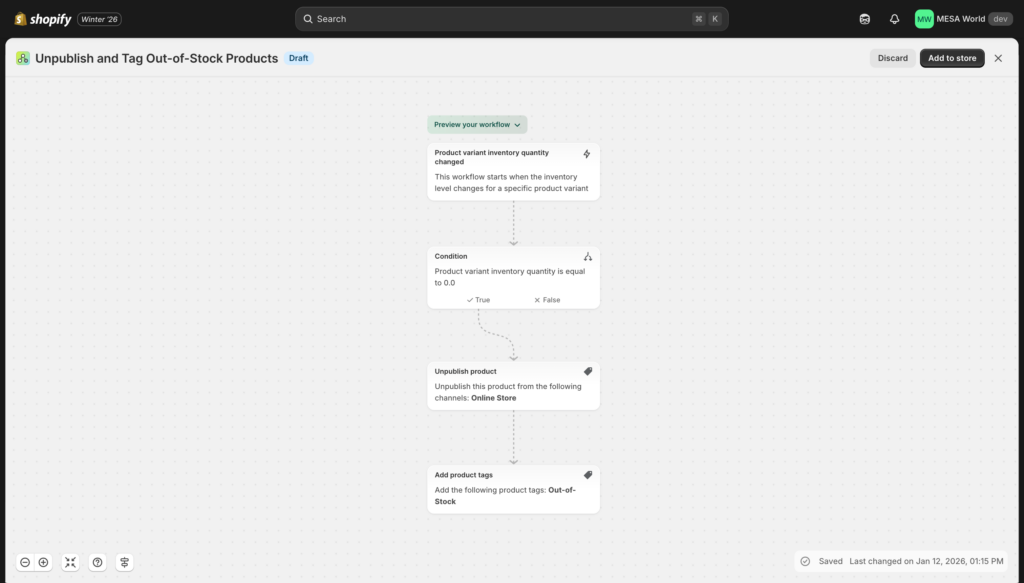
Step-by-step setup:
- Create new workflow in Shopify Flow
- Select trigger: Product → Product variant inventory quantity changed
- Add condition: Check a condition
- Variable:
Quantity - Operator:
is equal to - Value:
0
- Variable:
- Add actions (when condition is true):
- Action 1: Unpublish product
- Publication:
Online Store(or select specific sales channels)
- Publication:
- Action 2: Add product tags
- Tag:
Out-of-Stock
- Tag:
- Action 1: Unpublish product
- Save and turn on the workflow
Important considerations:
Multi-variant products: This workflow unpublishes the ENTIRE product when ANY variant hits zero. If you have a t-shirt with sizes S, M, L, XL and only size M sells out, the entire product becomes hidden.
To handle multi-variant products better, you need more complex logic (see "Advanced tip" below).
Customization tips:
- Tag with timestamp: Instead of just "Out-of-Stock", use "OOS-{{ "now" | date: "%Y-%m-%d" }}" to track when items went out of stock
- Sales channel specific: Unpublish only from specific channels (hide from Online Store but keep on POS for in-store-only inventory)
- Notification addition: Add email action to inventory manager with list of newly out-of-stock products
- Pair with republish workflow: Create companion workflow (see Beginner Example idea) that republishes when inventory > 0
Advanced tip for multi-variant products:
For products with multiple variants, you'd need to:
- Count how many variants have quantity > 0
- Only unpublish if ALL variants = 0
- This requires MESA or advanced Liquid code in Flow
Flow vs MESA:
| Feature | Flow | MESA |
|---|---|---|
| Basic unpublishing | ✅ When any variant hits zero | ✅ When any variant hits zero |
| Multi-variant handling | ❌ Unpublishes entire product | ✅ Only unpublish when all variants OOS |
| Auto-republishing | ⚠️ Requires separate workflow | ✅ Included in same automation |
| "Notify when available" | ❌ Manual setup | ✅ Auto-enable back-in-stock notifications |
| Alternative recommendations | ❌ Not available | ✅ Show similar products on hidden product pages |
| Inventory buffer | ❌ Hide only at zero | ✅ Hide at 2-3 units (prevent overselling) |
Try these MESA templates
You've completed the beginner examples! These five workflows form the foundation of smart store automation. Once you've implemented 2-3 of these and they're running smoothly for a week, you're ready to progress to intermediate examples with more complex logic and app integrations.
Next steps: Choose ONE example from above that addresses your biggest pain point. Build it in the next 15 minutes. Monitor it for a week. Then come back and add another.
Intermediate examples
These examples require understanding conditions, multiple actions, and some business logic. Build time: 20-30 minutes. Best implemented after you're comfortable with beginner workflows and ready for more sophisticated automation.
Example 6: Fraud prevention workflow ⭐⭐
What it does: Automatically detects potentially fraudulent orders using Shopify's risk analysis, holds fulfillment, tags for review, and notifies your fraud team before products ship.
Business impact:
- Chargeback reduction: 40-60% fewer fraudulent orders processed
- Revenue protected: $2,400-5,000/month in prevented fraud losses
- Time saved: 5-8 hours/week on manual fraud review
- False positive reduction: 25% fewer legitimate customers flagged vs manual review
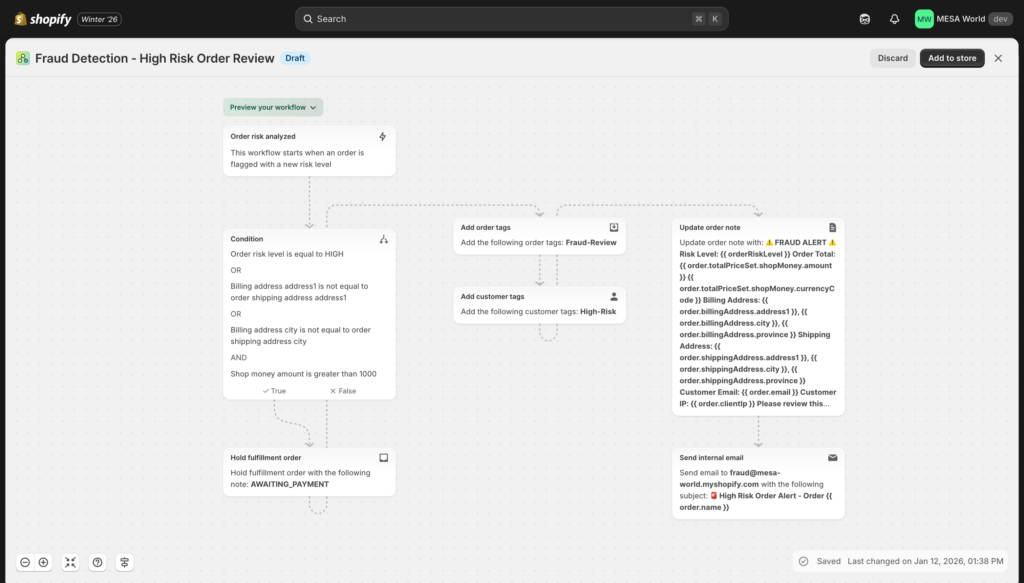
Step-by-step setup:
- Create new workflow in Shopify Flow
- Select trigger: Order → Order risk analyzed
- Add condition group (using OR logic):
- Condition 1: Risk level
- Variable:
Risk level - Operator:
is equal to - Value:
High
- Variable:
- OR
- Condition 2 (nested AND): Billing/shipping mismatch + high value
- Variable:
Billing address → Address1 - Operator:
is not equal to - Variable:
Shipping address → Address1 - AND
- Variable:
Order total - Operator:
is greater than - Value:
1000
- Variable:
- Condition 1: Risk level
- Add actions (when any condition is true):
- Action 1: Hold fulfillment
- Action 2: Add order tags
- Tags:
Fraud-Review,High-Risk
- Tags:
- Action 3: Add customer tags
- Tag:
High-Risk-Customer
- Tag:
- Action 4: Add order note
- Note:
HOLD FOR FRAUD REVIEW - Risk Level: {{ order.risk.level }}, Reason: {{ order.risk.message }}
- Note:
- Action 5: Send internal email
- Recipient:
[email protected] - Subject:
🚨 HIGH RISK ORDER - {{ order.name }} - Body:
Order: {{ order.name }}Customer: {{ customer.email }}Amount: ${{ order.totalPrice }}Risk: {{ order.risk.level }}Details: {{ order.risk.message }}Billing: {{ order.billingAddress.address1 }}Shipping: {{ order.shippingAddress.address1 }}Review at: https://{{ shop.domain }}/admin/orders/{{ order.id }}
- Recipient:
- Save and turn on the workflow
Understanding the condition logic:
This workflow flags orders if EITHER:
- Shopify's risk analysis marks it as "High"
- OR the billing and shipping addresses don't match AND the order is over $1,000
The OR logic casts a wider net—catching both Shopify's automated risk detection AND suspicious patterns you've identified.
Customization tips:
- Geographic risk: Add condition "Shipping country is [high-risk country]" to your OR logic
- Graduated response: Create separate workflows for medium vs high risk:
- Medium risk: Tag only (no hold), notify junior staff
- High risk: Hold fulfillment, escalate to fraud specialist
- Velocity checking: Add condition "Customer total orders = 1" to flag first-time customers making large purchases
- Payment method: If you accept multiple payment methods, add conditions for higher-risk methods (certain gateways, COD)
Flow vs MESA:
| Feature | Flow | MESA |
|---|---|---|
| Shopify risk analysis | ✅ Uses built-in risk score | ✅ Uses built-in risk score |
| Multiple risk factors | ✅ Combine with OR/AND logic | ✅ Combine with OR/AND logic |
| Additional risk signals | ❌ Limited to order data | ✅ IP geolocation, email verification, velocity checks |
| Blacklist management | ❌ Not available | ✅ Check against Google Sheets blacklist |
| Historical fraud patterns | ❌ Can't query past orders | ✅ Check customer's previous risk scores |
| Auto-cancel obvious fraud | ⚠️ Possible but risky without confidence scoring | ✅ With multi-factor confidence scoring |
Try these MESA templates
Example 7: Review request automation ⭐⭐
What it does: Automatically triggers review collection emails through your review platform (Yotpo, Judge.me, Loox) at the optimal time after delivery, with exclusions for unhappy customers.
Business impact:
- Review volume: 25-35% increase with optimized timing
- Time saved: 2 hours/week (no manual review request sending)
- Social proof: More reviews = 15-20% higher conversion rates
- SEO benefit: Fresh review content improves search rankings
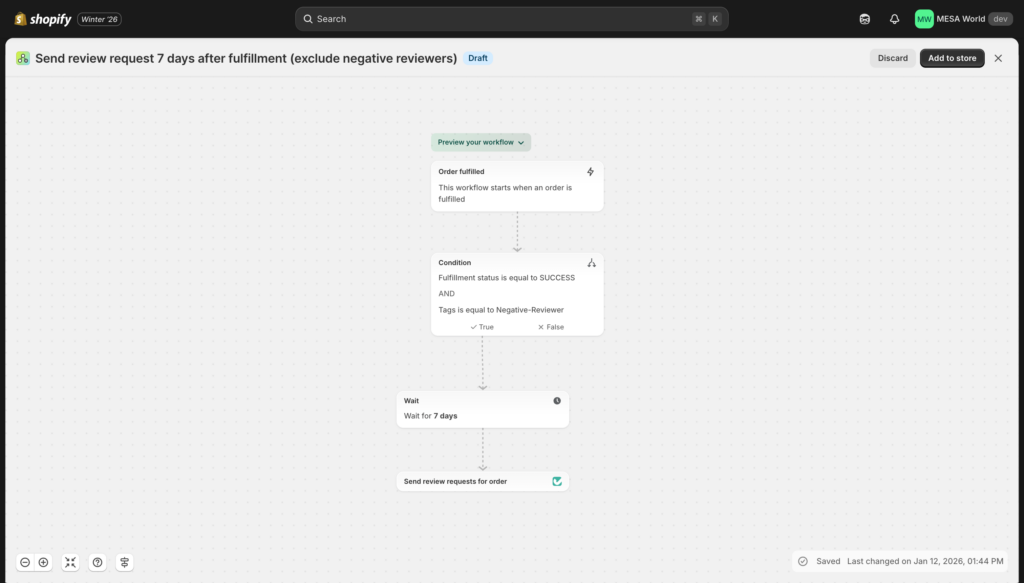
Step-by-step setup:
- Create new workflow in Shopify Flow
- Select trigger: Order → Order fulfilled
- Add condition 1: Check fulfillment status
- Variable:
Fulfillment status - Operator:
is equal to - Value:
Fulfilled
- Variable:
- Add condition 2 (nested): Exclude problem customers
- Variable:
Customer tags - Operator:
does not contain - Value:
Negative-Reviewer
- Variable:
- Add action 1: Wait for time delay
- Duration:
7 days
- Duration:
- Add action 2: (Depends on your review app)
- If using Yotpo: Trigger Yotpo → Send review request
- If using Judge.me: Trigger Judge.me → Request review
- If using Loox: Trigger Loox → Send review email
- If no connector: Send email to review platform API endpoint
- Save and turn on the workflow
Optimal timing research:
Don't send review requests immediately after fulfillment. Customers need time to receive and use products:
- Fast consumables (skincare, snacks, supplements): 7 days after delivery
- Durable goods (furniture, electronics, appliances): 14-21 days (time to use product)
- Apparel & accessories: 10 days (time to wear and wash)
- Subscription boxes: 5-7 days (opens quickly, uses immediately)
Adjust the "Wait" duration based on your product category.
Customization tips:
- Product-specific timing: Create multiple workflows with different wait times:
- Apparel products → Wait 10 days
- Electronics → Wait 21 days
- Food/beverage → Wait 7 days
- Exclude unhappy customers: Tag customers who leave 1-2 star reviews as "Negative-Reviewer" (using another workflow) to prevent review request fatigue
- Incentivize reviews: Include discount code in review request for next purchase
- A/B test timing: Create two workflows with 7-day vs 14-day delays, track which gets better response rates
Setting up the "Negative-Reviewer" tag workflow:
Create a companion workflow:
- Trigger: Product review created (if app supports)
- Condition: Review rating < 3 stars
- Action: Tag customer "Negative-Reviewer"
This prevents future review requests to customers who've already left negative feedback.
Flow vs MESA:
| Feature | Flow | MESA |
|---|---|---|
| Basic review trigger | ✅ If app has Flow connector | ✅ All major review apps |
| Timing customization | ✅ Fixed wait duration | ✅ Dynamic by product type/category |
| Exclude negative reviewers | ⚠️ Requires manual tagging | ✅ Automatic exclusion based on past ratings |
| Personalization | ⚠️ Limited variables | ✅ Product images, purchase details, names |
| Delivery confirmation | ⚠️ Based on fulfillment only | ✅ Wait for actual delivery (tracking integration) |
| Review rate tracking | ❌ Manual | ✅ Track conversion by segment |
Try these MESA templates
Example 8: B2B wholesale order routing ⭐⭐
What it does: Automatically identifies wholesale/B2B orders and routes them through special handling—dedicated fulfillment, account manager notification, payment terms application, and custom workflows.
Business impact:
- Time saved: 4-6 hours/week (eliminates manual B2B order identification)
- Processing accuracy: 95%+ of wholesale orders get proper treatment
- Account management: Ensures every B2B order reaches assigned rep
- Revenue protection: Proper payment terms prevent fulfillment before payment
Step-by-step setup:
- Create new workflow in Shopify Flow
- Select trigger: Order → Order created
- Add condition group (OR logic):
- Condition 1: Check customer tag
- Variable:
Customer tags - Operator:
contains - Value:
Wholesale
- Variable:
- OR
- Condition 2: Check if B2B customer (Shopify Plus)
- Variable:
Customer → Company - Operator:
is not empty
- Variable:
- Condition 1: Check customer tag
- Add actions (when conditions met):
- Action 1: Add order tags
- Tags:
B2B-Order,Wholesale,NET-30
- Tags:
- Action 2: Add order note
- Note:
WHOLESALE ORDER - NET 30 TERMS. Do not ship until payment verified. Account Manager: [assign based on region]. Company: {{ customer.company.name }}
- Note:
- Action 3: Send internal email
- Recipient:
[email protected] - Subject:
New B2B Order from {{ customer.company.name }} - Body:
Company: {{ customer.company.name }}Contact: {{ customer.firstName }} {{ customer.lastName }}Order #: {{ order.name }}Amount: ${{ order.totalPrice }}Review order: https://{{ shop.domain }}/admin/orders/{{ order.id }}
- Recipient:
- Action 4: (If multi-location) Assign fulfillment location
- Location:
Wholesale Warehouse
- Location:
- Action 1: Add order tags
- Save and turn on the workflow
Customization tips:
- Account manager assignment: Create separate workflows for different regions:
- IF "Shipping state = CA, OR, WA" → Email
[email protected] - IF "Shipping state = NY, NJ, CT" → Email
[email protected]
- IF "Shipping state = CA, OR, WA" → Email
- Tiered wholesale handling:
- IF "Customer tag contains: Wholesale-Tier-1" → NET-30 + 40% discount verification
- IF "Customer tag contains: Wholesale-Tier-2" → NET-15 + 30% discount verification
- Minimum order enforcement: Add condition "Order total < $500" → Tag "Below-Minimum" + notify sales team
- Custom packing slips: Route B2B orders to different packing slip template (company logo, no pricing)
Flow vs MESA:
| Feature | Flow | MESA |
|---|---|---|
| Basic B2B identification | ✅ Tag or company detection | ✅ Tag or company detection |
| Account manager routing | ⚠️ Static email addresses | ✅ Dynamic assignment by territory/tier |
| ERP integration | ❌ Not available | ✅ Sync to Odoo, QuickBooks |
| Payment terms management | ⚠️ Note only, manual enforcement | ✅ Integrate with accounting system |
| Pricing verification | ❌ Not available | ✅ Flag if discount doesn't match tier |
| Volume discount validation | ❌ Manual | ✅ Auto-verify quantity breaks applied |
Try these MESA templates
Example 9: Rush order expedited handling ⭐⭐
What it does: Automatically detects orders with expedited shipping and prioritizes them through your fulfillment process with immediate notifications and special handling tags.
Business impact:
- SLA compliance: 98% on-time shipping (up from 85% manual)
- Time saved: 2 hours/week (no manual rush order identification)
- Customer satisfaction: Fewer complaints about missed delivery promises
- Premium revenue: Protect 5-8% revenue from expedited shipping fees

Step-by-step setup:
- Create new workflow in Shopify Flow
- Select trigger: Order → Order created
- Add condition group (using OR logic):
- Condition 1: Shipping method name
- Variable:
Shipping line → Title - Operator:
contains - Value:
Express
- Variable:
- OR
- Condition 2:
- Variable:
Shipping line → Title - Operator:
contains - Value:
Overnight
- Variable:
- OR
- Condition 3:
- Variable:
Shipping line → Title - Operator:
contains - Value:
2-Day
- Variable:
- Condition 1: Shipping method name
- Add actions (when any condition true):
- Action 1: Add order tags
- Tags:
Rush-Order,Priority-Fulfillment
- Tags:
- Action 2: Add order note
- Note:
⚠️ EXPEDITED SHIPPING - {{ order.shippingLine.title }}MUST SHIP TODAY by 3pm for on-time deliveryDelivery promise: [calculate based on method]
- Note:
- Action 3: Send internal email
- Recipient:
[email protected] - Subject:
🚨 RUSH ORDER {{ order.name }} - Ship Today - Body:
EXPEDITED SHIPPING SELECTEDOrder: {{ order.name }}Shipping: {{ order.shippingLine.title }}Customer: {{ customer.firstName }} {{ customer.lastName }}Destination: {{ order.shippingAddress.city }}, {{ order.shippingAddress.provinceCode }}Process immediately.
- Recipient:
- Action 1: Add order tags
- Save and turn on the workflow
Advanced setup with SMS (requires MESA):
Add SMS notification to warehouse manager's mobile for immediate awareness:
- Send SMS:
RUSH ORDER {{ order.name }} - {{ order.shippingLine.title }} - Ship by 3pm today
Customization tips:
- Urgency levels: Create tags based on shipping speed:
- Overnight → Tag "Rush-Priority-1" (most urgent)
- 2-Day → Tag "Rush-Priority-2"
- Express → Tag "Rush-Priority-3"
- Cut-off time enforcement: Add condition "Order created before 2pm" → Different handling for after-hours rush orders
- Specific carrier routing: Match expedited orders to fastest carrier:
- Overnight → Auto-select FedEx Priority Overnight
- 2-Day → Auto-select UPS 2nd Day Air
- Holiday rush: During peak season (Nov-Dec), treat ALL orders as rush to meet holiday delivery promises
Flow vs MESA:
| Feature | Flow | MESA |
|---|---|---|
| Shipping method detection | ✅ Keyword matching | ✅ Keyword matching |
| Email notifications | ✅ Standard alerts | ✅ HTML formatted with priority styling |
| SMS alerts | ❌ Not available | ✅ Send to warehouse manager mobile |
| Carrier selection | ❌ Manual | ✅ Auto-select fastest carrier by destination |
| SLA monitoring | ❌ Not available | ✅ Track processing time, escalate if delayed |
| Priority queue | ⚠️ Tag only, manual prioritization | ✅ Integrate with 3PL API for queue position |
| Shipping label creation | ❌ Manual | ✅ Auto-generate draft labels |
Try these MESA templates
Example 10: International order customs preparation ⭐⭐
What it does: Automatically flags international shipments and prepares them for customs documentation, reducing delays and ensuring compliance with destination country requirements.
Business impact:
- Time saved: 2 hours/week on customs prep
- Customs delays: Reduced from 15% to 3% of shipments
- Customer satisfaction: Faster international delivery
- Compliance: Fewer rejected shipments due to documentation errors
Step-by-step setup:
- Create new workflow in Shopify Flow
- Select trigger: Order → Order created
- Add condition: Check shipping destination
- Variable:
Shipping address → Country code - Operator:
is not equal to - Value:
US(or your store's country)
- Variable:
- Add actions (when condition true):
- Action 1: Add order tags
- Tags:
International,Customs-Required,Ship-{{ order.shippingAddress.countryCode }}
- Tags:
- Action 2: Add order note
- Note:
INTERNATIONAL SHIPMENT to {{ order.shippingAddress.country }}Requires customs documentationDeclared value: ${{ order.totalPrice }}HS codes required: Check products for codesRestricted items: Verify destination allows all products
- Note:
- Action 3: Send internal email
- Recipient:
[email protected] - Subject:
International Order {{ order.name }} - {{ order.shippingAddress.country }} - Body:
Destination: {{ order.shippingAddress.city }}, {{ order.shippingAddress.country }}Value: ${{ order.totalPrice }}Items: {{ order.lineItems.size }}Required documents:- Commercial invoice- Customs declaration- HS codes for all itemsReview order: https://{{ shop.domain }}/admin/orders/{{ order.id }}
- Recipient:
- Action 1: Add order tags
- Save and turn on the workflow
Customization tips:
- High-value threshold: Add condition "Order total > $800" (or your country's de minimis value) → Tag "Customs-Duties-Required" + additional documentation notice
- Restricted countries: Create separate workflows for high-risk destinations requiring extra compliance:
- IF "Country = Russia or China or Brazil" → Tag "Enhanced-Customs" + escalate to compliance team
- Product restrictions: Add conditions checking for restricted items:
- IF "Product type = Cosmetics" AND "Shipping to EU" → Tag "Requires-Cosmetics-Certificate"
- IF "Product type = Food" → Tag "Perishable-Customs" + expedited processing
- Region-specific handling:
- EU shipments → IOSS number required
- Canada/Mexico → USMCA certificate beneficial
- Australia → Strict biosecurity documentation
Flow vs MESA:
| Feature | Flow | MESA |
|---|---|---|
| International detection | ✅ Country comparison | ✅ Country comparison |
| Basic customs flagging | ✅ Tag and notify | ✅ Tag and notify |
| HS code lookup | ❌ Manual | ✅ Auto-populate from product database |
| Commercial invoice | ❌ Manual creation | ✅ Auto-generate PDF |
| Restricted item checking | ⚠️ Manual conditions | ✅ Database of country restrictions |
| Duties calculation | ❌ Not available | ✅ Estimate duties for customer |
| Courier integration | ❌ Manual | ✅ Create customs documents via ShipStation/ShipBob |
| Compliance tracking | ❌ Not available | ✅ Flag permits needed, track expiration |
You've completed the intermediate examples! These five workflows introduce multi-condition logic, app integrations, and more sophisticated business rules. Once you've successfully implemented 2-3 intermediate examples and they're running smoothly, you're ready for advanced workflows requiring external data, scheduled triggers, and complex automation.
Next steps: Choose one intermediate example that solves a current operational challenge. Build it following the step-by-step instructions. Test thoroughly. Monitor for 1-2 weeks. Then add another.
Advanced examples
These examples combine multiple conditions, require external integrations, use scheduled triggers, or implement complex business logic that Flow cannot handle natively. Build time: 45-60 minutes. These workflows require MESA or advanced Flow techniques. Best implemented after mastering beginner and intermediate workflows.
Example 11: Multi-order consolidation ⭐⭐⭐
Why it's advanced: Requires querying order history, comparing timestamps across multiple orders, and coordinating actions on orders that aren't the current trigger.
What it does: Detects when a customer places 2+ orders within 24 hours and automatically holds all orders to ship together in one package, reducing shipping costs and improving the customer experience.
Business impact:
- Shipping cost savings: $400-600/month (15-25% reduction on multi-order customers)
- Time saved: 2-3 hours/week (eliminates manual consolidation checks)
- Better unboxing experience: One package vs 3-4 small packages
- Environmental benefit: Less packaging waste, fewer shipments
Why Flow can't do this:
Shopify Flow lacks critical capabilities:
- No order history queries: Can't search for "customer's other orders in last 24 hours"
- No timestamp comparisons: Can't calculate "is this order within 24 hours of previous order?"
- No cross-order actions: Can't apply tags to multiple orders simultaneously
- No counting/aggregation: Can't count how many orders exist in a time window
MESA implementation:
- Trigger: Order created
- Get Order Data action: Query orders
- Filter:
Customer ID = {{ order.customer.id }} - Date range: Last 24 hours
- Status: Any (unpaid, paid, fulfilled)
- Filter:
- Condition: Check order count
- Variable:
{{ orders.length }} - Operator:
is greater than or equal to - Value:
2
- Variable:
- Loop action: For each order in results
- Sub-action 1: Update order
- Add tag:
CONSOLIDATE - Hold fulfillment:
true
- Add tag:
- Sub-action 2: Add order note
- Note:
Part of consolidation group - {{ orders.length }} orders. Ship together with: [list order numbers]
- Note:
- Sub-action 1: Update order
- Send email: Notify warehouse
- Recipient:
[email protected] - Subject:
🎁 CONSOLIDATE SHIPMENT - Customer {{ customer.firstName }} {{ customer.lastName }} - Body:
Customer placed {{ orders.length }} orders in 24 hours. Consolidate into single shipment:[Loop through orders listing order numbers, items, totals]Total consolidated value: $[sum of all order totals]
- Recipient:
- Send email: Notify customer
- Recipient:
{{ customer.email }} - Subject:
Your orders are being combined for eco-friendly shipping - Body:
Great news! We noticed you placed multiple orders and we're combining them into one shipment to reduce packaging waste. You'll receive one package with all your items.Orders included:[List order numbers]Expected ship date: [tomorrow's date]Thank you for helping us reduce our environmental impact!
- Recipient:
Setup requirements:
- MESA subscription
- Understanding of "Get Data" actions and filtering
- Basic loop logic familiarity
- Time to test with historical data
Customization tips:
- Time window adjustment:
- Domestic orders: 24-hour window
- International orders: 48-hour window (longer processing time anyway)
- Same-day orders: 4-hour window for same-day shipping promises
- Product category exceptions:
- Exclude perishables (can't wait for consolidation)
- Exclude time-sensitive items (gifts with delivery dates)
- Exclude pre-orders (different fulfillment timeline)
- Subscription order handling: Exclude subscription orders (separate fulfillment schedule)
- Value threshold: Only consolidate if combined value > $50 (below that, consolidation isn't worth delay)
Advanced features:
- Intelligent routing: If orders contain items from different warehouses, don't consolidate (would require inter-warehouse transfer)
- Customer notification timing: Wait 2 hours after second order before notifying (in case they place a third order)
- Automatic release: If 24 hours pass with no additional orders, automatically unhold and ship
- Tracking consolidation: Track monthly savings in Google Sheets dashboard
Testing strategy:
- Create test customer account
- Place 2 test orders within minutes
- Verify both orders get tagged and held
- Check that emails send with correct order details
- Confirm warehouse can identify which orders to combine
- Test edge cases: 3 orders, orders 23 hours apart, orders with different shipping addresses
Example 12: Win-back campaign trigger ⭐⭐⭐
Why it's advanced: Requires scheduled daily triggers, customer history analysis, date calculations, and email platform API integration.
What it does: Runs daily automated checks to identify customers with no purchase in 90+ days and automatically triggers segmented re-engagement campaigns with escalating offers.
Business impact:
- Revenue recovered: $800-2,000/month from customers who were drifting away
- Churn prevention: 10-15% of at-risk customers return
- Time saved: 3 hours/week (eliminates manual customer segmentation)
- Automated lifecycle marketing: Set it once, runs forever
Why Flow can't do this:
Shopify Flow lacks essential capabilities:
- No scheduled triggers: Can't run daily/weekly checks automatically
- No customer data queries: Can't fetch "all customers" and filter by order history
- No date calculations: Can't calculate "days since last order" dynamically
- No email platform API triggers: Can't trigger Klaviyo/Mailchimp sequences programmatically
MESA implementation:
- Schedule Trigger:
- Frequency: Daily
- Time: 9:00 AM (adjust to your timezone)
- Get Customer Data action: Fetch customers with orders
- Query: All customers
- Include: Last order date, order count, total spent
- Filter: Has placed at least one order (exclude never-purchased)
- Transform data: Calculate days since last order
- For each customer:
days_inactive = (today - last_order_date)
- For each customer:
- Filter condition: Segment 90-day inactive
- Condition:
days_inactive >= 90ANDdays_inactive < 91 - Result: Customers who hit exactly 90 days today
- Condition:
- Loop: For each 90-day inactive customer
- Sub-action 1: Update Shopify customer
- Add tag:
At-Risk-Churn-90
- Add tag:
- Sub-action 2: Trigger Klaviyo flow
- API endpoint: Klaviyo list/profile
- List: "90-Day Win-Back"
- Profile: Customer email, name, last product purchased
- Sub-action 3: (Optional) Update CRM
- HubSpot/Salesforce: Set contact status = "At Risk"
- Sub-action 1: Update Shopify customer
- Repeat steps 4-5 for other segments:
- 120-day segment: Tag
At-Risk-Churn-120, trigger "Last Chance" flow with 20% discount - 180+ day segment: Tag
Lost-Customer, suppress from marketing (save costs)
- 120-day segment: Tag
- Send summary report: Daily digest email
- Recipient:
[email protected] - Subject:
Daily Win-Back Report - {{ date }} - Body:
Today's churn segments:- 90-day: {{ count_90 }} customers tagged- 120-day: {{ count_120 }} customers tagged- 180+ day: {{ count_180 }} customers suppressedTotal win-back emails triggered: {{ total_triggered }}
- Recipient:
Setup requirements:
- MESA subscription
- Email marketing platform with API access (Klaviyo, Mailchimp, Omnisend)
- Pre-built email sequences in your platform:
- 90-day: "We miss you" gentle reminder
- 120-day: "Last chance" with escalated discount (20% off)
- 180+ day: Suppression to avoid wasting sends
- Historical purchase data for initial segmentation
Customization tips:
- Product-based win-back:
- Consumables (skincare, supplements): 60-day window (faster repurchase cycle)
- Durable goods (furniture, electronics): 180-day window (longer repurchase cycle)
- Apparel: 90-day window (seasonal refresh)
- Exclude active subscribers: Add condition "Customer does NOT have tag: Active-Subscriber" (they're still engaged via subscriptions)
- VIP handling: Different win-back offers by customer tier:
- VIP customers: Personalized call from account manager at 60 days
- Regular customers: Standard email sequence
- Seasonal adjustments: Pause win-back campaigns during holiday season (customers naturally return then)
Advanced features:
- Predictive churn: Use purchase frequency to predict churn earlier (customer who bought every 30 days but hasn't in 45 days)
- Recommended products: Include last-purchased items or complementary products in win-back emails
- Multi-channel approach:
- 90 days: Email only
- 120 days: Email + retargeting ads on Facebook/TikTok
- 150 days: Email + SMS (last attempt before suppression)
Expected results:
- Email open rates: 18-25% (higher than regular campaigns due to relevance)
- Click-through rates: 8-12%
- Conversion rates: 3-5% of recipients make purchase
- ROI: For every $1 spent on win-back campaigns, expect $6-10 return
Testing strategy:
- Run initial query to identify current segment sizes
- Start with 90-day segment only (test on smaller group)
- Monitor email deliverability and engagement rates
- Verify customers are properly tagged in Shopify
- Check email platform for sequence triggering
- After 2 weeks of data, add 120-day segment
- After 1 month, add 180+ day suppression
Example 13: Seasonal inventory threshold adjustment ⭐⭐⭐
Why it's advanced: Requires date-based logic, dynamic threshold calculations, and scheduled automation to adjust inventory alerts based on season.
What it does: Automatically increases low-stock alert thresholds during peak seasons (Q4 holiday) and returns them to normal levels during slower periods, preventing stockouts during high demand without carrying excess inventory year-round.
Business impact:
- Stockout prevention: 95%+ availability during peak season
- Time saved: 5 hours/week during seasonal transitions (no manual threshold updates)
- Cash flow optimization: 15-20% reduction in off-season inventory carrying costs
- Demand planning: Automated adjustment eliminates human error
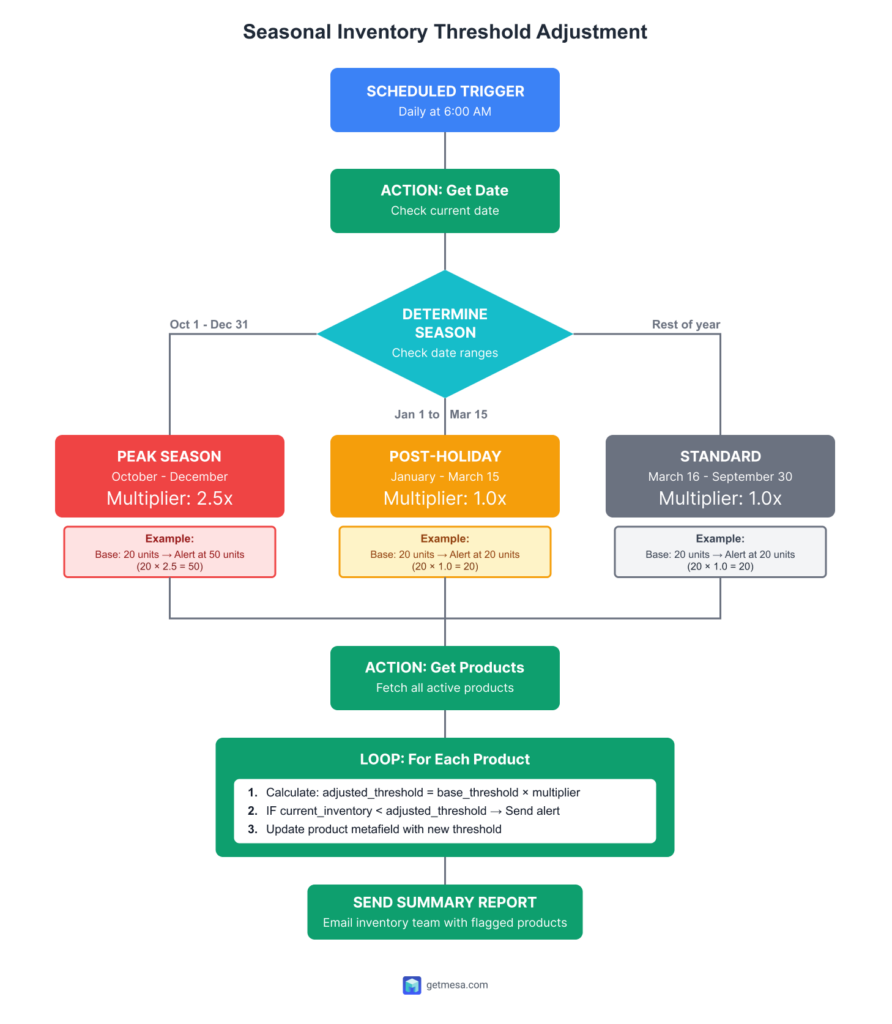
Why Flow can't do this:
Shopify Flow cannot:
- Run scheduled checks: No time-based triggers
- Perform date calculations: Can't check "is today between Oct 1 and Dec 31?"
- Store variable thresholds: Can't maintain per-product thresholds
- Update metafields: Can't write threshold values back to products
- Do mathematical calculations: Can't multiply base threshold × seasonal multiplier
MESA implementation:
- Trigger: Schedule
- Frequency: Daily
- Time: 6:00 AM
- Get current date action: Store today's date
- Variable:
current_date
- Variable:
- Determine season action: Conditional logic
IF current_date between Oct 1 and Dec 31:
season = "peak" multiplier = 2.5ELSE IF current_date between Jan 1 and Mar 15:
season = "post-holiday" multiplier = 1.0ELSE:
season = "standard" multiplier = 1.0 - Get Products action: Fetch all active products
- Filter: Status = Active
- Include: Variants, inventory levels, base threshold metafield
- Loop: For each product
- Sub-action 1: Calculate adjusted threshold
- Formula:
adjusted_threshold = base_threshold × multiplier - Example: Base = 20 units → Peak season = 20 × 2.5 = 50 units
- Formula:
- Sub-action 2: Check current inventory
- IF
current_inventory < adjusted_threshold:- Send low stock alert
- Tag product:
Low-Stock-Seasonal - Email: Include product, current stock, adjusted threshold
- IF
- Sub-action 3: Update product metafield
- Metafield:
custom.seasonal_threshold - Value:
{{ adjusted_threshold }} - Purpose: Track what threshold is currently active
- Metafield:
- Sub-action 1: Calculate adjusted threshold
- Send summary report: Daily digest
- Count products flagged as low stock
- List top 10 products closest to threshold
- Show current season and multiplier in effect
Setup requirements:
- MESA subscription
- Product metafield setup:
custom.base_threshold(Integer) - Store base reorder point for each productcustom.seasonal_threshold(Integer) - Current adjusted threshold
- Historical sales data to determine appropriate base thresholds and multipliers
Customization tips:
- Product-specific multipliers:
- Seasonal products (decorations, holiday items): 3x multiplier
- Evergreen products (basics, essentials): 1.5x multiplier
- Subscription items: No adjustment (predictable demand)
- Regional variations:
- US-centric business: October-December peak
- Australia: November-January peak (summer holidays)
- Multiple regions: Weighted multiplier based on sales distribution
- Pre-season buffer:
- Start increasing thresholds September 15 (before peak demand)
- Ensures stock arrives before crush begins
- Adjust lead times into multiplier calculation
- Category-based timing:
- Back-to-school items: August peak (2x multiplier)
- Summer apparel: May-July peak
- Different workflows for different product categories
Advanced features:
- Sales velocity integration: Instead of fixed multiplier, calculate based on actual sales trends:
multiplier = (last_30_days_sales / historical_average_sales) × 1.2 - Supplier lead time consideration:
- Products with 30-day lead time: Start increasing threshold earlier
- Products with 7-day lead time: Can wait longer to adjust
- Formula:
adjusted_threshold = base × multiplier × (lead_time_days / 7)
- Automated reorder triggering: When threshold is crossed, automatically:
- Generate purchase order draft
- Email supplier with quantities needed
- Create task in project management tool
Example threshold calculations:
Product: Winter Coat
- Base threshold: 15 units
- Historical Q4 sales: 150 units/month (vs 30 units/month average)
- Lead time: 45 days
- October 1 adjustment: 15 × 2.5 × 1.5 (lead time factor) = 56 units
- Alert triggers when inventory drops below 56 units
Product: Basic T-Shirt
- Base threshold: 50 units
- Consistent year-round sales: 200 units/month
- Lead time: 14 days
- October 1 adjustment: 50 × 1.5 (slight bump) = 75 units
- Alert triggers when inventory drops below 75 units
Testing strategy:
- Start with small product subset (10-20 SKUs)
- Run manual calculation to verify math is correct
- Compare historical peak season stockouts to baseline
- Monitor first seasonal transition closely
- Adjust multipliers based on actual performance
- Expand to full catalog after successful pilot
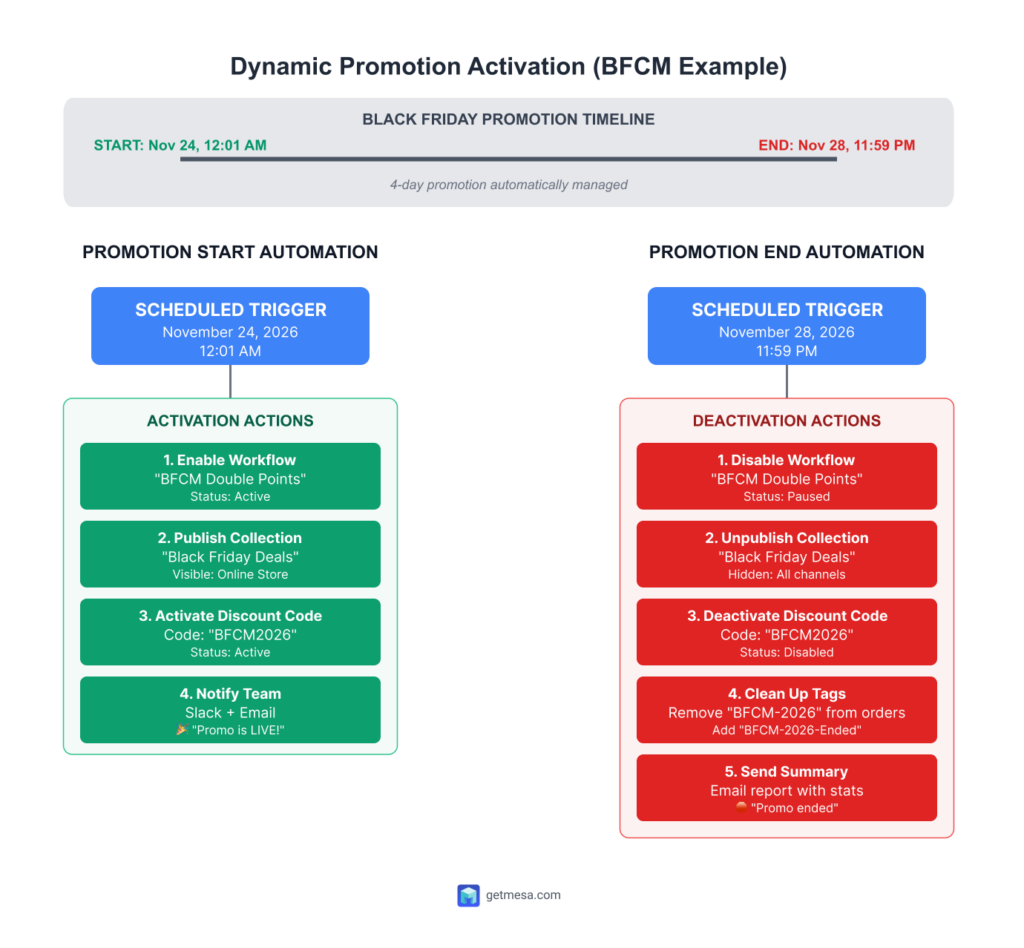
Example 14: Dynamic promotion activation ⭐⭐⭐
Why it's advanced: Requires scheduled triggers to automatically activate and deactivate workflows, discount codes, or collection visibility at precise times without manual intervention.
What it does: Automatically enables seasonal promotion workflows at scheduled times (Black Friday double points starts Nov 24 at 12:01 AM), runs them for the promotional period, then disables them and cleans up promotional tags when the sale ends.
Business impact:
- Time saved: 3-4 hours during promotional periods (no manual activation/deactivation)
- Error prevention: 100% reliable timing (never forget to start or end promotions)
- Team coordination: Eliminates "who's turning on the BFCM workflow?" confusion
- Clean data: Automatic tag cleanup prevents promotional tags lingering on old orders
Why Flow can't do this:
Shopify Flow cannot:
- Schedule workflow activation: No ability to enable/disable other workflows programmatically
- Control discount codes: Can't activate or deactivate discount codes
- Publish/unpublish collections: No control over collection visibility
- Time-based cleanup: Can't remove tags from historical orders in bulk
MESA implementation:
Part 1: Promotion Start Automation
- Trigger: Schedule
- Date: November 24, 2026
- Time: 12:01 AM (your timezone)
- Enable workflow action: Activate BFCM workflow
- Workflow ID: "bfcm-double-loyalty-points"
- Status:
On
- Update collection: Make sale collection visible
- Collection: "Black Friday Deals"
- Published:
true - Sales channels: Online Store, Mobile App
- Activate discount code: Enable promo code
- Code:
BFCM2026 - Active:
true
- Code:
- Send notifications:
- Slack: Post to #marketing channel
- Message:
🎉 BLACK FRIDAY PROMOTION IS NOW LIVE! Double points workflow activated. BFCM2026 code enabled.
- Message:
- Email: To marketing team
- Subject:
✅ BFCM Promotion Started Successfully - Body: Confirmation of all activated components
- Subject:
- Slack: Post to #marketing channel
Part 2: Promotion End Automation
- Trigger: Schedule
- Date: November 28, 2026
- Time: 11:59 PM (your timezone)
- Disable workflow action: Deactivate BFCM workflow
- Workflow ID: "bfcm-double-loyalty-points"
- Status:
Off
- Update collection: Hide sale collection
- Collection: "Black Friday Deals"
- Published:
false
- Deactivate discount code: Disable promo code
- Code:
BFCM2026 - Active:
false
- Code:
- Clean up promotional tags:
- Get all orders with tag "BFCM-2026"
- Loop through orders
- Remove tag: "BFCM-2026"
- Add tag: "BFCM-2026-Ended" (for historical tracking)
- Send notifications:
- Slack: Post to #marketing
- Message:
🛑 Black Friday promotion has ended. All workflows disabled. {{ order_count }} orders processed during sale.
- Message:
- Email: To marketing team with summary
- Total orders during promotion
- Total revenue
- Most popular products
- Discount code usage stats
- Slack: Post to #marketing
Setup requirements:
- MESA subscription
- Pre-built workflows that will be activated/deactivated
- Discount codes created in Shopify (but set to inactive initially)
- Collections prepared and ready to publish
- Test environment to verify timing and actions
Customization tips:
- Multiple promotions: Create separate scheduled workflows for each campaign:
- BFCM: Nov 24-28
- Cyber Monday: Nov 29-30
- Holiday shipping cutoff: Dec 15
- New Year sale: Jan 1-5
- Graduated activation: Phase promotions in stages:
- 12:01 AM: VIP early access (tag-based workflow)
- 6:00 AM: General public access (everyone)
- 11:59 PM: Sale ends
- Geographic variations:
- Enable promotion at midnight in each timezone
- US East Coast: 12:01 AM EST
- US West Coast: 12:01 AM PST (3 hours later)
- International: 12:01 AM local time
- Failsafe notifications: Send alerts if actions fail
- IF workflow enable fails → Page on-call engineer
- IF discount code doesn't activate → Immediate team alert
Advanced features:
- Pre-promotion warmup:
- 24 hours before: Send "Coming Soon" emails to VIPs
- 2 hours before: Send countdown email to all subscribers
- 30 minutes before: Slack reminder to support team
- Real-time monitoring:
- Every 15 minutes during promotion: Check order volume
- IF orders spike >200% normal → Alert team of traffic surge
- IF orders drop to zero → Alert team of potential site issue
- Post-promotion analysis:
- Automatically generate Google Sheets report
- Compare this year's performance to last year
- Email summary to executive team
Testing strategy:
- Test in staging environment:
- Schedule test promotion for tomorrow at 1:00 PM
- Verify all actions execute correctly
- Confirm notifications send
- Check workflow enables/disables properly
- Dry run before live promotion:
- Schedule "test activation" 1 week before actual promotion
- Execute all steps but with test workflows/collections
- Verify timing is correct
- Confirm team receives notifications
- Monitor first live promotion closely:
- Have team member awake at activation time
- Verify promotion started correctly
- Check customer-facing elements (collection visible, code works)
- Document any issues for next promotion
Example 15: Intelligent fulfillment routing ⭐⭐⭐
Why it's advanced: Requires querying multiple data sources (inventory at multiple locations, shipping zones, carrier performance), complex decision trees based on product availability and delivery promises, and integration with fulfillment systems.
What it does: Automatically analyzes each order and intelligently routes it to the optimal fulfillment location based on inventory availability, customer proximity, carrier performance, product type, and delivery speed requirements—minimizing shipping costs while maximizing delivery speed.
Business impact:
- Shipping cost reduction: 20-30% savings through optimized routing
- Delivery speed: 25% faster average delivery times
- Time saved: 6-8 hours/week (eliminates manual order routing decisions)
- Customer satisfaction: 95%+ on-time delivery through smart carrier selection
- Inventory optimization: Balanced inventory draw across locations
Why Flow can't do this:
Shopify Flow cannot:
- Query multi-location inventory: Can't check stock levels across warehouses simultaneously
- Perform complex calculations: Can't calculate shipping zones or compare distances
- Access external carrier data: No integration with carrier performance analytics
- Make multi-factor decisions: Limited conditional logic for complex decision trees
- Update fulfillment locations dynamically: Can't programmatically assign to specific warehouses
MESA implementation:
- Trigger: Order created
- Get inventory data: Check all locations
- Location 1: Los Angeles warehouse
- Location 2: Chicago warehouse
- Location 3: New Jersey warehouse
- For each line item: Check inventory availability
- Calculate fulfillment options:
For each location:- Check if has all items in stock- Calculate shipping zone to customer- Look up carrier performance to destination- Check location-specific constraints - Decision tree - Location selection:
Priority 1: Inventory availabilityIF only one location has full inventory:→ Route to that location→ Skip further logicIF multiple locations have full inventory:→ Continue to Priority 2IF no location has full inventory:→ Tag "Split-Shipment-Required"→ Route each item to nearest location with stock→ Notify customer of multiple shipments
Priority 2: Shipping speed requirementsIF order has expedited shipping:→ Route to location closest to customer→ Select fastest carrier to zoneIF order is standard shipping:→ Continue to Priority 3
Priority 3: Cost optimizationCalculate shipping cost from each location:LA to customer: $8.50 (Zone 6)Chicago to customer: $6.25 (Zone 4)NJ to customer: $5.75 (Zone 3)Route to location with lowest shipping cost
Priority 4: Inventory balancingIF multiple locations have equal shipping cost:→ Check inventory levels→ Route to location with highest stock levels→ Goal: Prevent any one warehouse from running out - Select optimal carrier:
For destination zone:- Check carrier on-time performance (last 30 days)- UPS: 96% on-time- FedEx: 94% on-time- USPS: 89% on-timeIF expedited shipping:→ Select carrier with best performanceIF standard shipping:→ Select carrier with best cost/performance ratio - Apply routing actions:
- Action 1: Assign fulfillment location
- Location:
{{ optimal_location }} - Update order: Fulfillment location
- Location:
- Action 2: Add order tags
- Tags:
Routed-{{ location_name }},Carrier-{{ carrier_name }},Zone-{{ shipping_zone }}
- Tags:
- Action 3: Add order note
- Note:
INTELLIGENT ROUTING\nLocation: {{ location_name }}Reason: {{ routing_reason }}Carrier: {{ carrier_name }} ({{ on_time_percentage }}% on-time)Shipping cost: ${{ shipping_cost }}Expected delivery: {{ estimated_delivery_date }}
- Note:
- Action 4: Send warehouse notification
- Recipient:
{{ location_email }} - Subject:
New Order Routed to {{ location_name }} - {{ order.name }} - Body:
Order details, items, packing instructions, recommended carrier
- Recipient:
- Action 5: Update fulfillment system
- API call to 3PL/WMS
- Send order data with location assignment
- Action 1: Assign fulfillment location
- Handle split shipments (if needed):
IF no single location has full inventory:- Split order by item- Route each item to nearest location with stock- Tag order: "Split-Shipment"- Email customer: Explain multiple packages- Coordinate timing for simultaneous delivery where possible - Track routing performance:
- Log decision to Google Sheets
- Columns: Order, Location, Carrier, Shipping Cost, Zone, Delivery Time
- Monthly analysis: Optimize routing logic based on performance data
Setup requirements:
- MESA subscription
- Multiple fulfillment locations configured in Shopify
- Historical carrier performance data (ShipStation, Shippo, or carrier APIs)
- Google Sheets or database for routing performance tracking
- Integration with 3PL/WMS systems (ShipBob, ShipStation, ShipMonk, etc.)
Customization tips:
- Product-specific rules:
- Fragile items → Route to location with best packaging reputation
- Perishables → Route to closest location (speed critical)
- Oversized items → Route to warehouse with freight carriers
- Custom/personalized items → Route to location with customization capability
- Customer tier considerations:
- VIP customers → Always use fastest location + premium carrier
- First-time customers → Optimize for speed (better first impression)
- Repeat customers → Balance between speed and cost
- Time-based routing:
- Orders before 2pm → Can ship same day from any location
- Orders after 2pm → Route to warehouse still open (timezone consideration)
- Weekend orders → Route to location with weekend fulfillment
- Seasonal adjustments:
- Q4 peak → Route to location with most available capacity
- Post-holiday returns period → Route away from warehouses processing returns
- Prime Day/BFCM → Pre-position inventory, route to pre-stocked locations
Advanced features:
- Predictive inventory routing:
Check sales velocity at each location:- LA: Fast-moving inventory running low- Chicago: High stock levelsRoute orders to Chicago to preserve LA inventoryGives time to restock LA before it sells out - Weather-based routing:
- Check weather at each location and along routes
- Avoid routing through severe weather zones
- Shift to southern routes during winter storms
- Carrier strike/delay handling:
- Monitor carrier service alerts
- Automatically switch to backup carrier if primary is delayed
- Reroute to location with alternate carrier options
- Return rate optimization:
- Track return rates by location
- Route to locations with lowest return rates for quality-sensitive products
- May indicate better QC or packing at certain warehouses
Example routing scenarios:
Scenario 1: Standard order, multiple options
- Order: $75, 2 items, standard shipping
- Customer: Denver, CO
- Inventory: All locations have stock
- Routing decision:
- LA to Denver: Zone 4, $6.75
- Chicago to Denver: Zone 3, $5.50
- NJ to Denver: Zone 5, $7.25
- Result: Route to Chicago (lowest cost, good transit time)
Scenario 2: Rush order
- Order: $200, 1 item, overnight shipping
- Customer: Boston, MA
- Inventory: LA and NJ have stock
- Routing decision:
- LA to Boston: 3-day transit minimum (even overnight)
- NJ to Boston: Next-day delivery possible
- Result: Route to NJ (only location that can meet promise)
Scenario 3: Split shipment required
- Order: 3 items, standard shipping
- Customer: Atlanta, GA
- Inventory:
- Item A: Only in LA
- Item B: Only in Chicago
- Item C: In Chicago and NJ
- Routing decision:
- Item A → LA to Atlanta
- Item B & C → Chicago to Atlanta (consolidate 2 items)
- Result: 2 shipments instead of 3 (minimize splits)
- Action: Email customer explaining split for faster delivery
Testing strategy:
- Start with test location subset:
- Test routing between 2 locations first
- Verify inventory checks work correctly
- Confirm assignments update in Shopify
- Test each priority tier:
- Create test orders that hit each routing rule
- Verify Priority 1 (inventory) works
- Test Priority 2 (speed) overrides cost when needed
- Confirm Priority 3 (cost) works for standard orders
- Edge case testing:
- Out of stock everywhere → What happens?
- Split shipments → Are costs still optimized?
- Same-day cutoff → Does it route correctly by time?
- Monitor first 50 routed orders:
- Track actual delivery times vs estimates
- Verify shipping costs align with projections
- Check warehouse feedback on routing decisions
- Adjust logic based on real-world results
- A/B test routing logic:
- Route 50% of orders using intelligent routing
- Route 50% using existing logic (control group)
- Compare: Costs, delivery times, customer satisfaction
- Full rollout after proving ROI
Expected results:
- Month 1: 10-15% shipping cost reduction (conservative as logic is optimized)
- Month 2: 20-25% reduction as routing data improves
- Month 3+: 25-30% steady-state savings
- Delivery speed: Average 1 day faster delivery
- Customer complaints: 40% reduction in "where's my order?" tickets
You've completed the advanced examples! These five workflows represent the cutting edge of ecommerce automation—multi-order logic, scheduled customer analysis, dynamic inventory management, and time-based promotion control. These examples require MESA's advanced capabilities but deliver exponential returns in time savings and operational efficiency.
Important reminder: Don't attempt advanced workflows until you've successfully implemented several beginner and intermediate examples. Build your automation confidence incrementally.
Implementation best practices
Building workflows is exciting, but the merchants who see lasting success follow a methodical approach. Here's how to implement these examples without overwhelming yourself or your team.
Start small, scale strategically
The biggest mistake is trying to automate everything in the first week. Instead, build momentum with this proven progression:
Week 1: Your foundation workflow
- Choose ONE beginner example addressing your biggest time drain
- If you spend hours checking inventory → Start with low stock alerts
- If VIP orders get lost in the queue → Start with high-value order tagging
- Follow the setup instructions exactly as written
- Monitor every single workflow run for the first week
Week 2-3: Build confidence
- Add 2 more beginner examples
- Focus on different categories (one order workflow, one customer workflow)
- Adjust conditions to match your business (dollar amounts, tag names, recipients)
- Document what you've learned in a shared doc or spreadsheet
Month 2: Layer in complexity
- Implement 2-3 intermediate examples
- Add workflows requiring app connections (review platforms, support tools)
- Introduce more sophisticated condition logic (multiple AND/OR statements)
- Start seeing compound time savings as workflows work together
Month 3+: Advanced automation
- Explore advanced examples requiring MESA or complex logic
- Build multi-step workflows connecting several systems
- Optimize based on 60+ days of performance data
- Consider contacting MESA service partners for custom builds
By month 3, you'll have 8-12 workflows running smoothly, saving 15+ hours weekly without ever feeling overwhelmed.
Testing workflow examples before going live
Flow has no sandbox environment—every workflow runs on live data. This makes testing critical.
Pre-activation testing:
1. Use Flow's Preview function
- Select a historical order/customer/product that should trigger the workflow
- Verify conditions evaluate correctly (shows green checkmarks for "true")
- Check that the workflow would take the expected path
- Limitation: Preview shows logic flow but not actual action outputs
2. Verify all connections
- Check email notification recipients are correct (not placeholder addresses)
- Confirm app integrations are connected (Klaviyo, Gorgias, Yotpo, etc.)
- Ensure tags are spelled consistently with existing workflows
- Test notification formats (send test email to yourself first)
3. Start workflows paused
- Build the complete workflow but leave it paused
- Review all conditions one final time
- Check for typos in tag names or email addresses
- Only activate after you've triple-checked everything
Post-activation monitoring:
First 10 runs are critical:
- Check workflow run history after every trigger for the first day
- Verify tags are applied correctly
- Confirm notifications reach the right people with correct content
- Look for unexpected triggers or false positives
- Adjust conditions immediately if something's wrong
Testing checklist (complete before activating):
- 🔲 All required apps are connected and authenticated
- 🔲 Email notifications use real addresses, not examples
- 🔲 Tag names match your existing tagging convention
- 🔲 Conditions use correct operators (>, <, =, ≠, contains)
- 🔲 No conflicting workflows targeting the same events
- 🔲 Error notifications are enabled (you'll know if it breaks)
- 🔲 You've tested with Flow's Preview on 3-5 historical records
Avoiding common mistakes
Mistake #1: Automation overload
Problem: Implementing 15 workflows in one week creates chaos and makes troubleshooting impossible.
Solution: Add maximum 2 workflows per week. Give each workflow 5-7 days to prove itself before adding another.
Mistake #2: Skipping the testing phase
Problem: Workflow accidentally sends 500 customer emails with wrong discount code or tags every order incorrectly.
Solution: Always use Preview function. Always monitor first 10-20 runs. Always start with harmless actions (add internal tags) before customer-facing actions (send emails).
Mistake #3: Set-it-and-forget-it syndrome
Problem: Seasonal Black Friday workflow still running in March, or workflow silently failing for 2 weeks unnoticed.
Solution: Monthly workflow audit (15 minutes). Review which workflows haven't triggered in 30 days. Check error rates. Disable seasonal workflows when out of season. Update notification recipients as team members change.
Mistake #4: Notification fatigue
Problem: Sales team receives 50+ Slack messages daily from various workflows and starts ignoring all automation alerts.
Solution: Consolidate similar notifications into daily digests. Use priority-based routing (only alert manager for orders >$1,000). Audit notification volume monthly—if your team ignores alerts, you've over-automated.
Mistake #5: Building when templates exist
Problem: Spending 2 hours building custom logic that MESA template solves in 5 minutes.
Solution: Before building complex workflows, check MESA's template library. Many advanced examples already exist as one-click templates. Save custom building for truly unique business logic.
When to upgrade from Flow to MESA
Flow handles 70-80% of common automation needs. Consider MESA when you need:
External integrations: CRM (Salesforce, HubSpot), productivity tools (Google Sheets, Airtable, Slack), email platforms without Flow connectors
Scheduled workflows: Daily inventory audits, weekly customer segmentation updates, monthly report generation
Historical data queries: "Find all customers with no purchase in 90+ days," "Identify products with zero sales this month"
Advanced logic: Complex calculations, conditional aggregation (sum only items over $50), multi-step data transformations
Decision framework: If you're spending 2+ hours trying to make Flow do something, check if MESA handles it natively. If a MESA template exists, the monthly subscription pays for itself in saved time.
The next section covers additional resources to support your automation journey.
Additional resources
Building automation is a journey, not a destination. These resources will help you continue learning and get support when you need it.
Related guides
Deepen your Flow knowledge:
- Shopify Flow: Complete Guide - Complete beginner's guide covering Flow basics, the visual builder interface, and how to create your first workflow from scratch. Start here if you're brand new to automation.
- Using Liquid in Shopify Flow - Advanced code examples showing how to access nested data, perform calculations, build conditional logic, and create dynamic content. Includes 26+ copy-paste Liquid snippets for common scenarios.
- Shopify Flow Templates - Comprehensive guide to Shopify's official template library with direct install links. Use templates when you want one-click setup; use examples (this guide) when you need customization.
- Shopify Flow Alternatives - Comparison of Flow vs MESA vs Zapier vs Make.com. Understand when Flow's limitations mean it's time to consider other automation platforms.
- How to Extend Shopify Flow - Strategies for pushing Flow beyond its native capabilities using webhooks, app connectors, and MESA integrations.
MESA template library
Don't want to build workflows from scratch? Browse 500+ pre-built MESA templates that handle complex automation with one-click installation:
- Order automation templates - Advanced order routing, multi-order consolidation, custom fulfillment logic, and more
- Inventory management templates - Dynamic reorder points, supplier automation, multi-location sync, stockout prevention
- Customer engagement templates - Win-back campaigns, loyalty programs, lifecycle marketing, VIP segmentation
- Browse all 500+ templates - Filter by app, use case, or integration to find exactly what you need
Each template includes setup instructions, required apps, and customization guidance.
Get expert help
Automation shouldn't feel overwhelming. MESA's team is here to help:
- Expert workflow development - Need complex automation built by professionals? Our team handles custom builds, integrations, and advanced logic.
- Start your 7-day free trial - Test MESA risk-free. All features unlocked, no credit card required. See if MESA's advanced capabilities are worth the investment for your store.
- MESA documentation - Technical guides, API references, and troubleshooting resources for advanced users.
Got questions about a specific example? Reach out via chat or email—we help with both Flow and MESA workflows.
Frequently asked questions
What's the difference between Shopify Flow examples and templates?
Examples are workflow ideas you build yourself following step-by-step instructions. Templates are pre-built workflows from Shopify you install with one click. Examples give you more customization control; templates are faster to deploy. Most merchants use both: install templates for common tasks, build examples for unique business needs.
Do I need coding skills to build these Flow examples?
No coding required for beginner and most intermediate examples. Advanced examples may use Liquid code (Shopify's templating language), but we provide copy-paste snippets you can use as-is. If you can follow step-by-step instructions, you can build these workflows. For complex custom logic, consider using MESA templates instead of coding yourself.
How long does it take to build an example workflow?
Beginner examples: 5-15 minutes | Intermediate examples: 20-30 minutes | Advanced examples: 45-60 minutes. This includes setup, testing, and customization. Your second workflow takes half the time as your first because you understand Flow's interface. Most merchants build 1-2 examples per week rather than rushing through everything at once.
Can I use these examples on Shopify Basic plan?
Yes, Shopify Flow is available on all Shopify plans (Basic, Shopify, Advanced, Plus). All examples work on every plan except those specifically noted as "Shopify Plus only." B2B-specific examples require Plus because they use company accounts. Advanced examples requiring MESA work on any Shopify plan with a MESA subscription.
What if an example doesn't work for my store?
Common reasons: missing app integrations, incorrect condition operators, typos in tag names, or the example needs customization for your business model. Check our troubleshooting steps in each example. If stuck, reach out to MESA support - we help with both Flow and MESA workflows.
How do I know if I need Flow or MESA for an example?
Use Flow when: workflow stays in Shopify, simple logic, no external apps, budget is tight. Use MESA when: need CRM/Google Sheets/Slack connections, scheduled workflows, complex calculations, or testing environment. Many merchants use both - Flow for simple automation, MESA for advanced needs.
Can I modify these examples for my business?
Absolutely! These examples are starting points meant for customization. Adjust dollar thresholds, change tag names, modify notification recipients, add additional conditions, or combine multiple examples. The "Customization tips" section in each example shows common modifications. Document your changes so you remember what you customized.
Will these examples work with my existing workflows?
Most examples work alongside existing workflows without conflicts. Potential issues: multiple workflows trying to set different tags on the same trigger, or duplicate notifications. Review existing workflows before adding new ones. Use clear naming conventions to track which workflows serve which purposes.
Conclusion
You now have 15 proven workflow examples with step-by-step instructions for automating every major aspect of your store—order management, inventory control, fraud prevention, customer engagement, fulfillment operations, and marketing campaigns. Each example includes the exact triggers, conditions, and actions you need to build it yourself today.
But here's what matters more than having all these examples: actually implementing them.
The difference between stores that successfully automate and those that don't isn't knowledge—it's execution. Don't bookmark this guide planning to "come back to it later." Don't try to implement everything at once. And definitely don't let perfect be the enemy of good enough.
The merchants seeing 15+ hours saved weekly all followed the same pattern:
- Week 1: Choose ONE beginner example (low stock alerts or VIP tagging)
- Week 2-3: Add 2 more simple workflows, monitor results closely
- Month 2: Layer in intermediate examples (fraud prevention, review automation)
- Month 3+: Explore advanced workflows (consolidation, win-back campaigns, scheduled tasks)
This incremental approach builds your automation confidence while delivering measurable results at each stage. You're not just saving time—you're learning how automation actually works in your specific business context.
Your next steps right now:
- Scroll back to the category matching your biggest operational pain point
- Choose ONE beginner example that would save you the most time
- Open Shopify Flow in your admin
- Follow the step-by-step setup instructions exactly as written
- Test with Flow's Preview function using 3-5 historical records
- Monitor the first 20 workflow runs over the next week
- Add another example next week and repeat
Need workflows that Flow can't handle—external integrations, scheduled automation, complex data transformations, or a testing environment? Browse MESA's template library for pre-built workflows that extend beyond Flow's native capabilities.
Stop reading. Start automating. Pick your first example and build it in the next 15 minutes. Every workflow you activate is time you're giving back to yourself. Your future self will thank you.