
Infinite Options renders its option sets on the product page. That is the one place it works, and it is the reason the app runs out of road the moment you need the same twelve-field configurator somewhere else — a wholesale intake form, a "request a quote" landing page, or a link you email to a repeat buyer. The options simply are not there, because there is no product page to hang them on.
The fix is not a second options app. It is to rebuild the option set as a form, then have MESA turn each submission into a Shopify draft order the customer can pay from a secure checkout link. Six steps, all standard Shopify connector actions, no custom code required. Below is exactly how it goes together — including the parts of an Infinite Options set that do not translate, which is the honest part most walkthroughs skip.
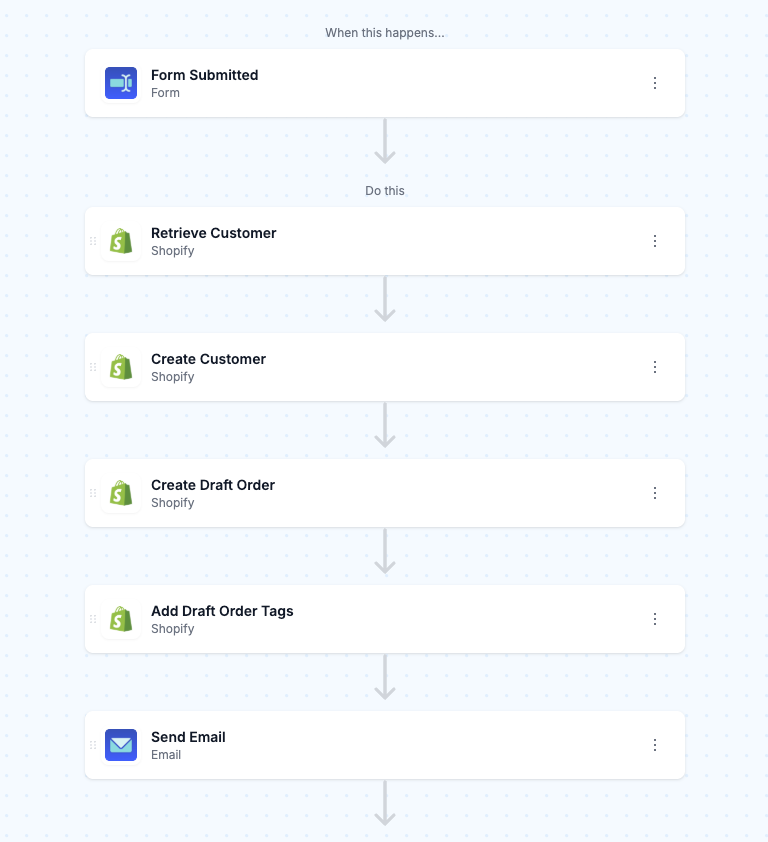
TL;DR: there's a template for that
Why Infinite Options stops at the product page
This is not a bug or a setting you have missed. It is the definition of the feature, stated plainly in ShopPad's own documentation:
"An Option Set is a group of custom fields that appear together on a product page."Infinite Options documentation
Infinite Options is genuinely good at what it does inside that boundary. Its field types cover a lot of ground — text field, large text, number, radio options, checkbox, drop-down menu, swatch, date picker, upload, header, switch, button, dropdown with images, and a font selector — and you can attach a price to individual values in any selectable option. If your configurator lives on a product page, keep it there.
MESA's own Infinite Options connector confirms the same boundary from the other direction. The only trigger it exposes is Infinite Options Order Created, which runs when an order arrives carrying a matching "Label on Cart" value. In other words, it reads option selections after a product-page add-to-cart has already happened. Nothing in it collects options anywhere else.
So if the intake has to happen off the product page, you need a different collection surface. A form is that surface.
The workflow at a glance
Here is the full sequence before we go step by step. The form is the trigger; everything after it is a Shopify action.
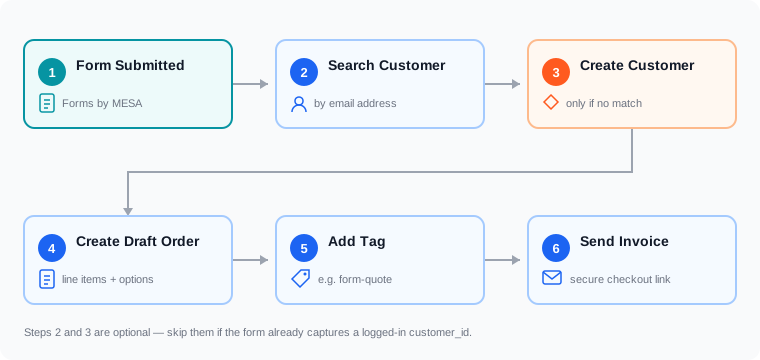
Steps 2 and 3 are conditional. If your form sits behind customer accounts, MESA's Form trigger already hands you the shopper's ID and you can drop straight from step 1 to step 4.
Step 1: Rebuild the option set as a MESA Form
Start with the Form trigger and its builder. MESA describes the building blocks like this:
"To gather the information you need, you can include headings, plain text, and various input types like text fields, dropdowns, and checkboxes."MESA Form documentation
In practice, the field types you have to work with when rebuilding an option set are: header, paragraph text, text field, text area, number, select, checkbox, radio, and date. Compare that against the Infinite Options list above and the gaps are specific and worth knowing before you start:
- Swatches have no equivalent. A colour or material swatch becomes a plain select or a set of checkboxes.
- Buttons and switches become radio groups and checkboxes respectively — same data, different feel.
- Dropdown with images and the font selector become ordinary selects, so the shopper is reading option names instead of seeing them.
- File upload is not part of the form builder's field set, so an artwork-upload step needs a different intake tool.
That trade is the whole decision. You are swapping a visually rich, product-page-bound configurator for a plain one that can live anywhere and write straight into Shopify. If your options sell on the visual — a grid of fabric swatches, say — that is a bad trade and you should keep those options on the product page. If your options are specifications a buyer already knows they want (quantity tiers, lead time, finish, engraving text, delivery window), the plain version costs you almost nothing.
Where to put the form
This is the part that actually answers "off the product page." A MESA Form gives you a hosted Form URL you can link or email directly, plus a JavaScript embed code you can drop anywhere. The documented placements include:
- A standalone page via the MESA Form app block in the Shopify theme editor — this one requires an Online Store 2.0 theme.
- Shopify's order status page, by pasting the embed code into the "Order status page additional scripts" box in Checkout settings.
- The customer account order page, by pasting the embed code into your theme's
customers/order.liquidtemplate. - Anywhere outside Shopify entirely — a sales email, a PDF, a partner portal — using the raw Form URL.
One detail worth designing around: if the shopper is logged in when they submit, the form's payload also includes customer_id. That single field lets you skip the next two steps entirely, so putting the form behind customer accounts is the cleanest version of this build if your audience is existing wholesale or repeat buyers. MESA wraps forms in Bootstrap by default and lets you attach your own class names per field, so matching store styling is a CSS job rather than a rebuild.
Step 2: Find the customer, or create one
A draft order needs someone to belong to. Shopify's draft order resource carries both a customer object and a separate email field, so at minimum you need one identifier off the form — usually an email address.
Add Shopify's Search Customer by Email action and feed it the email field from the form submission using the variable selector. If it returns a match, you have your customer ID. If it returns nothing, branch to Create Customer and build the record from the name and email the form collected. This is the same pattern behind creating Shopify customers from Typeform submissions, just pointed at a different downstream action.
If you went the logged-in route in step 1, delete both of these steps and use customer_id directly.
Step 3: Create the draft order
Now the part that makes a configurator work without variants. Add Shopify's Create Draft Order action. A draft order needs a customer identifier plus at least one line item with a quantity — and critically, that line item does not have to be a real product:
"To create a custom line item, provide the title, price, taxable, and quantity properties."Shopify draft order API reference
For a custom line item, variant_id is left null. This is why the approach sidesteps Shopify's variant ceiling completely: the entire configuration becomes one custom line item whose title you compose from the form's variables, at a price you either calculate or set to zero and quote on review. Twelve option categories that could never fit into Shopify's three option dimensions collapse into a single readable line like "Custom canoe — 16ft / cedar / brass trim / engraved".
Two things to add while you are in this step:
- Keep the raw answers. Composing a title is good for readability but lossy. Use Create or Update Draft Order Note Attribute (or Set Draft Order Metafield) to store each option answer as its own named field, so whoever builds or fulfils the order sees the real selections rather than parsing a string.
- Set a discount if you need one. Shopify's own constraint here is worth knowing up front: a draft order and each of its line items can carry one discount each, no more.
A note on scope, from a working version of this build tested internally: a first pass that hardcodes a single custom product and price is completely reasonable, and often correct. If every submission is genuinely "custom order, priced on review," a fixed custom line item is the whole answer and you are done. Letting the form pick a real catalogue product is a separate, optional addition — covered further down.
Step 4: Tag it, then send the invoice
Add Draft Order Add Tag with something specific like form-quote. Tags are what make these findable later, and they are what other workflows key off — a Slack alert to the sales team, a row in a Google Sheet, a follow-up reminder if the invoice goes unpaid for a week.
Then decide whether the invoice goes out automatically. Shopify's Send Invoice for Draft Order action does it in the workflow; leaving it off means a human reviews and prices the draft first, which is usually what you want when the configuration drives the price. Either way, the customer's side of it is a normal checkout:
"Draft orders let you add products, apply discounts, and then send invoices with secure checkout links for customers to complete payment online."Shopify Help Center
When it is paid, the draft becomes a regular order on your Orders page and behaves like any other order downstream — fulfilment, reporting, the lot. That is the real advantage over a form that just emails you a quote request: nothing has to be re-keyed. It is the same mechanic behind using Shopify draft orders for repeat purchases, applied to intake instead of reordering.
Optional: let the form choose a real product
If you want the form's product select to map to an actual Shopify variant — so inventory, reporting, and product-level analytics all behave normally — you need one lookup step between the form and the draft order.
The cleanest route is Shopify's Retrieve Product Variant Details from SKU action, which returns IDs for the product, product variant, and inventory item when given a SKU. Put the SKU as the stored value behind each option in your form's product select, then pass the submitted SKU into that action and hand the returned variant ID to Create Draft Order. For a submission that should produce several lines, add Add Line Item to Draft Order steps after the draft exists.
Be realistic about this one: it is not plug-and-play. Every store's option set, SKU scheme, and pricing logic is different, which is exactly why this cannot ship as a one-click template. Treat the fixed-custom-line-item version as the build you launch with, and add the lookup once you know which selections actually need to hit real inventory.
When to use this, and when not to
Reach for a form-to-draft-order build when:
- The intake has to happen somewhere other than a product page — wholesale application, quote request, an emailed reorder link, a trade-show follow-up.
- The configuration determines the price, so a human should review before payment.
- The option count is well past what Shopify's variant model can express, and the options are specifications rather than visual choices.
Stay on the product page with a dedicated options app when the options need live in-cart pricing as the shopper clicks, when swatches and image pickers are doing the selling, or when the purchase is a normal self-serve checkout that should not wait on an invoice. If you are still weighing collection surfaces, our roundup of form builder apps for Shopify covers the alternatives to building the intake in MESA directly.
FAQs
Can Infinite Options collect options outside a product page?
No. ShopPad's documentation defines an Option Set as custom fields that "appear together on a product page," and MESA's Infinite Options connector only exposes an order-created trigger that reads selections after a product-page add-to-cart. For intake anywhere else, rebuild the option set as a form.
Does a MESA Form support swatches or image dropdowns?
No. The form builder's field types are header, paragraph text, text field, text area, number, select, checkbox, radio, and date. Swatches, switches, buttons, image dropdowns, font selectors, and file uploads have no direct equivalent — selectable ones can be approximated with a select or checkboxes, at the cost of the visual.
Do I need a specific Shopify plan for draft orders?
Shopify's draft order documentation lists no plan requirement — drafts live under Orders in the admin, and the API uses the standard draft_orders access scope. Plan tiers do gate some B2B-specific draft-order behaviour, so check Shopify's current B2B plan-features page if your build is wholesale-specific.
Can the customer pay the draft order themselves?
Yes. Sending an invoice gives the customer a secure checkout link they complete online, and once paid the draft becomes a regular order. You can also mark it paid manually if payment arrived some other way.
How do I keep the option answers visible on the final order?
Write each answer to the draft order as a note attribute or metafield in the same workflow that creates it, rather than relying only on a composed line-item title. Note attributes stay attached through payment, so the production or fulfilment team sees the real selections on the resulting order.