How to Extend Shopify Flow: Connect Any App in Both Directions
-
- •
- Last updated: Jan. 27, 2026
- •
- 20 min read

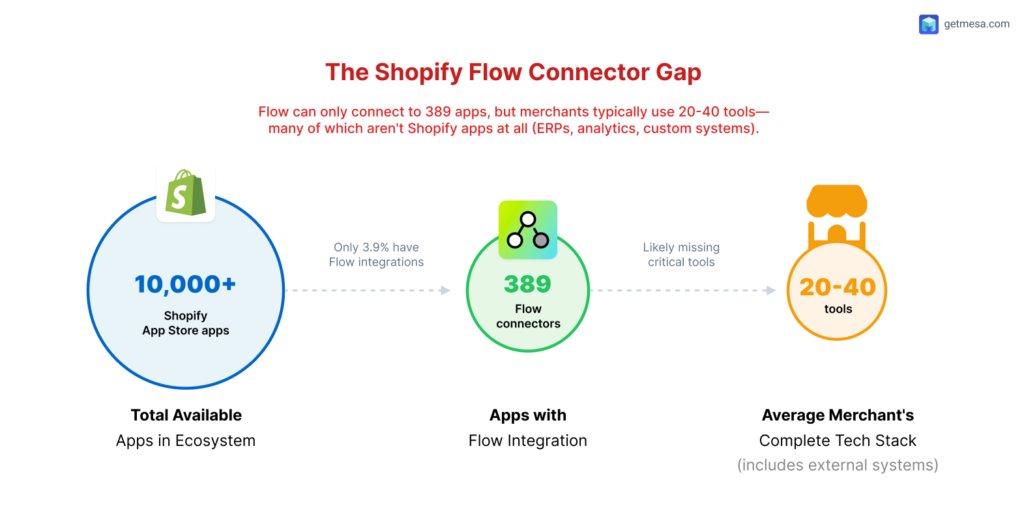
Shopify Flow connects to 300+ apps through custom connectors built by developers—which sounds impressive until you realize that’s just ~3% of the 10,000+ apps in the Shopify App Store. And that’s before considering your complete tech stack of ERPs, warehouse systems, analytics platforms, and specialized tools your business depends on daily.
The gap between what Flow connects to and what your business actually needs creates manual work. You end up exporting data to spreadsheets, copying information between systems, or worse—skipping automation altogether for certain workflows.
Here’s what most merchants don’t realize: you can extend Flow in two directions. Send Flow’s powerful Shopify triggers and data to virtually any app, or pull data from external systems to kick off Flow workflows in Shopify. This bidirectional capability turns Flow from a useful tool into the automation nerve center of your entire operation.
This guide walks through both extension patterns with step-by-step instructions, real-world examples, and a decision framework to help you determine when extending Flow makes sense versus using native automation workflows. Whether you’re a Flow beginner hitting your first limitation or an experienced user ready to scale your automations across your full tech stack, you’ll find the exact approach you need.
📘 For a complete overview, see our Complete Shopify Flow Guide
Related guides in this series:
Table of Contents:
Understanding Shopify Flow’s integration limits
Shopify Flow excels at what it was designed for: automating common tasks within the Shopify ecosystem. It connects seamlessly with popular Shopify apps, handles standard ecommerce workflows, and requires no coding knowledge to set up basic automations. For many stores, Flow’s native capabilities cover a substantial portion of their automation needs right out of the box.
But Flow was built with specific constraints that become apparent as your business grows or your tech stack becomes more specialized.

What Flow handles well
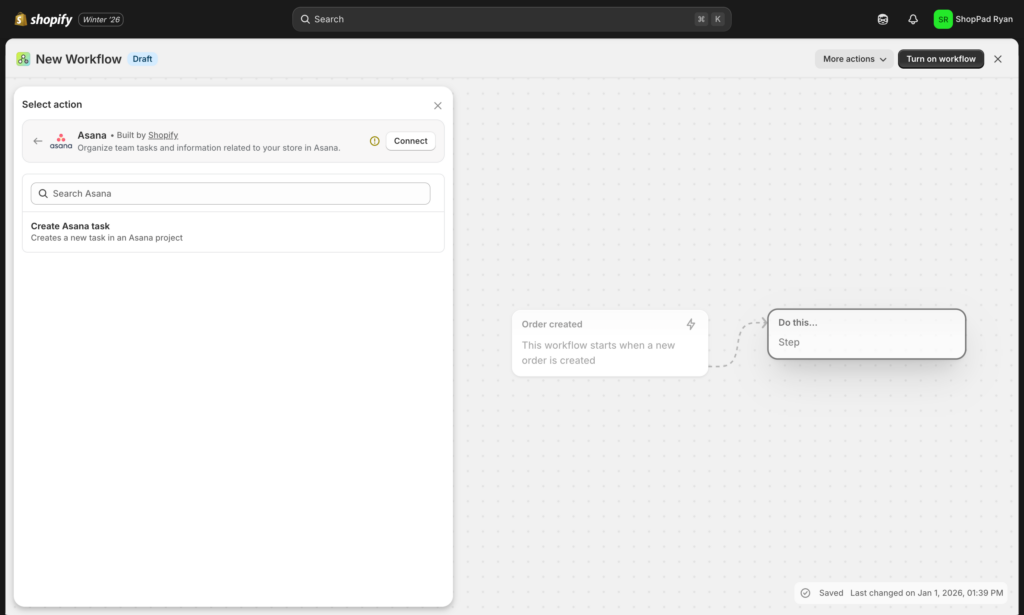
Flow shines when you’re working within its supported ecosystem. With 389 app connectors available, it can connect with tools ranging from major platforms like Klaviyo, Gorgias, and LoyaltyLion to specialized apps for specific markets and use cases. The visual workflow builder makes it easy to set up automations for tagging customers, sending notifications, or updating inventory. For standard Shopify Plus workflows—like fraud detection, order routing, or customer segmentation—Flow delivers solid performance without technical overhead.
Where Flow’s limitations appear
The challenges emerge in four specific areas: connector availability, conditional logic complexity, custom data handling, and trigger direction.
First, while 389 connectors sounds substantial, it represents less than 4% of the apps available in the Shopify App Store. Your accounting system, warehouse management platform, industry-specific software, or newer specialized tools likely won’t be included. Connector availability depends entirely on whether individual app developers choose to build Flow integrations—and many don’t, especially smaller teams, niche apps, and enterprise systems.
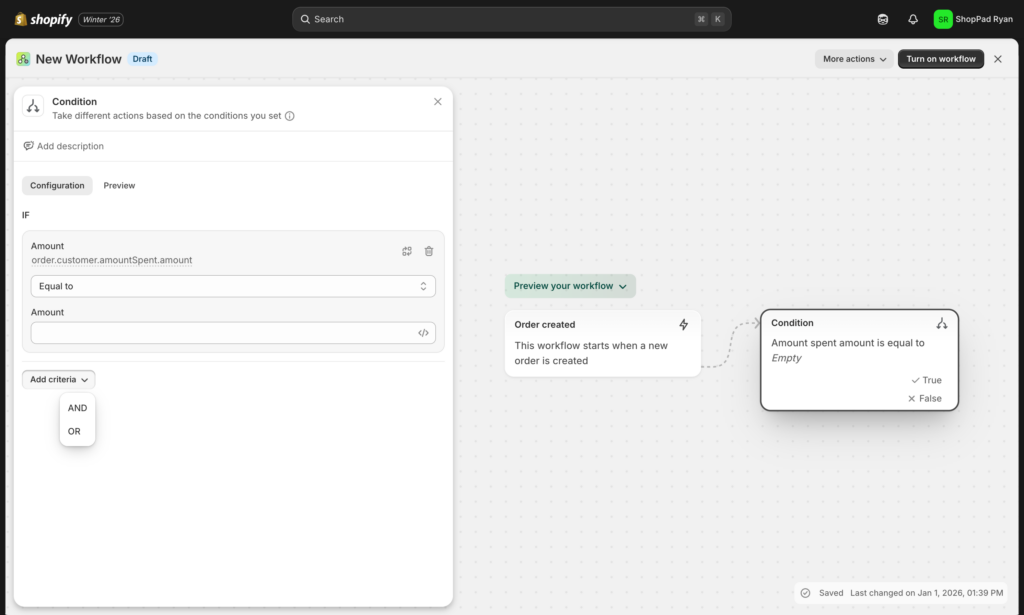
Second, Flow’s simplicity comes with trade-offs in conditional logic. Beyond app-specific actions, Flow only offers a “Condition” step for building if/then logic—and creating anything remotely complex requires writing Liquid code. What starts as a visual workflow can quickly demand technical knowledge when you need nuanced business rules.
Third, even when an app is supported, Flow often exposes only the most common actions, leaving advanced features inaccessible through automation. And Flow struggles with custom data structures. If you need to send a dynamically structured payload, handle complex transformations, or work with data that doesn’t fit Shopify’s standard object model (orders, customers, products), you’ll hit walls. The platform prioritizes simplicity, which means limited flexibility for edge cases.
Fourth, Flow workflows are primarily reactive to Shopify events. While you can trigger workflows when something happens in Shopify or one of its connected apps, you can’t easily start a Flow automation based on events from external systems. If your ERP detects low inventory or your customer service platform flags a VIP issue, Flow can’t natively respond to those signals.
When you’ve outgrown native Flow
You know it’s time to extend Flow when you notice these patterns in your operations:
You’re manually moving data between systems that should talk to each other automatically. Maybe you’re exporting Flow results to Google Sheets and then importing them elsewhere, or copying information from one app into Shopify so Flow can act on it.
You’ve built complex workarounds to achieve simple outcomes. If you’re chaining together multiple apps just to get data from point A to point B, or using Shopify itself as a makeshift data bridge between systems, there’s a more direct path.
Your team has identified automation opportunities that Flow simply can’t execute. When you hear “I wish we could automatically…” and the answer is “Flow doesn’t connect to that,” you’re leaving efficiency on the table.
The extension decision framework
Before extending Flow, ask yourself three questions:
Does the task genuinely require Shopify data or actions? If your automation doesn’t need to read from or write to Shopify, a native workflow in a dedicated automation platform might be simpler than extending Flow.
Are you already invested in Flow workflows that just need one more connection? Extending Flow makes the most sense when you have effective automations that are 90% complete but missing that critical final action or initial trigger.
Will your team maintain this long-term? Extended workflows add complexity. If your automation needs are growing rapidly, consider whether starting fresh with a more flexible platform might serve you better than continuously patching Flow’s gaps.
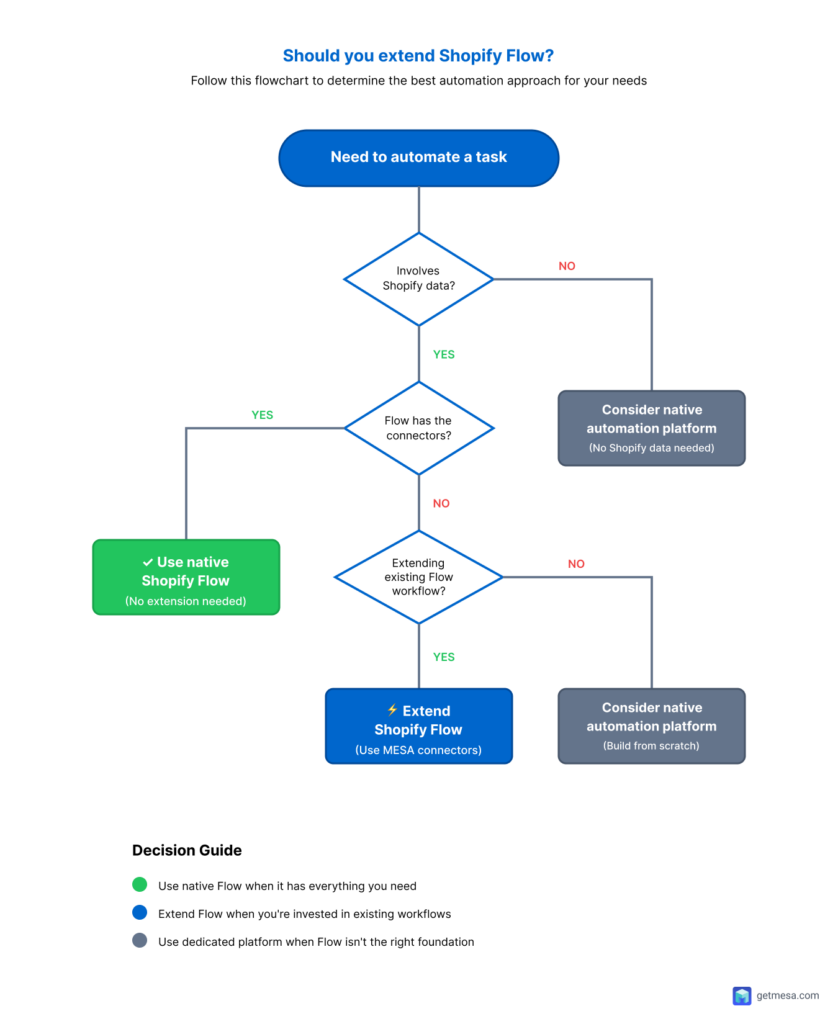
The good news: extending Flow doesn’t mean abandoning it. In the next sections, you’ll see how to preserve your Flow investments while unlocking connections to your entire tech stack.
Two ways to extend Shopify Flow
Flow’s power comes from its ability to react to Shopify events and execute actions across your store. But what happens when you need to send Flow’s data somewhere it can’t reach, or trigger Flow from systems it can’t see?
That’s where bidirectional extension comes in. You can extend Flow in two distinct patterns, each solving a different limitation while preserving your existing Flow workflows.
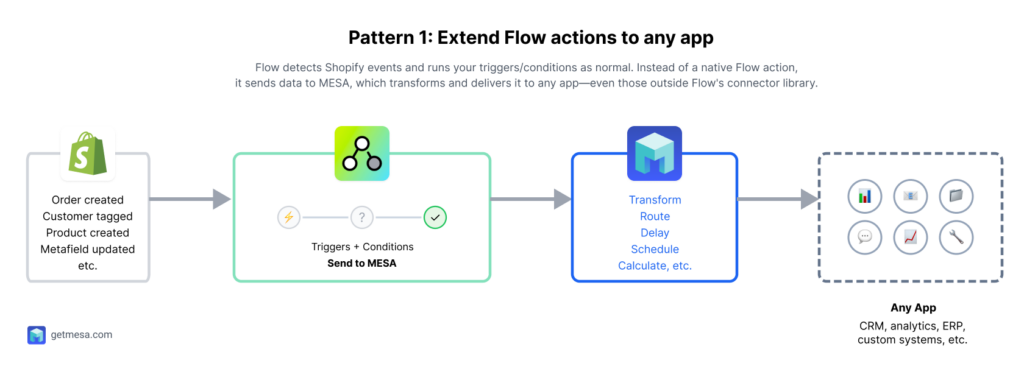
Pattern 1: Extend Flow actions to any app
This pattern solves the “last mile” problem: Flow detects the perfect trigger in Shopify, but you need the resulting action to happen in an app outside Flow’s connector ecosystem.
When to use this pattern:
You’ve built a Flow automation that works perfectly until the final step. Maybe you need to log data in your custom CRM, send formatted reports to your data warehouse, update inventory in your ERP, or trigger notifications in team tools Flow doesn’t support. The trigger and conditions are exactly what you need—you just need the action to reach beyond Flow’s boundaries.
Common scenarios:
- Sending detailed order data to business intelligence tools for custom reporting
- Creating tasks in project management systems Flow doesn’t connect to
- Updating external databases or spreadsheets with formatted Shopify data
- Triggering webhooks to custom applications your team built in-house
- Syncing customer data to specialized email platforms or analytics tools
How it works:
Flow runs your automation as normal, then hands off the payload to MESA, which transforms and delivers it to any destination. Think of MESA as Flow’s universal translator and delivery service for that final action.
MESA Template ID
run-custom-code-in-shopify-flow-workflows
Step-by-step: Send Flow data to any app
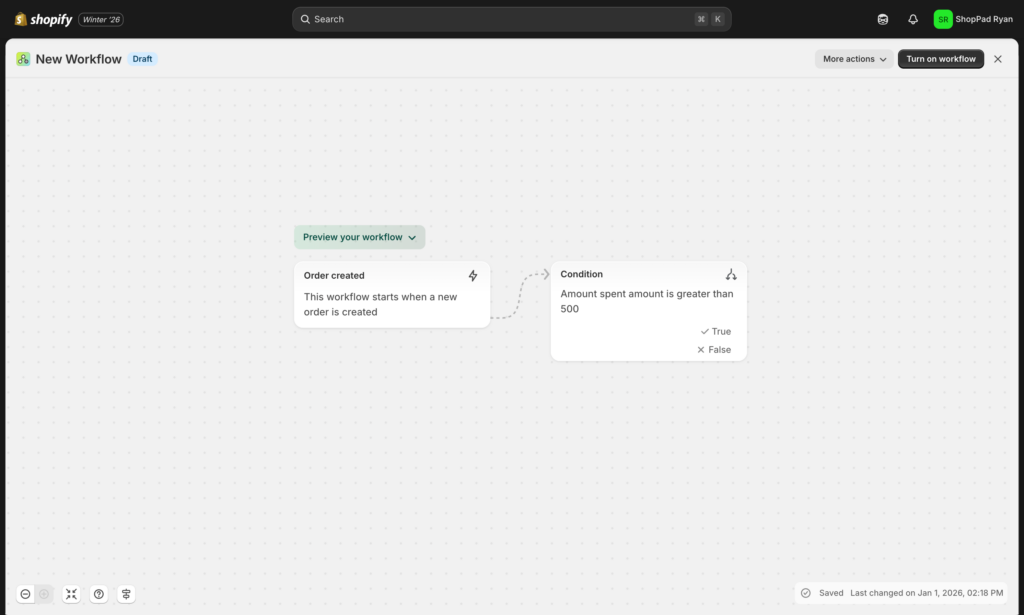
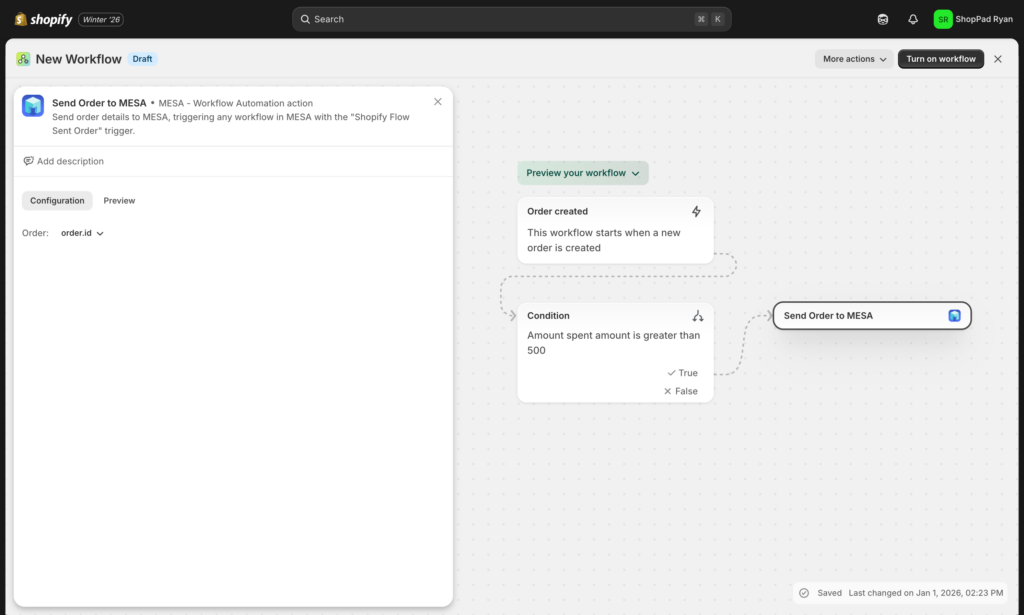
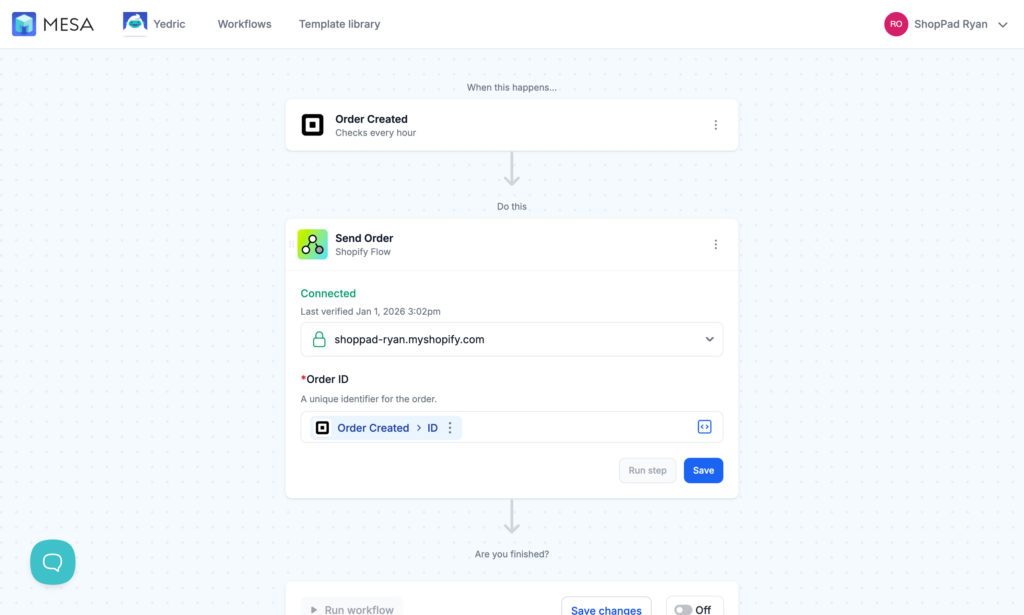
Step 1: Set up your Flow workflow
Create your Flow automation with the trigger and conditions you need. Build it as you normally would—tagging customers, checking order values, filtering by product type, whatever logic your business requires. Don’t worry about the final action yet.
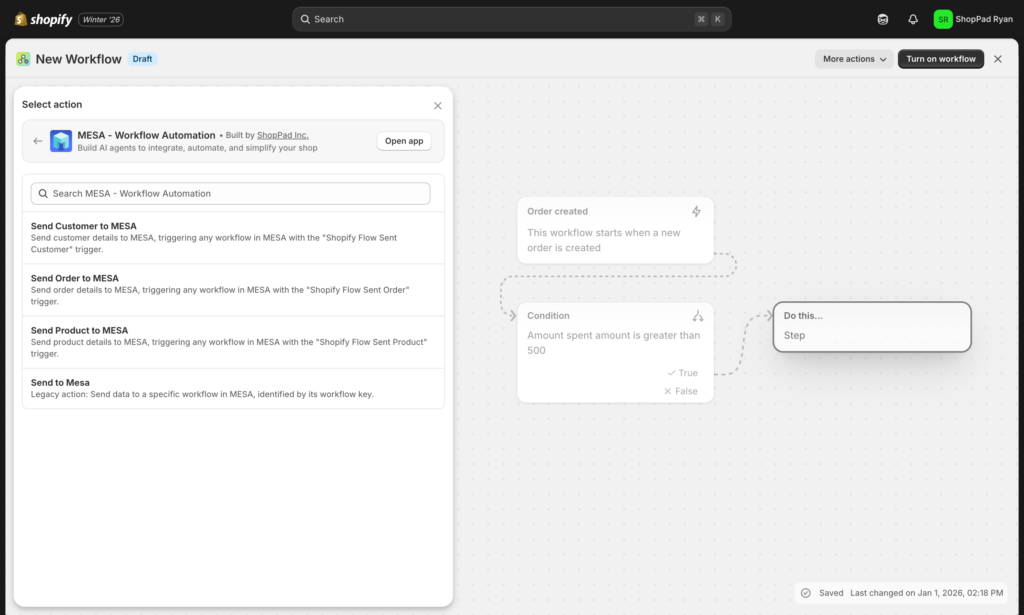
Step 2: Add the MESA action in Flow
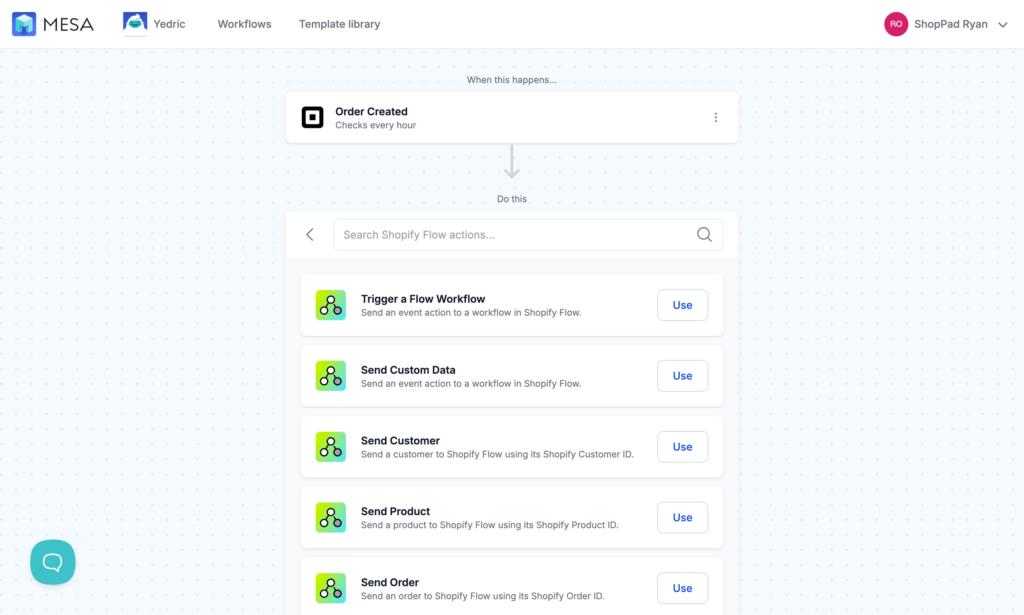
In your Flow workflow, add a new action and search for “MESA” in the connector library. Select “Send data to MESA workflow” as your action type. This creates a bridge between Flow and MESA’s broader connector ecosystem.
Step 3: Configure the data payload
Decide what information you want to send from Flow to your destination app. Flow makes data from earlier steps available—order details, customer information, product data, tags, metafields, and any custom variables you’ve created. Map the fields you need into MESA’s payload.
Pro tip: Send more data than you think you’ll need. Use the more specific MESA actions if you know the data to send. It’s easier to ignore extra fields in MESA than to come back and modify your Flow workflow later.
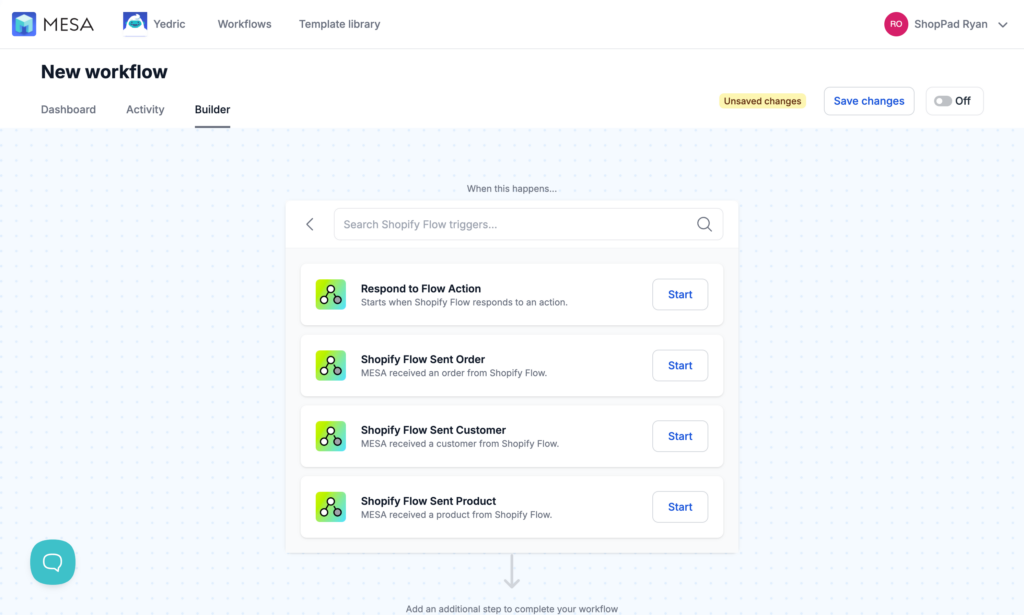
Step 4: Create the corresponding MESA workflow
In MESA, start a new workflow with “Shopify Flow” as your trigger. MESA automatically receives the payload you configured in Step 3. From here, you have access to MESA’s full connector library—over 100 native integrations plus the ability to connect to any API.
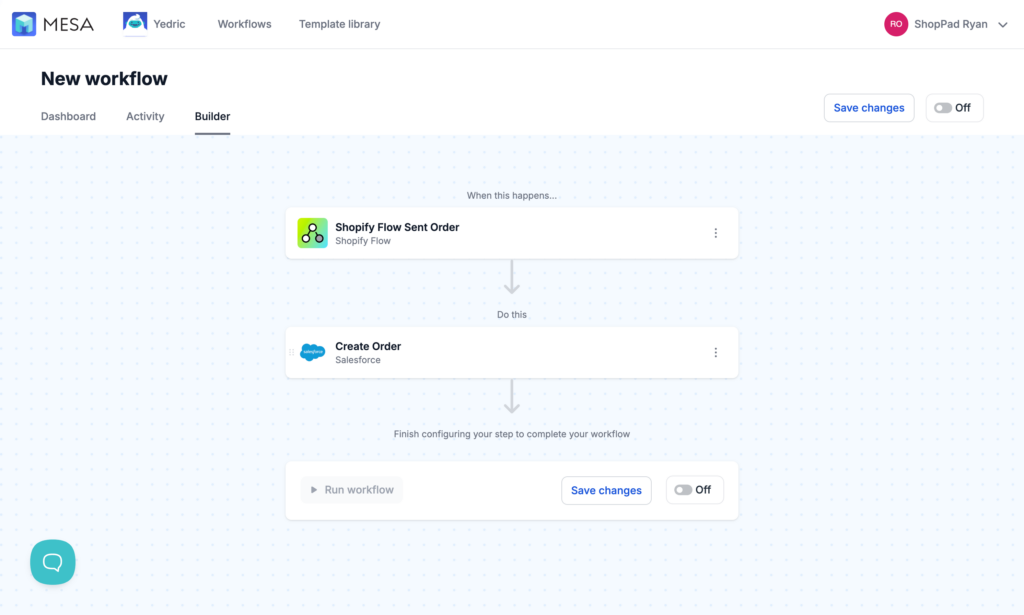
Step 5: Add your destination action in MESA
Choose the app you want to send data to. MESA provides pre-built actions for popular tools and a flexible HTTP request action for anything else. Map the data from Flow’s payload to your destination app’s required fields.
For example, if you’re sending order data to Salesforce, you’d select the data object and configure any formatting rules.
Step 6: Test the complete workflow
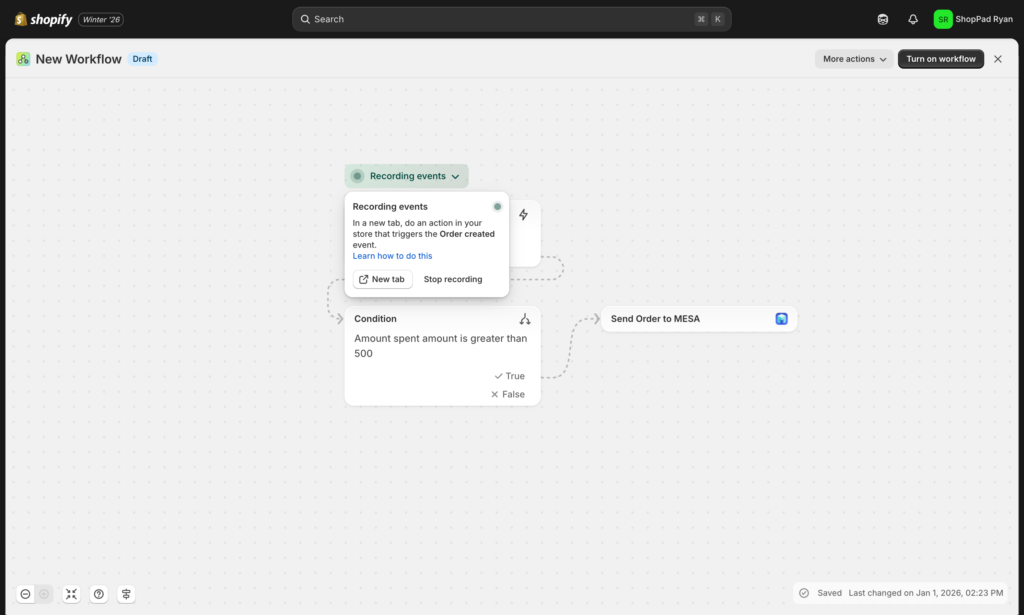
Back in Flow, use the Recording Events to trigger your automation with sample data. Watch the data flow from Shopify → Flow → MESA → your destination app. MESA’s activity log shows you exactly what data passed through and whether it arrived successfully.
If something doesn’t work as expected, MESA’s logs show you where the issue occurred—whether the data didn’t arrive from Flow, failed transformation, or encountered an error at the destination.
Pro tips for payload optimization:
- Send related data in nested objects (like order.customer.email) for easier mapping in MESA
- Include IDs even if you’re sending descriptive names—IDs make data matching more reliable
- Use Flow’s Liquid variables to format dates and currency in Flow before sending to MESA
- Consider sending event timestamps to track when things happened vs. when they were processed
- Test with edge cases (refunded orders, pre-orders, etc.) to ensure data handles exceptions]
Common troubleshooting:
Data not appearing in MESA? Check that your Flow and MESA workflows are both active and has been triggered at least once. MESA only receives data when Flow actually runs.
Wrong data reaching your destination app? Review the field mapping in both Flow (what you’re sending) and MESA (how you’re transforming it). MESA’s activity log shows the exact payload received from Flow.
Workflow running too often? Add more specific conditions in Flow before sending to MESA. Flow is better at filtering Shopify-specific criteria, while MESA is better at cross-app logic.
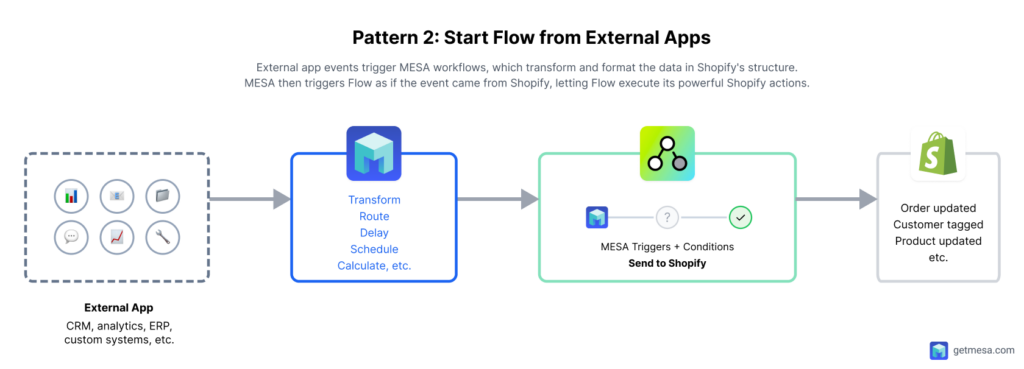
Pattern 2: Start Flow from external apps
This pattern solves the “first mile” problem: you need Flow’s powerful Shopify actions, but the event that should trigger them happens outside Shopify in a system Flow can’t see.
When to use this pattern:
Your business logic starts somewhere other than Shopify—your inventory management system, ERP, customer service platform, or custom application—but the resulting action needs to happen in Shopify using Flow’s sophisticated workflow capabilities. Rather than abandoning your Flow investments, you extend Flow’s trigger capabilities to watch external systems.
Common scenarios:
- Inventory management systems detecting low stock and needing to trigger Flow’s supplier notification workflows
- Customer service platforms identifying VIP issues and needing Flow to tag customers and send internal alerts
- External fraud detection services flagging risky orders for Flow to hold or cancel
- Marketing platforms updating customer segments based on off-site behavior
- ERP systems detecting fulfillment issues and needing Flow to notify customers and update order tags
How it works:
An event occurs in your external system, MESA detects it and formats the data in Shopify’s structure, then sends it to Flow as if it originated in Shopify. Flow receives properly formatted data and executes its workflow exactly as designed—tagging, updating, notifying, or running any of its native actions.
MESA Template ID
trigger-shopify-flow-from-any-service
Step-by-step: Trigger Flow from any app
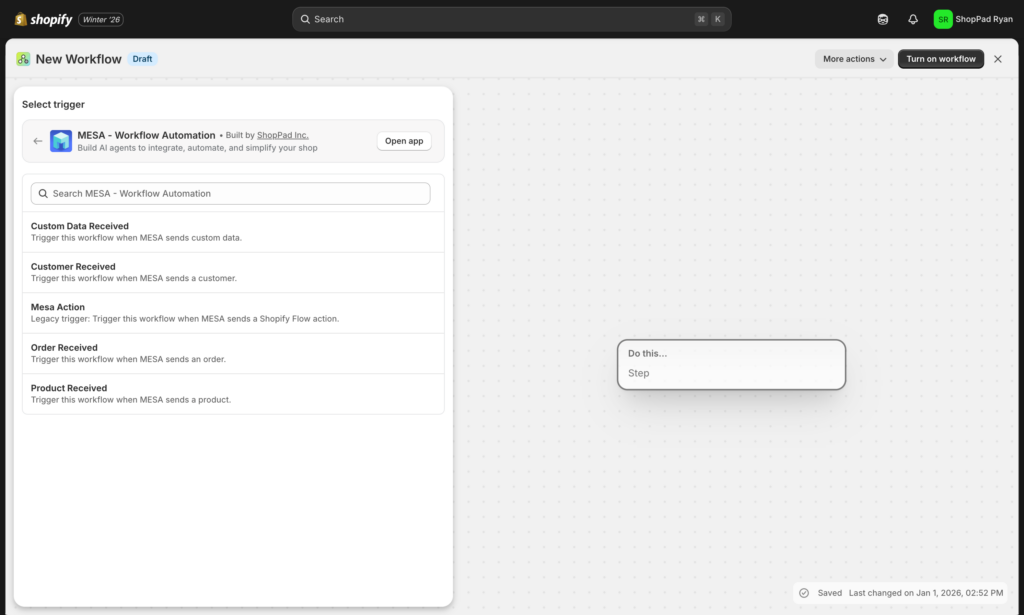
Step 1: Create a Flow workflow with a MESA trigger
In Shopify Flow, start a new workflow and select MESA as your trigger. This tells Flow to wait for data coming from MESA rather than a native Shopify event. Flow will execute whenever MESA sends it properly formatted data.
Step 2: Define what data Flow expects
Decide what information Flow needs from your external system to run its workflow. If you’re triggering customer tagging, Flow needs customer ID or email. If you’re creating draft orders, Flow needs product IDs and quantities. Map out these requirements—you’ll configure MESA to send them in the right format.
Step 3: Set up your MESA workflow with the external trigger
In MESA, create a new workflow starting with your external app as the trigger. This might be a webhook from your ERP, a scheduled check of your inventory system, monitoring for new tickets in your support platform, or watching for changes in a spreadsheet.
External systems rarely format data exactly how Shopify expects it. MESA’s transformation layer lets you map fields, look up Shopify IDs based on external identifiers, format dates and currency, and structure nested data.
For example, if your ERP uses SKUs but Flow needs Shopify product variant IDs, MESA can look up the matching ID before sending data to Flow. If your external system uses “customer_email” but Flow expects “email”, MESA handles the field mapping.
This step is critical: Flow expects data in Shopify’s format. MESA ensures external data arrives looking like it came from Shopify.
Step 5: Add the Flow action in MESA
Add “Trigger Shopify Flow” as your action in MESA. Select the Flow workflow you created in Step 1. Map the transformed data from your external system to the fields Flow expects.
MESA validates that you’re sending the right data structure before the workflow activates, catching configuration errors before they cause issues in production.
Test your MESA workflow with real data from your external system. Watch the data flow through MESA’s transformation steps and verify it arrives in Flow correctly. Check Flow’s run history to confirm it received the data and executed your Shopify actions.
Testing reveals edge cases: What happens if the external system sends incomplete data? What if a customer ID doesn’t exist in Shopify? MESA’s error handling can catch these scenarios before they reach Flow.
Activate your MESA workflow and Flow workflow. MESA will now monitor your external system and trigger Flow whenever the conditions are met. Both platforms maintain execution logs, giving you end-to-end visibility into every automation run.
Best practices for ID mapping:
- Always send both external IDs and Shopify IDs when possible for better troubleshooting
- Use MESA’s lookup actions to convert external identifiers to Shopify IDs before triggering Flow
- Store ID mappings in a reference table if you’re dealing with complex product catalogs
- Include timestamps to track when external events occurred vs. when Flow processed them
- Build in error handling for cases where external IDs don’t match Shopify records]
Data type considerations:
Flow expects specific data types for its conditions and actions. When sending data from external systems through MESA:
- Dates must be in ISO 8601 format (YYYY-MM-DDTHH:mm:ssZ)
- Currency values should be formatted as numbers without symbols
- Boolean fields need true/false, not yes/no or 1/0
- Arrays must be properly structured if you’re sending multiple items
- Customer and product references work best with Shopify’s native IDs, not external identifiers
MESA’s transformation tools handle these conversions, but understanding the requirements helps you configure mappings correctly.
Common troubleshooting:
Flow workflow not triggering? Verify that MESA successfully sent data (check MESA’s activity log) and that the data structure matches what Flow expects. Flow’s run history shows attempts even if they failed.
Flow receiving data but not executing actions? Check Flow’s conditions—they might be filtering out the data from MESA based on criteria that made sense for Shopify-native triggers but don’t apply to external events.
Mismatched customer or product data? MESA likely sent an external ID that doesn’t exist in Shopify. Add a lookup step in MESA to convert external identifiers to Shopify IDs before triggering Flow.
Choosing the right pattern
Both patterns extend Flow’s capabilities while preserving your existing workflows, but they solve different problems:
Use Pattern 1 (Flow → MESA → App) when:
- Your trigger and business logic live in Shopify
- Flow’s conditions and filtering are perfect for your needs
- You just need the final action to reach an app Flow doesn’t support
- You want to leverage Flow’s visual builder for Shopify-specific logic
Use Pattern 2 (App → MESA → Flow) when:
- Events originate in external systems
- You want to leverage Flow’s sophisticated Shopify actions
- You’ve invested in Flow workflows and want to expand their trigger sources
- You need the same Flow logic to respond to both Shopify and external events
Many businesses use both patterns simultaneously, creating a fully connected automation ecosystem where Flow sits at the center of their Shopify operations while MESA extends its reach in both directions.
For more technical details about the Shopify Flow triggers and actions, read our Shopify Flow documentation.
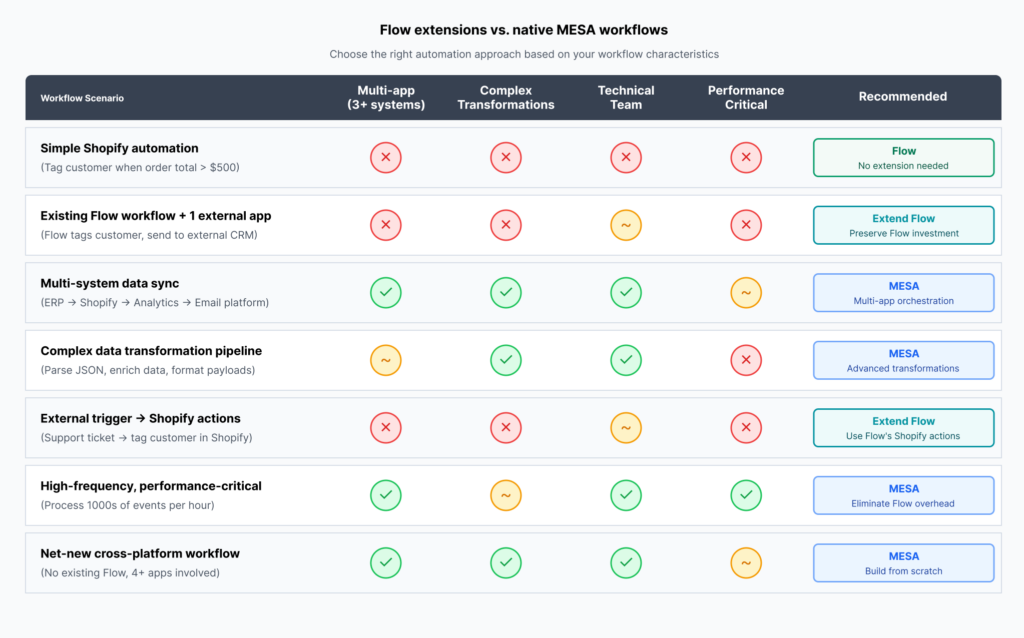
When to use Flow extensions vs. native MESA workflows
Extending Flow isn’t always the right answer. Sometimes starting fresh with a native MESA workflow delivers better results with less complexity. The decision hinges on where your automation needs sit and how invested you are in Flow.
When extending Flow makes the most sense
Choose Flow extensions when you’re already leveraging Flow’s strengths for Shopify-specific automation. If you’ve built workflows that handle customer segmentation, order routing, or inventory tagging—and they work well—extending those existing workflows is more efficient than rebuilding them from scratch.
Flow excels at Shopify’s native objects and relationships. Its visual builder makes it easy for non-technical team members to understand and modify workflows. The conditions and filters are optimized for ecommerce logic. If your automation starts and ends with Shopify data, and you just need to bridge the gap to one or two external apps, extending Flow preserves that investment while solving the connectivity problem.
Extend Flow when:
- You have existing Flow workflows that are 90% complete but missing critical connections
- Your team is comfortable with Flow’s visual builder and you want to maintain that simplicity
- The core logic involves Shopify-specific conditions (customer lifetime value, order tags, product collections, etc.)
- You need Flow’s sophisticated Shopify actions as the endpoint of your automation
- Your stakeholders prefer seeing workflows in Flow’s interface for approval and understanding
- You’re triggering off Shopify events and only need external apps for the final action
- You want to maintain separation between “Shopify automations” and “everything else” for organizational clarity
When native MESA workflows work better
Choose native MESA workflows when your automation spans multiple systems beyond Shopify, requires complex data transformations, or doesn’t depend on Flow’s Shopify-specific capabilities.
MESA’s workflow builder provides more flexibility for multi-step automations involving numerous apps. You can handle complex conditional logic without Liquid coding, transform data structures on the fly, and orchestrate sequences that touch five or ten different systems. If you’re building automations where Shopify is just one participant among many, starting in MESA eliminates the unnecessary layer of Flow.
Use native MESA workflows when:
- Your automation involves 3+ apps in a sequence with Shopify as just one stop
- You need complex data transformations that go beyond simple field mapping
- The workflow doesn’t start or end with Shopify-specific triggers or actions
- You require advanced error handling, retry logic, or conditional branching
- Performance matters and you want to eliminate the Flow → MESA handoff delay
- You’re building net-new automation rather than extending existing Flow workflows
- Your workflow needs to handle edge cases that would require complex Liquid in Flow
The hybrid approach: Using both strategically
Many businesses run both Flow workflows and native MESA workflows side by side. Flow handles Shopify-specific automations—customer lifecycle management, order processing rules, inventory updates. MESA handles cross-platform orchestration—syncing data between your ERP, warehouse management system, analytics platform, and Shopify.
This hybrid approach lets each platform focus on what it does best. Flow remains your Shopify automation engine. MESA becomes your integration backbone, sometimes extending Flow and sometimes operating independently.
The key is avoiding redundancy. Don’t build the same logic in both places. Define clear boundaries: “Flow owns all workflows that start with a Shopify event and primarily manipulate Shopify data” and “MESA owns all cross-system orchestration and complex data pipelines.”
Frequently asked questions
You can. MESA offers ready-made actions and templates for Shopify flow automations so you can set up smart workflows with clicks instead of code. The visual builder helps you put together even complex flows with confidence.
Connect as many as you need. There’s no hard cap. As you add more, organize your workflows for clarity, and you’ll have a powerful network of automations across every tool you use.
These workflows run in the background, away from your storefront. Your customers won’t notice a thing, even if your automations are doing a lot behind the scenes.
No coding is required to extend Flow using MESA. Both platforms use visual workflow builders where you drag and drop actions, map fields, and configure settings through forms. If you can build a Flow workflow, you can extend it with MESA. The only time coding becomes relevant is when you need complex conditional logic in Flow itself (which requires Liquid) or when you’re connecting to custom APIs that need specific payload structures. Even then, MESA provides templates and examples that eliminate most technical barriers.
Flow connectors are pre-built integrations created by app developers that expose specific triggers and actions within Flow’s visual builder. They’re limited to what the developer chose to include and only work within Flow. MESA templates are complete, ready-to-use workflow blueprints that can involve multiple apps and complex logic. A single MESA template might combine Flow triggers with transformations, lookups, and actions across several systems. Templates serve as starting points you can customize, while connectors are fixed integration points you configure.
Absolutely. Many successful businesses run hybrid automation strategies where Flow handles Shopify-centric workflows and MESA handles cross-platform orchestration or extends Flow’s capabilities. This is a stable, supported architecture. The key is maintaining clear boundaries so you don’t duplicate logic in both platforms. Define which types of workflows belong in Flow (typically Shopify-native automations your team manages visually) and which belong in MESA (complex integrations, multi-app sequences, or technical workflows).
Conclusion
Shopify Flow’s 300+ app connectors provide solid automation for common ecommerce workflows, but your business likely relies on tools beyond that ecosystem. Rather than accepting gaps in your automation or abandoning Flow entirely, extending Flow in both directions preserves your existing workflows while unlocking connections to your complete tech stack.
The two extension patterns serve different needs. Extend Flow actions to any app when you have perfect triggers and conditions in Flow but need the final action to reach beyond its connectors. Trigger Flow from external apps when events originate in systems Flow can’t see but you want to leverage Flow’s powerful Shopify actions.
Many businesses use both patterns simultaneously, creating a seamless automation ecosystem where Flow handles Shopify-centric logic while MESA extends its reach in both directions. Others migrate entirely to native MESA workflows as their needs grow more complex. There’s no single right answer—the best approach depends on your existing workflows, team capabilities, and future automation needs.
The decision framework is straightforward: if you’re invested in Flow workflows that just need better connectivity, extend them. If you’re building complex cross-platform automations from scratch, native MESA workflows offer more flexibility. Both approaches are stable, supported, and designed to grow with your business.