You've built a Shopify Flow workflow to tag high-value customers, but you quickly hit a wall. Flow's basic conditions can't check if an order total exceeds $100 and the customer is from California and it's their third purchase. You need Liquid.
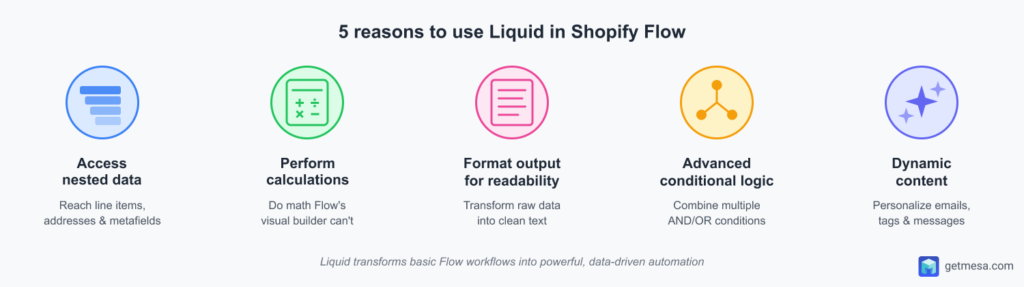
Liquid is Shopify's templating language that transforms Shopify Flow from a simple automation tool into a powerful workflow engine. While Flow's visual builder handles basic tasks, Liquid lets you access nested data, perform calculations, build complex conditional logic, and create dynamic content—all without leaving Flow's interface.
In this comprehensive guide, you'll learn exactly how to use Liquid in Shopify Flow with 20+ copy-paste examples covering customer segmentation, order processing, inventory management, and advanced multi-step workflows. Whether you're tagging customers based on lifetime value or routing orders by shipping speed, you'll find practical code you can implement today.
This guide is designed for Shopify store owners and developers who are actively using Flow and need to unlock advanced customization. No prior Liquid experience required—we'll start with basics and progress to advanced techniques.
Note: While Liquid is powerful, it does require some coding knowledge. If you prefer visual, no-code solutions, we'll show you how Shopify Flow vs MESA comparison handles these same workflows without syntax at the end of this article.
What is Liquid in Shopify Flow?
Understanding Liquid
Liquid is Shopify's open-source templating language, originally created by Shopify founder Tobias Lütke in 2006 (https://shopify.github.io/liquid/). While it was initially designed to power Shopify themes and store customization, Shopify extended Liquid's capabilities to Flow in 2019, enabling merchants to build sophisticated automation workflows.
Think of Liquid as the programming layer that sits on top of Flow's visual builder. Where Flow's interface lets you click and select basic options, Liquid gives you direct access to your store's data structure. You can read order details, customer information, product attributes, and metafields—then manipulate that data using filters and conditional logic.
Liquid uses a simple syntax with three main components: objects (your data), filters (functions that transform data), and tags (logic and control flow). For example, {{ order.total_price }} is an object that outputs an order's total, while {{ order.total_price | divided_by: 100 }} applies a filter to convert Shopify's cent-based pricing to dollars.
The beauty of Liquid in Flow is that it runs server-side during workflow execution, meaning you can access real-time Shopify data without API calls or external integrations.
Where Liquid appears in Flow
Liquid shows up in three specific places within Shopify Flow's workflow builder, each serving a distinct purpose:
1. Condition steps (filtering logic)
Use Liquid to evaluate whether a workflow should continue. For example, to identify high-value customers: {{ customer.amountSpent.amount > 10000 }}
Flow conditions support basic true/false logic so you no longer need to write Liquid in order to control the routes. However, you will need to add as many condition steps as needed for your use case. This can get tedious for complex IF/ELSE logic.
2. Action inputs (dynamic values)
Insert Liquid into action fields to create dynamic content. Instead of a static tag like "new-customer," create tags like "3-orders" or "15-orders" automatically: {{ customer.ordersCount }}-orders
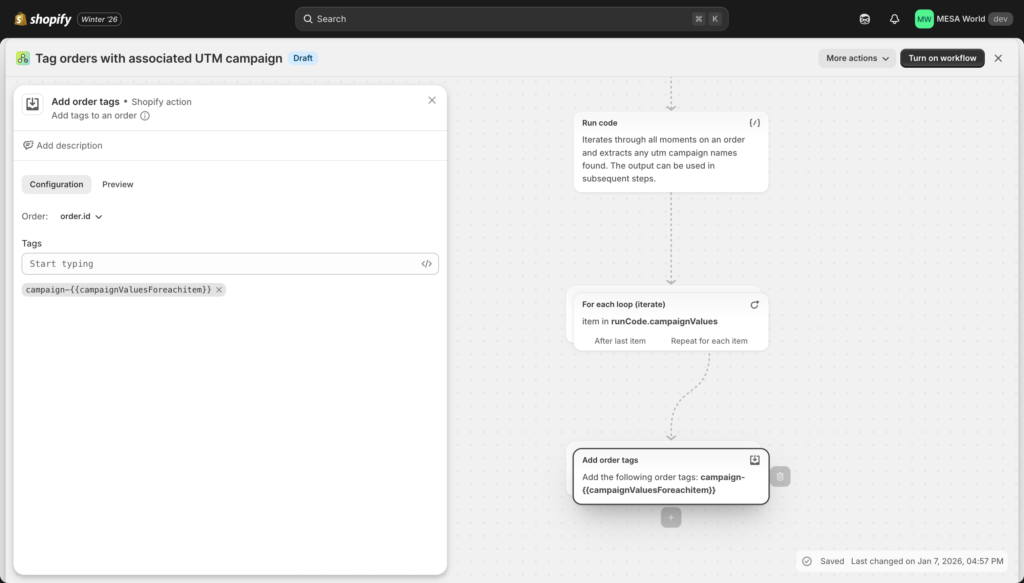
3. Variable definitions (data manipulation)
Create custom variables using Liquid that you can reference later in your workflow. Calculate totals, format dates, or extract specific data points.
Here's a quick practical example that demonstrates Liquid's power:
{{ order.totalPrice.amount | divided_by: 100 | round: 2 }}
This single line of Liquid code converts Shopify's cent-based order total (e.g., 12599) into a readable dollar amount (125.99)—something you simply cannot do with Flow's visual builder alone. Without Liquid, you'd see order totals as "12599" instead of "$125.99" in your tags, emails, or notifications.
Flow's visual helpers reduce (but don't eliminate) Liquid needs
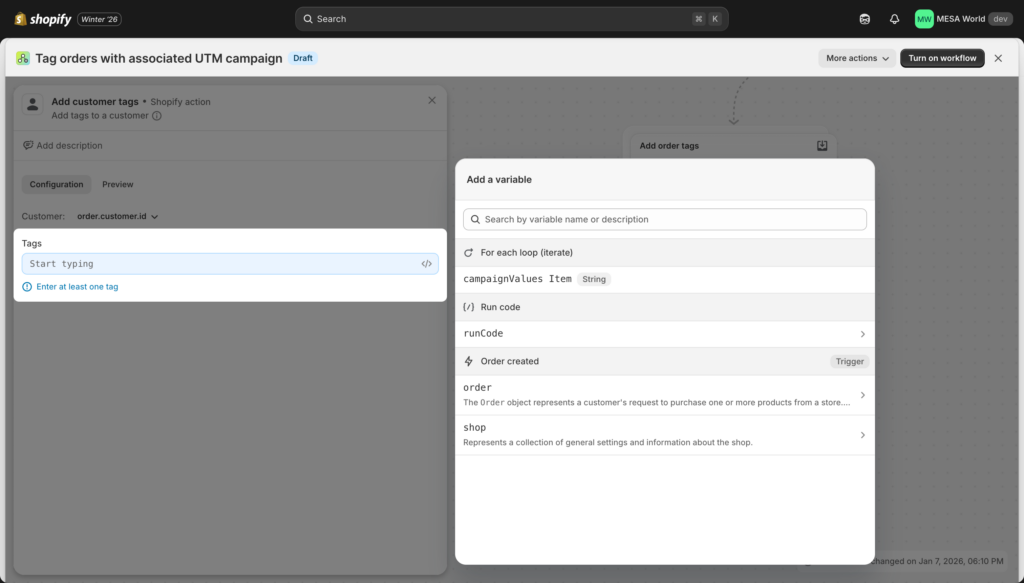
Before diving into where you'll write Liquid code, it's important to know that the app now offers visual helpers for common Flow tasks. When you click into action fields, you'll see a variable picker that lets you select objects (customer, order, product) from a dropdown menu. You can even apply basic filters visually without writing code.
Flow also includes built-in actions that handle common operations:
- Count: Counts items in a list (replaces manual loops for simple counting)
- Sum: Calculates totals (replaces manual arithmetic for basic sums)
- For each: Loops over items (replaces manual iteration for simple operations)
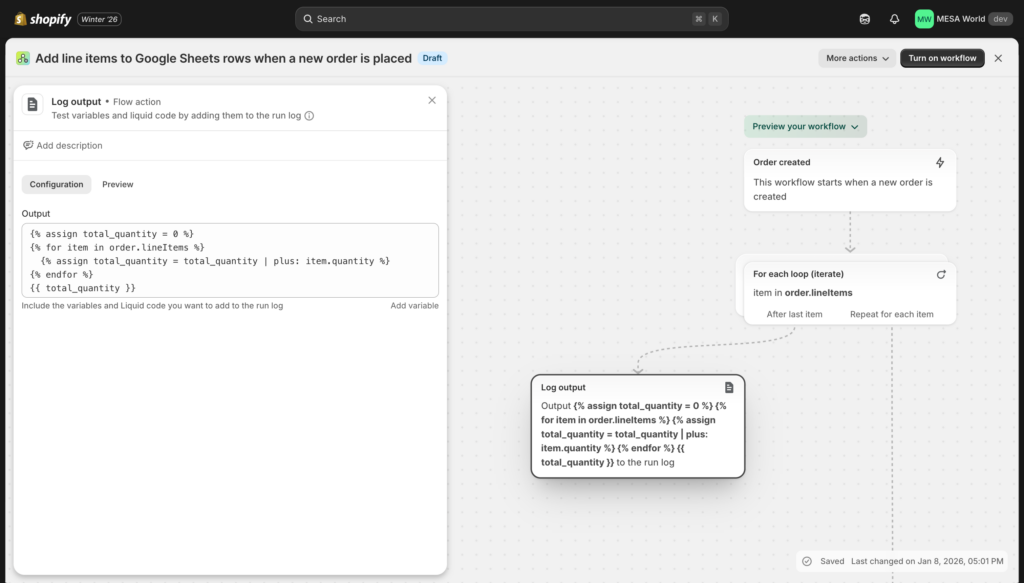
- Log output: Tests variables and Liquid code by adding them to the run log
- Wait: Delays workflow execution without complex date calculations
However, these visual helpers only work for straightforward tasks. Once you need complex conditional logic, custom calculations, or data transformations, you'll still need Liquid.
Important: Flow uses GraphQL syntax
Shopify Flow's Liquid implementation uses GraphQL property names (camelCase), not the REST API syntax (snake_case) you might see in older Shopify documentation or theme Liquid.
What this means:
- ✅ Use
order.totalPrice(notorder.total_price) - ✅ Use
order.lineItems(notorder.line_items) - ✅ Use
customer.ordersCount(notcustomer.orders_count)
How to find the right syntax: Click in any Flow input field and use the variable picker dropdown—it shows the exact property names Flow expects.

Why use Liquid in Shopify Flow?
Shopify Flow's visual builder handles basic automation like "when order is created, add tag," but real-world ecommerce operations demand more sophistication. Liquid bridges the gap between Flow's simplicity and your business's complex needs. Here are five specific scenarios where Liquid becomes essential:
1. Access deeply nested data
Flow's variable picker shows available properties like order.totalPriceSet.shopMoney.amount, but you need Liquid to actually use these values in conditions, calculations, or dynamic tags. The visual interface can't combine multiple nested properties or extract specific data from complex objects.
- Access product metafield values for custom routing logic
- Tag orders over $500 from specific states
- Check if line items contain products from premium vendors
- Identify customers whose billing and shipping addresses don't match
2. Perform calculations Flow can't handle
While Flow includes Sum and Count actions for basic math, it can't do conditional calculations, percentages, or multi-step formulas. Any scenario requiring "calculate X, then use that result to determine Y" needs Liquid.
- Sum quantities across line items (not just count line item types)
- Calculate what percentage discount a customer received
- Determine average item price in an order
- Count only items matching specific criteria (e.g., items over $50)
- Calculate inventory value (quantity × price)
3. Format data for human readability
Shopify stores dates, prices, and other data in system-friendly formats. Liquid transforms these into text that makes sense in emails, Slack messages, and customer-facing content.
- Generate properly formatted addresses for shipping labels
- Convert timestamps to "January 07, 2026 at 2:30 PM"
- Format prices with currency symbols and proper decimals
- Create comma-separated lists of products
- Build readable variant descriptions ("T-Shirt - Large / Blue")
4. Build advanced conditional logic
Flow's visual condition builder works for simple checks, but complex multi-factor decisions require Liquid. When you need to evaluate several criteria together and output different results based on combinations, Liquid's if/elsif/else structure is essential.
- Flag orders requiring special handling based on combined factors
- Create dynamic customer tiers based on spend AND order frequency
- Route orders by region with custom shipping speed expectations
- Apply different tags based on multiple product attributes
- Segment customers by behavior patterns across multiple dimensions
5. Create dynamic, personalized content
Generate tags, notifications, and messages that include actual data values rather than generic text. This makes automation feel less robotic and more tailored to each customer or order.
- Create tags like "spent-$1,250" instead of generic "high-value"
- Build personalized greetings that change by time of day
- Generate notifications with specific product names and quantities
- Create order summaries with actual item details
- Tag customers with their exact order count ("15-orders")
Love Liquid? Be sure to check out Karl Meisterheim's LiquidWeekly.com for his email newsletter and podcast about all things Shopify Liquid.
When Flow's visual tools are enough
You don't always need Liquid. Flow's visual builder handles simple operations well:
- Basic tagging (add or remove single tag)
- Simple routing (if A then B)
- Flow's For each action for identical operations on all items
- Sending standard notification text
Use Liquid when you need:
- Multiple data points combined in one decision
- Math beyond simple addition
- Conditional logic inside loops
- Human-readable formatting
- Dynamic content with actual data values
The following sections teach you Liquid's syntax and provide 25+ copy-paste examples for these exact scenarios.
20+ practical Liquid examples for Shopify Flow
Copy these examples directly into your Flow workflows. Each includes the exact code you need, where to paste it, and what it accomplishes. Start with customer and order examples, then progress to advanced techniques.
Customer workflows

Example 1: Tag customers by lifetime spend tiers
{% assign customer_spent = customer.amountSpent.amount %}

{% if customer_spent > 1000 %}
  platinum-customer
{% elsif customer_spent > 500 %}
  gold-customer
{% elsif customer_spent > 100 %}
  silver-customer
{% else %}
  standard-customer
{% endif %}- Use in: Add customer tag action
- Result: Automatically assigns tier tags based on lifetime spend
Example 2: Identify first-time customers
{{ customer.ordersCount == 1 }}- Use in: Condition step (returns true or false)
- Use case: Trigger welcome workflows or first-purchase offers
Example 3: Check if customer is from specific region
{{ customer.defaultAddress.provinceCode == "CA" }}- Use in: Condition step
- Combine with: Order value checks for regional VIP programs
Example 4: Count customer tags
{{ customer.tags | size }}- Use in: Condition step (e.g., check if
> 5tags) - Use case: Flag over-tagged customers for cleanup
Example 5: Create personalized greeting by time of day
{% assign hour = "now" | date: "%H" | plus: 0 %}
{% if hour < 12 %}
  Good morning, {{ customer.firstName }}!
{% elsif hour < 18 %}
  Good afternoon, {{ customer.firstName }}!
{% else %}
  Good evening, {{ customer.firstName }}!
{% endif %}- Use in: Email subject or body (if Flow supports email actions)
- Note: Time is UTC, not customer's local timezone
Order workflows
Example 6: Calculate total item quantity across order
{% assign total_quantity = 0 %}
{% for edge in order.lineItems.edges %}
  {% assign item = edge.node %}
  {% assign total_quantity = total_quantity | plus: item.quantity %}
{% endfor %}
{{ total_quantity }}- Use in: Condition step or tag value
- Use case: Tag bulk orders with "10+ items" for special handling
- Note: This counts total units ordered, not line item types
Example 7: Check if order contains specific SKU
{% assign has_sku = false %}
{% for edge in order.lineItems.edges %}
  {% assign item = edge.node %}
  {% if item.sku == "PREMIUM-001" %}
    {% assign has_sku = true %}
    {% break %}
  {% endif %}
{% endfor %}
{{ has_sku }}- Use in: Condition step
- Use case: Route orders with premium products to priority fulfillment
Example 8: Calculate discount percentage applied
{% assign subtotal = order.subtotalPriceSet.shopMoney.amount %}
{% assign total = order.totalPriceSet.shopMoney.amount %}
{% assign discount = subtotal | minus: total %}
{% assign percentage = discount | times: 100 | divided_by: subtotal %}
{{ percentage | round }}%- Use in: Tag orders or analytics export
- Use case: Track discount effectiveness, identify high-discount orders
Example 9: Identify rush or express shipping
{{ order.shippingLine.title contains "Express" or order.shippingLine.title contains "Rush" }}- Use in: Condition step for priority fulfillment
- Customize: Adjust "Express" and "Rush" to match your shipping method names
Example 10: Format order date for human reading
{{ order.createdAt | date: "%B %d, %Y at %I:%M %p" }}- Use in: Email content, Slack notifications, Google Sheets exports
- Output: "January 07, 2026 at 02:30 PM"
Example 11: Multi-condition order tagging
{% assign order_total = order.totalPriceSet.shopMoney.amount %}
{% assign customer_tags = customer.tags %}
{% assign country = order.shippingAddress.countryCode %}

{% if order_total > 100 and customer_tags contains "wholesale" and country == "US" %}
  wholesale-bulk-domestic
{% endif %}- Use in: Condition step before adding tag
- Combines: Order value + customer type + shipping destination
Example 12: Check if order uses discount code
{{ order.discountApplications | size > 0 }}- Use in: Condition step
- Use case: Track discount usage, flag orders for profitability review
Product and inventory workflows

Example 13: Low stock alert with safety threshold
{% assign inventory = product.variants.edges.first.node.inventoryQuantity %}
{% if inventory < 10 and inventory > 0 %}
  true
{% endif %}- Use in: Condition before Slack/email notification
- Prevents: Alerts for out-of-stock items (only alerts for 1-9 units)
Example 14: Calculate inventory value
{% assign variant = product.variants.edges.first.node %}
{% assign inventory = variant.inventoryQuantity %}
{% assign price = variant.price %}
{% assign value = inventory | times: price %}
${{ value }}- Use in: Google Sheets for inventory valuation reporting
- Note: Works for single-variant products
Example 15: Check product type for routing
{{ product.productType == "Apparel" }}- Use in: Condition step for type-specific workflows
- Use case: Route apparel vs electronics to different fulfillment centers
Example 16: Format product variant with title
{{ product.title }} - {{ product.variants.edges.first.node.title }}- Use in: Custom notifications, inventory reports
- Output: "Classic T-Shirt - Large / Blue"
Advanced multi-step logic
Example 17: Dynamic customer segmentation engine
{% assign spent = customer.amountSpent.amount %}
{% assign orders = customer.ordersCount %}

{% if spent > 1000 and orders > 20 %}
  vip-frequent-buyer
{% elsif spent > 1000 %}
  vip-whale
{% elsif orders > 20 %}
  frequent-buyer
{% elsif spent > 100 %}
  growing-customer
{% else %}
  standard-customer
{% endif %}- Use in: Customer tagging workflow
- Creates: Six distinct segments based on spend and frequency
Example 18: Regional shipping speed classification
{% assign state = order.shippingAddress.provinceCode %}

{% if state == "CA" or state == "NV" or state == "OR" or state == "WA" %}
  west-coast-1-2-days
{% elsif state == "NY" or state == "NJ" or state == "CT" or state == "MA" %}
  east-coast-1-2-days
{% elsif state == "TX" or state == "AZ" or state == "NM" %}
  southwest-2-3-days
{% else %}
  standard-3-5-days
{% endif %}- Use in: Order tagging for shipping expectations
- Customize: Adjust states based on your warehouse locations
Example 19: Calculate days since last order
{% assign last_order_date = customer.lastOrder.createdAt | date: "%s" %}
{% assign current_date = "now" | date: "%s" %}
{% assign seconds_diff = current_date | minus: last_order_date %}
{% assign days = seconds_diff | divided_by: 86400 %}
{{ days }}- Use in: Condition step (e.g., check if
> 90days) - Use case: Trigger win-back campaigns for dormant customers
Example 20: Access product metafield values
{{ product.metafield.namespace.key }}- Use in: Condition step or tag value
- Prerequisite: Metafield must exist in your store
- Use case: Route products based on custom priority levels
Example 21: Count high-value items in order
{% assign high_value_count = 0 %}
{% for edge in order.lineItems.edges %}
  {% assign item = edge.node %}
  {% assign item_price = item.originalTotalSet.shopMoney.amount %}
  {% if item_price > 100 %}
    {% assign high_value_count = high_value_count | plus: 1 %}
  {% endif %}
{% endfor %}
{{ high_value_count }}- Use in: Condition step (check if
> 0) - Use case: Require signature confirmation, add insurance
More popular examples
Example 22: Check if customer phone exists
{% if customer.phone != blank %}
  true
{% else %}
  false
{% endif %}- Use in: Condition before SMS notifications
- Prevents: Errors from texting customers without phone numbers
Example 23: Extract order number without prefix
{{ order.name | remove: "#" }}- Use in: External system integrations
- Converts: "#1001" to "1001"
Example 24: Check if order has customer notes
{{ order.note != blank }}- Use in: Condition step to flag orders needing attention
- Follow-up: Access note content with
{{ order.note }}
Example 25: Calculate average item price in order
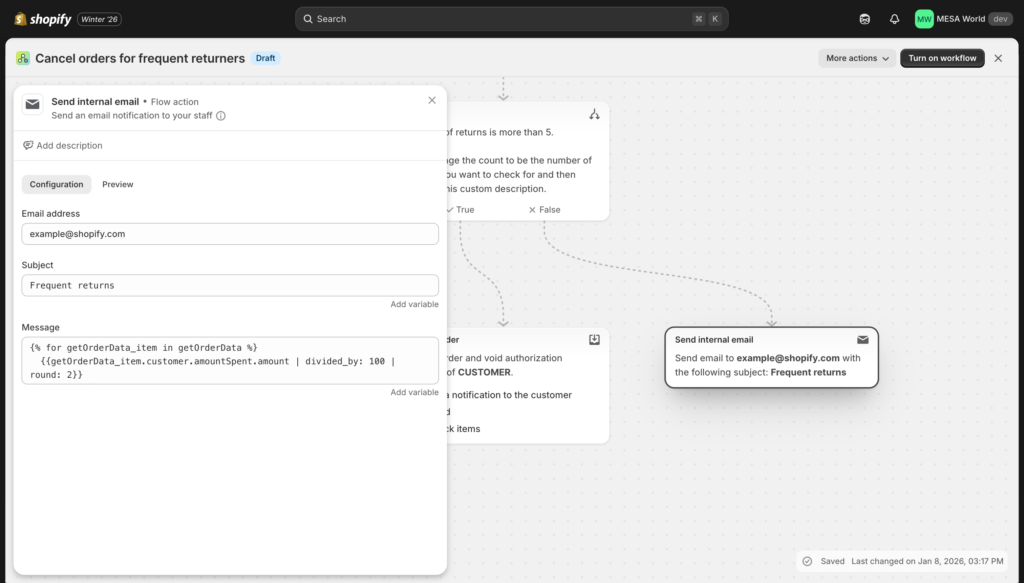
{% assign item_count = order.lineItems.edges | size %}
{% assign order_total = order.totalPriceSet.shopMoney.amount %}
{% assign avg_price = order_total | divided_by: item_count %}
${{ avg_price | round: 2 }}- Use in: Tag orders or analytics
- Use case: Segment orders by price tier for different fulfillment SLAs
Example 26: Test Liquid with Log output action
Order: {{ order.name }}
Total: ${{ order.totalPriceSet.shopMoney.amount }}
Customer: {{ customer.firstName }} {{ customer.lastName }}
Items: {{ order.lineItems.edges | size }}- Use in: Flow's "Log output" action
- How: Add Log output step, paste code, check run history
- Use case: Test your Liquid before using in actual tags or actions
Liquid examples summary
These 26 examples cover the most common Shopify Flow automation scenarios. Start with the simpler customer and order examples (1-12), then progress to product inventory (13-16) and advanced techniques (17-25) as you become more comfortable with Liquid syntax.
| # | Use case | Complexity | Where to use it |
|---|---|---|---|
| 1 | Tag customers by lifetime spend tiers | 🟡 Medium | Add customer tag action |
| 2 | Identify first-time customers | 🟢 Basic | Condition step |
| 3 | Check if customer is from specific region | 🟢 Basic | Condition step |
| 4 | Count customer tags | 🟢 Basic | Condition step |
| 5 | Create personalized greeting by time of day | 🟡 Medium | Email subject line or body |
| 6 | Calculate total item count across order | 🟡 Medium | Condition step or tag value |
| 7 | Check if order contains specific SKU | 🟡 Medium | Condition step |
| 8 | Calculate actual discount percentage applied | 🔴 Expert | Tag orders or analytics export |
| 9 | Identify rush or express shipping | 🟢 Basic | Condition step |
| 10 | Format order date for human reading | 🟢 Basic | Email content, Slack notifications |
| 11 | Multi-condition order tagging | 🟡 Medium | Condition step before tag action |
| 12 | Check if order uses discount code | 🟢 Basic | Condition step |
| 13 | Low stock alert with safety threshold | 🟡 Medium | Condition before Slack/email alert |
| 14 | Calculate total inventory value | 🟡 Medium | Google Sheets export |
| 15 | Check product type for routing | 🟢 Basic | Condition step |
| 16 | Format product variant with title | 🟢 Basic | Custom notifications, reports |
| 17 | Dynamic customer segmentation engine | 🔴 Expert | Customer tag action |
| 18 | Regional shipping speed classification | 🟡 Medium | Order tag action |
| 19 | Calculate days since customer's last order | 🔴 Expert | Condition step for re-engagement |
| 20 | Access product metafield values | 🟢 Basic | Condition step or tag value |
| 21 | Count high-value items in order | 🔴 Expert | Condition step |
| 22 | Check if customer phone number exists | 🟢 Basic | Condition before SMS actions |
| 23 | Extract order number for clean formatting | 🟢 Basic | External integrations, reporting |
| 24 | Check if order has customer notes | 🟢 Basic | Condition step |
| 25 | Calculate average item price in order | 🔴 Expert | Tag orders or analytics |
| 26 | Use Log output action to test your Liquid | 🟢 Basic | Log output action (testing) |
Remember: every example here can be combined with others. For instance, Example 1 (customer tiers) + Example 11 (multi-condition tagging) creates powerful segmentation. The real power of Liquid comes from mixing and matching these building blocks.
In the next section, we'll cover the most common mistakes people make when implementing these examples—and how to avoid them.
Common Liquid mistakes in Shopify Flow
Even experienced developers make these mistakes when first using Liquid in Flow. Learn from these common errors to save hours of debugging.
Mistake #1: Treating GraphQL prices like REST API prices
If you've worked with Shopify's REST API or theme Liquid before, you're used to prices stored in cents. Flow's GraphQL uses decimal format instead.
✅ Right: {% if order.totalPriceSet.shopMoney.amount > 100 %}
❌ Wrong: {% if order.totalPriceSet.shopMoney.amount > 10000 %}
Why the first is right: GraphQL returns 125.99 for a $125.99 order. Comparing to 100 checks if the order exceeds $100.
The wrong version checks if the order is over $10,000 (treating the decimal as if it were 10,000 cents).
When this matters: Any price comparison in conditions—order totals, customer lifetime spend, product prices, line item prices.
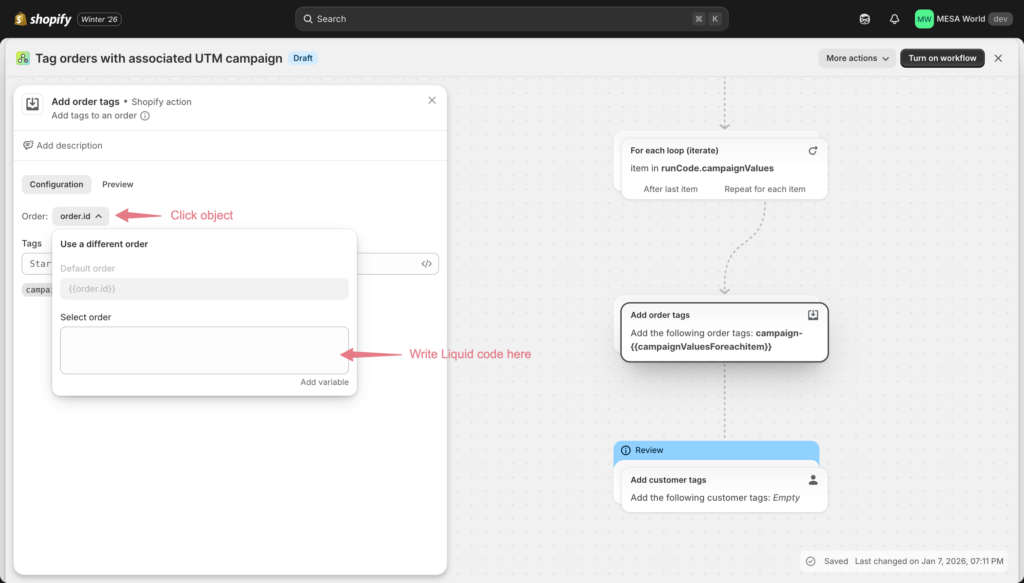
Mistake #2: Typing GraphQL paths manually instead of using variable picker
Flow's GraphQL syntax is verbose. Typing order.totalPriceSet.shopMoney.amount by hand invites typos.
❌ Wrong (typo): {{ order.totalPrice.shopMoney.amount }}
✅ Right: {{ order.totalPriceSet.shopMoney.amount }}
How to avoid: Always use Flow's variable picker dropdown. Click in any field, browse to the property you need, and Flow inserts the exact syntax automatically.
Pro tip: For complex Liquid with multiple references to the same property, assign it to a simple variable name once:
{% assign order_total = order.totalPriceSet.shopMoney.amount %}
{% assign customer_spent = customer.amountSpent.amount %}

{% if order_total > 100 and customer_spent > 1000 %}
  vip-order
{% endif %}
This keeps your code readable and reduces typo risk.
Mistake #3: Case-sensitive tag and text comparisons
Liquid comparisons are case-sensitive. "VIP" does not equal "vip" or "Vip".
❌ Wrong: {% if customer.tags contains "VIP" %}Problem: Won't match if the actual tag is "vip", "Vip", or "V.I.P."
Solution 1 - Check multiple variations:
✅ Right: {% if customer.tags contains "VIP" or customer.tags contains "vip" %}Solution 2 - Convert to lowercase first:
✅ Right: {% assign tags_lower = customer.tags | join: "," | downcase %}
{% if tags_lower contains "vip" %}
When this matters: Tag checking, product type comparisons, vendor names, SKU matching, any text comparison.
Mistake #4: Not handling null or empty values
Missing data causes workflow failures when you try to use it without checking first.
❌ Wrong: Send SMS to {{ customer.phone }}Problem: Fails if customer.phone is null/empty.
Solution for output (provide fallback):
✅ Right: {{ customer.phone | default: "No phone provided" }}Solution for conditions (check before using):
✅ Right: {% if customer.phone != blank %}
  Send SMS to {{ customer.phone }}
{% endif %}
Common null fields: customer.phone, order.note, customer.note, product metafields, order.shippingAddress.company
Mistake #5: Overly complex nested conditions
Cramming too much logic into one condition makes it unreadable, error-prone, and impossible to debug.
❌ Too complex:
{% if customer.tags contains "wholesale" and order.totalPriceSet.shopMoney.amount > 100 and order.lineItems.edges | size > 5 and order.shippingAddress.countryCode == "US" and customer.ordersCount > 10 %}
Problems:
- Hard to read and understand
- Difficult to debug which condition is failing
- One typo breaks the entire check
Better approach: Break into multiple condition steps in Flow, or simplify the logic.
✅ Better:
{% assign order_total = order.totalPriceSet.shopMoney.amount %}
{% assign is_wholesale = customer.tags contains "wholesale" %}
{% assign is_us = order.shippingAddress.countryCode == "US" %}

{% if is_wholesale and order_total > 100 and is_us %}
  <!-- Then add second condition step for remaining criteria -->
{% endif %}
Or use separate Flow condition steps:
- First condition: Check customer is wholesale AND order over $100
- Second condition: Check order has 5+ items AND ships to US
- Third condition: Check customer has 10+ orders
Mistake #6: Forgetting GraphQL uses edges and nodes for arrays
When looping through collections like line items, you must access the nested GraphQL structure correctly.
❌ Wrong: {% for item in order.lineItems %}
           {{ item.title }}
         {% endfor %}

✅ Right: {% for edge in order.lineItems.edges %}
            {% assign item = edge.node %}
            {{ item.title }}
          {% endfor %}
Why it matters: GraphQL wraps collections in edges, and each edge contains a node with the actual data.
Exception: When using Flow's "For each loop" action, Flow creates simplified variables like lineItemsForeachitem.title automatically. This mistake only applies to raw Liquid loops.
Mistake #7: Not testing before going live
Flow has no true sandbox environment. Every workflow runs on live data, which means untested Liquid code can cause real problems.
Common consequences:
- Orders tagged incorrectly
- Notifications sent to wrong recipients
- Failed workflows that should have succeeded
- Customers seeing error messages
How to avoid:
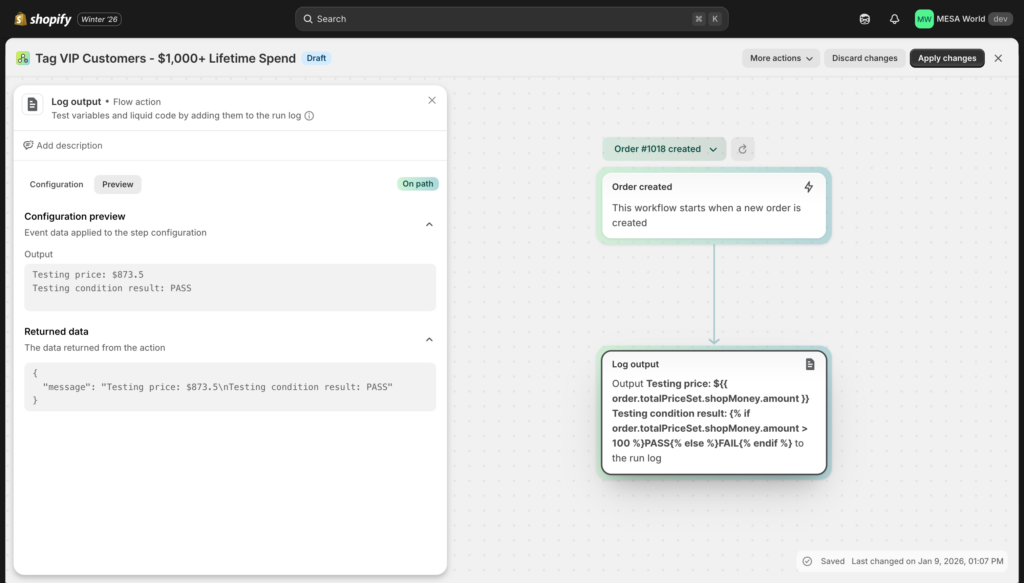
1. Use Flow's Log output action (Example 26):
Testing price: ${{ order.totalPriceSet.shopMoney.amount }}
Testing condition result: {% if order.totalPriceSet.shopMoney.amount > 100 %}PASS{% else %}FAIL{% endif %}
2. Use Flow's Preview function:
- Select a past order/customer/product
- See which path your workflow would take
- Verify conditions pass/fail as expected
3. Test with harmless actions first:
- Use "add tag: test" instead of real actions
- Verify tag appears correctly
- Update to production action only after confirmation
Mistake #8: Confusing Flow's For each variables with Liquid loop variables
Flow's "For each loop (iterate)" action creates special variables that only work within that action context.
❌ Wrong (in raw Liquid loop):
{% for item in order.lineItems %}
  {{ lineItemsForeachitem.title }}
{% endfor %}

✅ Right (in Flow's For each action):
Use Flow's action, then reference:
{{ lineItemsForeachitem.title }}

✅ Right (in raw Liquid loop):
{% for edge in order.lineItems.edges %}
  {% assign item = edge.node %}
  {{ item.title }}
{% endfor %}
When each syntax works:
lineItemsForeachitem.*→ Only inside Flow's For each actionedge.node.*→ Only in raw Liquid loops- They're not interchangeable
Test your Liquid code before deploying
Before adding Liquid code to your live workflows, use this syntax checker to catch common errors. While it can't test against your actual store data (use Flow's Log output action for that), it identifies basic syntax mistakes, Flow-specific issues, and potential problems that cause workflow failures.
Paste your code below to check for:
- Missing closing tags (
{% endif %},{% endfor %}) - Mismatched curly braces
- Theme syntax vs Flow's GraphQL syntax
- Common mistakes like treating decimals as cents
- Null values without proper checks
🧪 Liquid Syntax Checker
Paste your Shopify Flow Liquid code below to check for common syntax errors and Flow-specific issues.
Quick test examples:
Remember: This tool catches syntax errors, not logic errors. Always test your Liquid in Flow using the Log output action (Example 26) with real trigger data before deploying to production workflows.
The next section covers testing strategies to catch these mistakes before they cause problems in production.
Liquid limitations in Shopify Flow
While Liquid is powerful, it has inherent constraints that affect what you can build in Flow. Understanding these limitations helps you know when to use Flow's other tools—or when to consider alternatives.
What Liquid itself cannot do
No custom functions or imports
Liquid is limited to Shopify's built-in filters. You cannot:
- Create custom functions
- Import JavaScript libraries
- Use date/time libraries like Moment.js
- Add third-party utilities or helpers
- Define reusable code blocks
Complex calculations become unwieldy
While basic math works (plus, minus, times, divided_by), complex formulas get messy:
{% assign margin_dollars = product.priceRangeV2.maxVariantPrice.amount | minus: product.cost %}
{% assign margin_percent = margin_dollars | divided_by: product.priceRangeV2.maxVariantPrice.amount | times: 100 %}
This calculates profit margin, but multi-step financial calculations or statistical analysis become unreadable quickly.
Limited string manipulation
Liquid provides basic text filters (upcase, downcase, split, replace), but lacks:
- Regular expressions (regex)
- Advanced pattern matching
- Complex text parsing
- Substring extraction with start/end positions
- Character encoding conversions
Read-only data access
Liquid can access and display data, but cannot modify underlying objects. You can't:
- Update customer tags within Liquid (need separate action)
- Change product properties mid-workflow
- Build new objects to pass between steps
- Store calculated values for later use (except in variables within same step)
How Flow's built-in actions help (but don't solve everything)
HTTP request enables external data access
Flow's "Send HTTP request" action lets you call external APIs, addressing one major Liquid limitation. However:
- Requires endpoint setup and authentication
- Limited error handling
- No retry logic for failed requests
- Response parsing can be complex
- Rate limiting concerns with external APIs
For each loop handles simple iteration
Flow's "For each loop (iterate)" action processes lists visually, but:
- Cannot perform conditional iteration (skip items based on criteria)
- Limited to Flow's predefined actions inside loop
- No loop metadata access (index, first/last flags)
- Cannot accumulate values across iterations without workarounds
- Can't break out of loop early when condition met
Count and Sum actions for basic aggregation
Flow includes visual Count and Sum actions, but:
- Count: Cannot count conditionally (only items matching criteria)
- Sum: Cannot sum conditionally (only items over certain value)
- Neither can perform calculations during aggregation
- No average, median, or other statistical functions
Log output for debugging
Flow's "Log output" action helps test Liquid, but:
- Requires running workflow on real/historical data
- No step-through debugging
- Can't inspect variables mid-execution
- Limited to viewing final output
- Must check run history after execution
Run code action for advanced logic
The "Run code" action lets merchants write JavaScript:
What it enables:
- Full JavaScript syntax and features
- Complex data transformations
- Advanced conditional logic
- API calls with full control
- Mathematical calculations
Major limitations:
- Cannot import external libraries (no npm packages)
- Limited execution time (may timeout)
- Requires JavaScript knowledge
- Less documented than Liquid
- Debugging still challenging
Real-world challenges that remain
Date math is painful
Calculating time differences requires converting dates to Unix timestamps:
{% assign last_order = customer.lastOrder.createdAt | date: "%s" %}
{% assign now = "now" | date: "%s" %}
{% assign diff = now | minus: last_order %}
{% assign days = diff | divided_by: 86400 %}
This works, but there's no simple days_between() function. Every date calculation requires manual timestamp math.
Conditional aggregation requires loops
Want to sum quantities only for items over $50? You need a full loop:
{% assign conditional_sum = 0 %}
{% for edge in order.lineItems.edges %}
  {% assign item = edge.node %}
  {% assign item_price = item.originalTotalSet.shopMoney.amount %}
  {% if item_price > 50 %}
    {% assign conditional_sum = conditional_sum | plus: item.quantity %}
  {% endif %}
{% endfor %}
Flow's Sum action can't handle the conditional logic. Flow's For each action can't accumulate values easily.
No built-in error handling
If Liquid encounters an error (null value, division by zero, invalid property), the workflow fails. There's no try/catch:
{%- comment -%} This fails if phone is null {%- endcomment -%}
{{ customer.phone | upcase }}

{%- comment -%} Must use default filter {%- endcomment -%}
{{ customer.phone | default: "N/A" | upcase }}
Every potential null must be manually handled with default filters or != blank checks.
GraphQL's nested structure adds complexity
Accessing simple data requires navigating multiple levels:
{{ order.totalPriceSet.shopMoney.amount }}
{{ order.lineItems.edges.first.node.title }}
{{ customer.defaultAddress.provinceCode }}
While Flow's variable picker helps, the verbosity makes code harder to read and debug.
No way to persist data between workflow runs
Each workflow execution is isolated. You cannot:
- Track cumulative totals across orders
- Build running calculations
- Store state for future triggers
- Create custom databases or logs
- Reference data from previous runs
Testing and debugging limitations
Flow provides limited testing capabilities:
What Flow offers:
- Preview function (shows workflow path)
- Log output action (requires real trigger data)
- Run history (shows errors after they happen)
What's missing:
- True sandbox environment
- Step-through debugger
- Variable inspector mid-workflow
- Ability to test with mock data
Performance considerations
Liquid loops can be slow:
- Processing 100+ line items with complex logic takes time
- Nested loops multiply execution time
- Flow may timeout on very complex calculations
- No way to optimize or profile performance
No caching:
- Same calculation repeated in multiple conditions runs each time
- Cannot cache API responses
- Cannot store intermediate results for reuse
When these limitations matter
You're fine with Liquid + Flow if:
- Working only with Shopify data
- Workflows have 5 or fewer conditions
- Basic math operations (add, subtract, multiply, divide)
- You're comfortable debugging code
- Simple date formatting (not complex date math)
- Small to medium data volumes (< 50 line items typically)
Consider alternatives when:
- Connecting multiple external systems beyond Shopify
- Complex data transformations with nested calculations
- Team members aren't technical or don't want to learn Liquid
- Need robust testing before deploying workflows
- Require detailed debugging and error logs
- Need to persist data between workflow runs
- Want conditional aggregations (sum/count with criteria)
- Processing high volumes requiring performance optimization
- Not on Shopify Plus and need logic beyond Liquid's capabilities
The pricing consideration:
Flow is free, making it attractive for simple automation. However, consider time costs:
- Hours debugging Liquid syntax errors
- Workflow failures affecting real orders
- Limited testing causing production issues
- Ongoing maintenance as workflows grow complex
Sometimes a paid alternative with better tooling saves more than the subscription costs.
MESA vs Shopify Flow limitations
| Challenge | Shopify Flow + Liquid | MESA |
|---|---|---|
| External API calls | Requires HTTP request setup | 100+ pre-built integrations |
| Complex calculations | Manual Liquid code | Visual calculation builder |
| Date math | Unix timestamp workarounds | Built-in date functions |
| Conditional loops | Requires Liquid | Visual loop with conditions |
| Error handling | Workflow fails | Try/catch logic available |
| AI integrations | None | Native + ChatGPT, Claude, Perplexity, Gemini connectors |
| Advanced logic | Run code (Plus only) | Available on all plans |
See how MESA handles these challenges →
The bottom line: Liquid is powerful for Shopify-native automation, but has clear boundaries. Flow's visual actions address some gaps, and the Run code action helps Shopify Plus merchants, but fundamental limitations remain for complex workflows.
Frequently asked questions
Do I need to know Liquid to use Shopify Flow?
No, you don't need to know Liquid to use Shopify Flow. Flow's visual builder, variable picker, and built-in actions handle common automation tasks without code. You only need Liquid for advanced scenarios like:
• Complex conditional logic combining multiple factors
• Custom calculations beyond basic math
• Conditional loops that filter or accumulate data
• Dynamic content with formatted output
Most merchants use Flow successfully without ever writing Liquid code.
What is Liquid in Shopify Flow?
Liquid in Shopify Flow is a templating language that lets you access and manipulate store data for advanced automation. It enables you to:
• Read deeply nested data (order totals, customer details, product properties)
• Perform calculations and comparisons
• Build conditional logic with if/else statements
• Loop through collections like line items
• Format data for human-readable output
Flow uses GraphQL-based Liquid syntax, which differs from theme Liquid.
How do I write Liquid code in Shopify Flow?
To write Liquid in Shopify Flow, click in any condition or action field and either use the variable picker or type Liquid code directly. Follow these steps:
• Click the input field where you want to add Liquid
• Use the variable picker to browse available objects and properties
• Or type manually using double curly braces: {{ object.property }}
• For logic, use curly braces with percent signs: {% if condition %}
• Test your code using Flow's "Log output" action before going live
Always use the variable picker to avoid syntax errors.
What's the difference between Liquid in themes vs Flow?
In themes, Liquid generates HTML for your storefront. In Flow, Liquid evaluates data to make decisions (conditions) or create dynamic values (action inputs). The syntax is the same, but the context and available objects differ.
How do I test Liquid code in Shopify Flow?
Test Liquid code in Flow using the "Log output" action. Here's the process:
• Add a "Log output" action to your workflow
• Paste your Liquid code into the log field
• Run the workflow with a real or historical trigger
• Check the workflow run history to see the output
• Verify the results match your expectations
Alternatively, use Flow's Preview function to see which workflow path a specific order/customer would take, though it won't show actual Liquid output values.
How do I access order total in Shopify Flow Liquid?
Access order total in Flow using {{ order.totalPriceSet.shopMoney.amount }}. This returns the order total as a decimal (e.g., 125.99 for a $125.99 order).
For conditions checking if order exceeds $100:{% if order.totalPriceSet.shopMoney.amount > 100 %} high-value-order {% endif %}
Note: Flow uses decimals, not cents. Don't divide by 100 or you'll get incorrect values.
Can I use Liquid to access metafields in Flow?
Yes! Use syntax like {{ product.metafields.namespace.key }} or {{ customer.metafields.custom.field_name }}. Make sure metafields are set up in your store first. Flow only accesses existing metafields, it cannot create new ones.
Do I need Shopify Plus to use Liquid in Flow?
No, Liquid is available in Flow on all Shopify plans (Starter, Basic, Shopify, Advanced, Plus). However, some Flow features like "Run code" action are Plus-only.
When to use Liquid vs when to use MESA
The choice between mastering Liquid in Flow or switching to MESA depends on your workflow complexity, team skills, and how much time you want to invest in automation.
Use Liquid in Flow when:
✅ You only need Shopify data - No external apps or systems to connect
✅ Workflows are relatively simple - Fewer than 5 conditions, basic logic
✅ You're comfortable with code - You or your team can write and debug Liquid
✅ You're already on Shopify Plus - Flow is included, no additional cost
✅ Basic internal automation - Order tagging, customer segmentation, inventory alerts
Flow + Liquid works well for: Auto-tagging orders by value, flagging VIP customers, routing orders based on shipping address, basic inventory notifications.
Consider MESA instead when:
❌ You need external app integrations - Google Sheets, Slack, CRMs, ERPs, marketing tools
❌ Your team isn't technical - No one wants to learn Liquid syntax
❌ Complex data transformations - Multi-step calculations, date math, conditional aggregations
❌ AI-powered automation - Need Yedric for intelligent routing and content generation
❌ Scheduled workflows - Need workflows that run on time schedules, not just triggers
❌ Detailed debugging required - Need clear error messages and step-by-step logs
Real customer experiences
After shopping the market and outgrowing Shopify Flow, MESA was the only solution that could handle our complex requirements for managing our store.
⭐⭐⭐⭐⭐ Madhappy
Amazing app, that basically takes Shopify Flow idea to the next level, with a very simple graphical interface and a ton of functionality.
⭐⭐⭐⭐⭐ Reinhard Frans
The practical decision framework
Start with Flow if:
- You're testing automation for the first time
- Budget is extremely tight
- Workflows are simple and Shopify-only
Switch to MESA when:
- You've hit Flow's limitations (external integrations, testing, complexity)
- Automation is business-critical and needs reliability
- Time spent debugging Liquid exceeds cost of MESA subscription
- You need expert support from Shopify automation specialists
Many stores use both: Flow for simple internal tasks, MESA for complex workflows connecting external systems. You don't have to choose just one.
Conclusion
Liquid transforms Shopify Flow from a basic automation tool into a powerful workflow engine capable of handling sophisticated ecommerce scenarios. While Flow's visual builder handles simple tasks, Liquid unlocks the ability to access nested data, perform complex calculations, build multi-factor conditional logic, and create dynamic, personalized content that makes automation feel less robotic.
The 26 examples in this guide cover the most common Shopify automation scenarios—from customer segmentation and order routing to inventory management and conditional tagging. Start with beginner examples (like first-time customer detection or date formatting), test thoroughly using Flow's Log output action, then progress to advanced techniques as your confidence grows.
Remember the key principles:
- Always use Flow's variable picker to avoid syntax errors
- Flow uses GraphQL decimals for prices, not cents
- Test with Log output action before deploying to production
- Assign complex paths to simple variable names for readability
- Break overly complex conditions into multiple Flow steps
Your next steps:
- Start small: Pick one example that solves an immediate business need
- Test safely: Use Log output action or Flow's Preview function
- Iterate: Once it works, expand to more complex scenarios
- Bookmark this guide: Reference the examples as you build new workflows
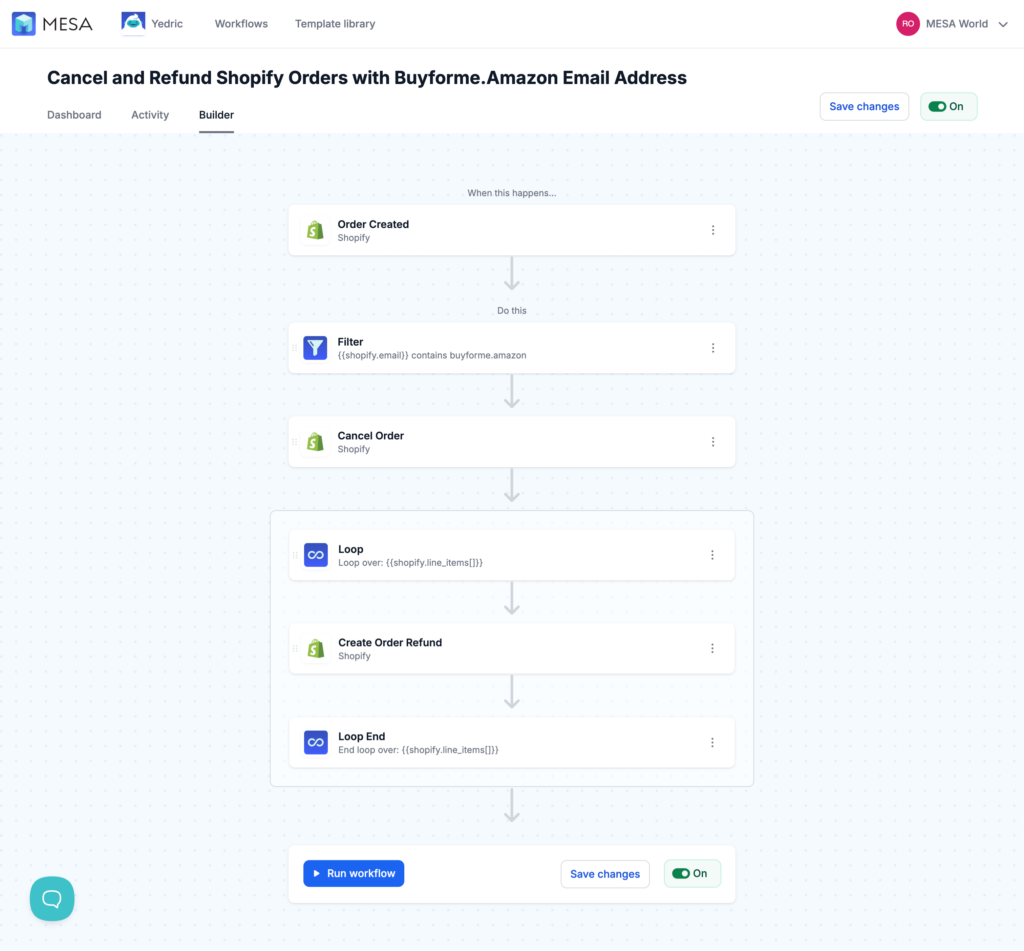
When Flow + Liquid isn't enough:
If you find yourself spending hours debugging syntax errors, hitting Flow's limitations with external integrations, or wishing for a proper testing sandbox, it might be time to explore alternatives. MESA offers the same automation capabilities with a visual interface, built-in testing, 100+ pre-built integrations, and expert support from Shopify automation specialists.
- MESA template library
- Shopify Flow vs MESA comparison
- How to Extend Shopify Flow
- 50+ Shopify Flow Templates
- Shopify Flow: Complete Guide
Whether you master Liquid in Flow or switch to a visual platform, the important thing is that you're automating. Every workflow you build frees up time for strategic work that actually grows your business.
Ready to build your first Liquid workflow? Pick an example from this guide, open Flow, and start automating.