You're driving traffic to your Shopify store. Your marketing campaigns are running. Visitors are landing on your site. But here's the hard truth: if those visitors aren't converting into customers, every dollar you spend on traffic is essentially wasted. The difference between a 1% conversion rate and a 3% conversion rate isn't just a couple of percentage points—it's the difference between barely breaking even and building a thriving ecommerce business.
Conversion rate optimization for Shopify stores goes beyond generic CRO advice. It means understanding how Shopify's platform specifically impacts your conversion funnel, from the checkout process to theme performance to app integrations.
In this comprehensive guide, you'll learn how to calculate and track your Shopify conversion rate, discover where your store stacks up against industry benchmarks, identify exactly why visitors aren't converting, and develop a plan of action.
Optimizing your conversion rate is the most cost-effective way to grow your revenue without spending more on advertising. Let's get started.
What is Shopify conversion rate?
Your Shopify conversion rate is the percentage of visitors to your store who complete a desired action. While most merchants think of conversion rate as the percentage of visitors who make a purchase, conversion rate optimization actually encompasses multiple types of conversions throughout the customer journey.
The primary conversion: Purchase completion
When Shopify calculates your store's conversion rate in the Analytics dashboard, it uses this formula: (Number of orders placed / Number of sessions) × 100. A session represents a single visit to your store, and Shopify counts each order as one conversion, regardless of how many items are in that order.
How Shopify tracks conversions differently
Unlike platforms like WordPress with WooCommerce, Shopify's built-in analytics automatically tracks ecommerce conversions without requiring additional plugins or complex setup. Shopify uses session-based tracking rather than unique visitor tracking, which means if someone visits your store three times in one day, that counts as three sessions. This is important to understand because it can make your conversion rate appear lower than visitor-based calculations.
Shopify also attributes conversions to the session in which the purchase was completed, not necessarily the session where the customer first discovered your store. This means if someone browses on Monday and purchases on Wednesday, the conversion is attributed to Wednesday's session.
Secondary conversions
Effective Shopify CRO tracks multiple conversion types:
- Add to Cart Rate: The percentage of visitors who add at least one item to their cart
- Checkout Initiation Rate: Visitors who begin the checkout process
- Account Creation Rate: Visitors who register for an account
- Newsletter Signup Rate: Visitors who subscribe to your email list
- Product Page Engagement: Clicks on product images, reviews, or videos
Understanding the Shopify conversion funnel
The typical Shopify conversion funnel flows like this:
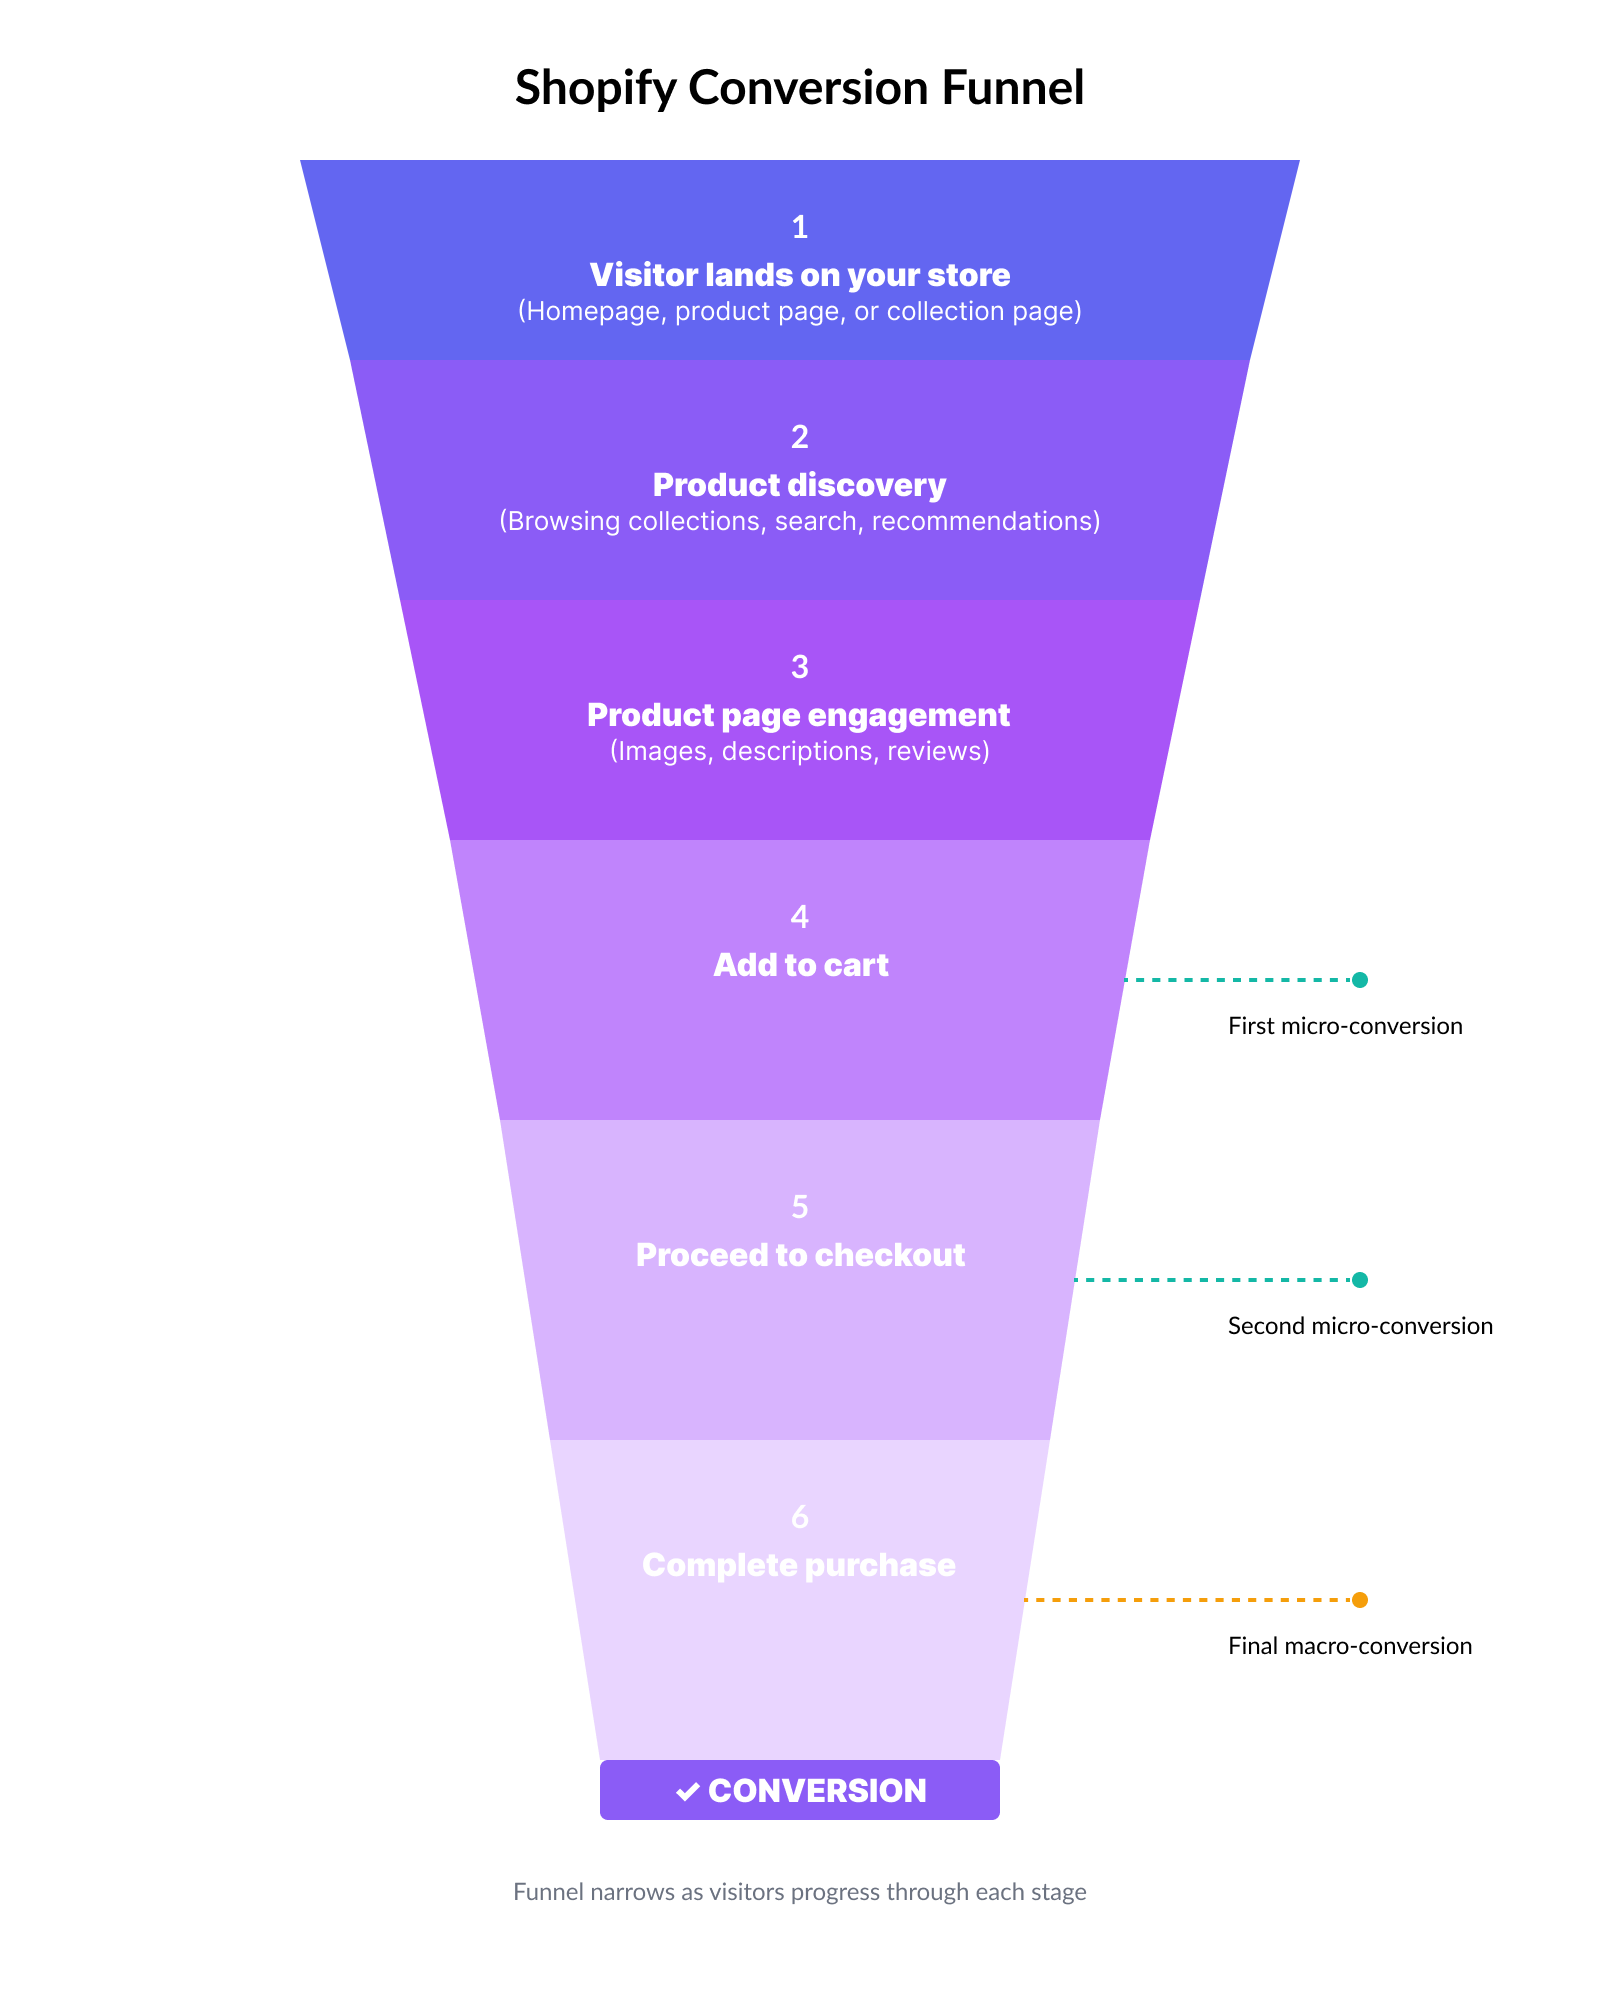
- Visitor lands on your store (homepage, product page, or collection page)
- Product discovery (browsing collections, using search, viewing recommendations)
- Product page engagement (viewing images, reading descriptions, checking reviews)
- Add to cart (first major micro-conversion)
- Proceed to checkout (second micro-conversion)
- Complete purchase (final macro-conversion)
Each stage represents an opportunity for optimization. By tracking where visitors drop off in this funnel, you can identify exactly where to focus your CRO efforts for maximum impact.
How to calculate your Shopify conversion rate
Understanding how to calculate your Shopify conversion rate accurately is essential for measuring your store's performance and tracking improvement over time. Let's break down the formulas and walk through exactly where to find this data.
The standard conversion rate formula is:
Conversion Rate = (Number of Conversions / Number of Sessions) × 100
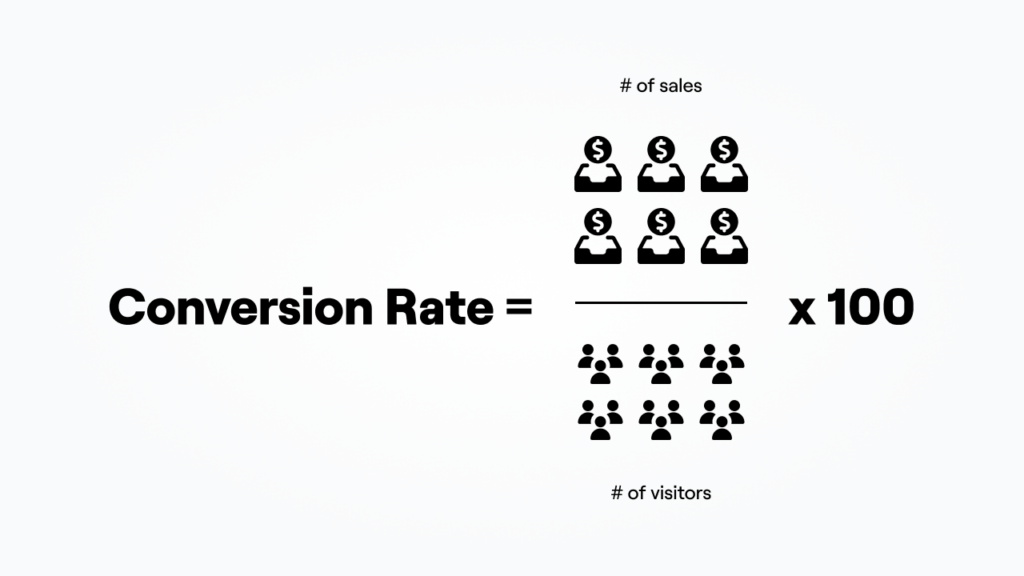
Note that Shopify uses "sessions" rather than "unique visitors." A session is a single visit to your store, and one person can generate multiple sessions.
Let's say your Shopify store had the following traffic last month:
- Total sessions: 5,000
- Orders completed: 85
Your conversion rate calculation would be: (85 orders / 5,000 sessions) × 100 = 1.7% conversion rate
This means that for every 100 visitors to your store, 1.7 of them made a purchase.
Calculating different conversion types
You can apply this same formula to track other important conversions:
Add to Cart Rate
- (Number of sessions with cart additions / Total sessions) × 100
- Example: (750 / 5,000) × 100 = 15% add to cart rate
Checkout Initiation Rate
- (Number of checkouts started / Total sessions) × 100
- Example: (200 / 5,000) × 100 = 4% checkout initiation rate
Cart-to-Purchase Conversion Rate:
- (Number of orders / Number of carts created) × 100
- Example: (85 / 750) × 100 = 11.3% cart conversion rate
This last metric is particularly valuable because it shows how effective your checkout process is once someone has expressed interest by adding an item to their cart.
Common calculation mistakes to avoid
Confusing sessions with unique visitors: Shopify's default metric is sessions, which typically results in a lower conversion rate than visitor-based calculations.
Using different time periods: Always compare conversion rates from the same time period length (e.g., comparing a 7-day period to another 7-day period, not 7 days to 30 days).
Ignoring returns and cancellations: Shopify counts an order as a conversion even if it's later cancelled or returned. For true conversion rate, some merchants subtract these.
Not accounting for traffic source: A 1% conversion rate from cold Facebook ads is very different from 1% from email subscribers. Always segment by traffic source.
Mixing up orders and customers: If one customer places two orders in one session (rare but possible), that's two conversions from one session.
Finding your conversion rate in Shopify analytics
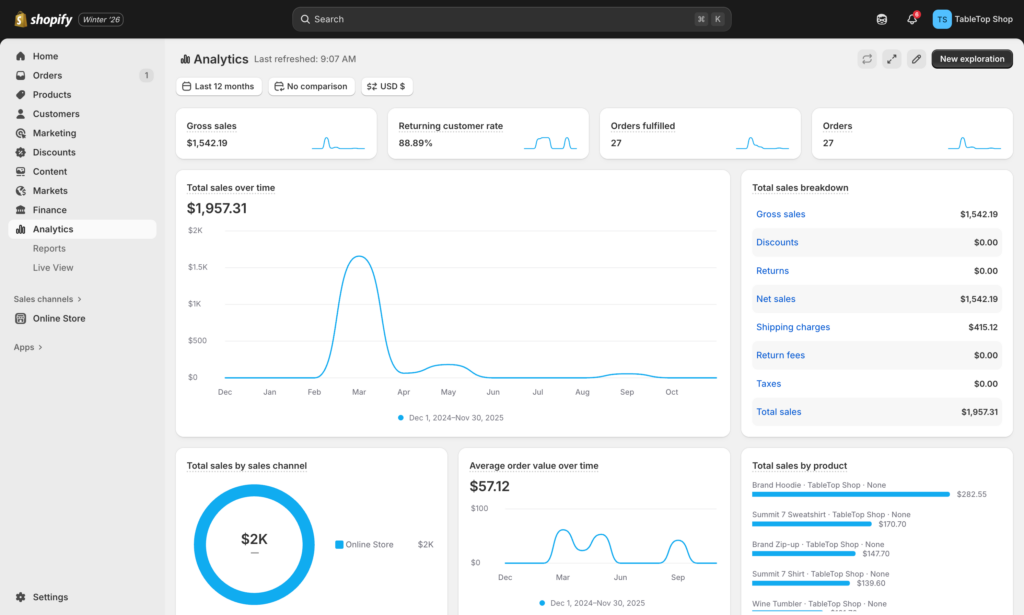
To find your conversion rate in Shopify:
- Log in to your Shopify Admin
- Navigate to Analytics > Reports (left sidebar)
- Search by "conversion"
- Your conversion reports appear in the page results
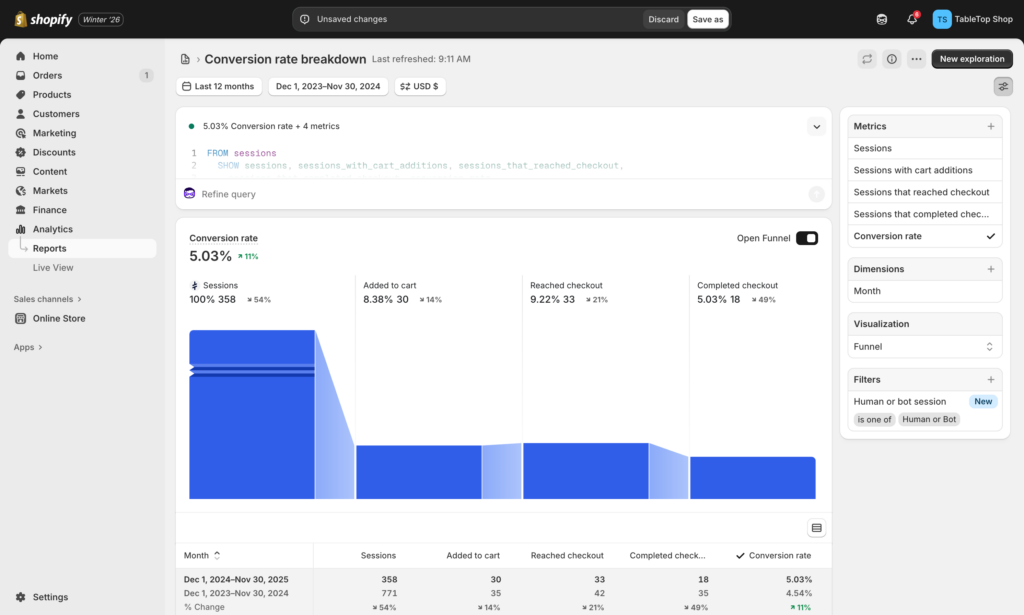
- Click on "Conversion rate breakdown" to see a detailed graph over time
For more granular data:
- Go to Analytics > Reports
- View Checkout conversion rate over time, Product recommendation conversions over time, Search conversions over time, and more
- Export data for deeper analysis or comparison (CSV, JSON, XML and other data types are available)
The Shopify dashboard updates in near real-time, so you can monitor the impact of changes to your store almost immediately.
Shopify conversion rate benchmarks [2026]
Knowing where your Shopify store stands compared to industry standards helps you set realistic goals and identify whether your conversion rate needs urgent attention or fine-tuning. Here's what the data tells us about Shopify conversion rates in 2026.
The overall average: 1.4%
According to thousands of Shopify stores and confirmed by multiple recent studies, the average conversion rate across all Shopify stores is approximately 1.4%. This means that out of every 100 sessions, between 1 and 2 result in a purchase.
However, averages only tell part of the story. Your conversion rate's "health" depends on where you fall within the distribution.
Understanding the benchmark tiers
Here's how to interpret your Shopify store's conversion rate:
Below 0.5% = Needs Immediate Attention
If your conversion rate is below half a percent, something is fundamentally broken. This could indicate technical issues (broken checkout, slow loading times), major trust problems, traffic quality issues, or severe product-market fit problems. Stores in this range should prioritize basic fixes before worrying about optimization.
0.5% - 1.3% = Room for Improvement
You're converting visitors, but you're below average. This suggests your store has the basics covered but needs strategic optimization. Focus on the high-impact areas: product pages, checkout friction, and mobile experience. Most stores can move out of this range with dedicated CRO efforts.
1.3% - 3.3% = Above Average
You're performing better than most Shopify stores. At this level, continue testing and optimizing, but focus on incrementally improving high-performing elements rather than fixing broken fundamentals. Small improvements here can yield significant revenue gains.
Above 3.3% = Top 20%
You're in the top quintile of Shopify stores. Conversion rates above 3% are excellent, and anything above 4.7% puts you in the top 10% of all Shopify stores. At this level, focus on advanced personalization, customer lifetime value optimization, and maintaining your competitive advantage.
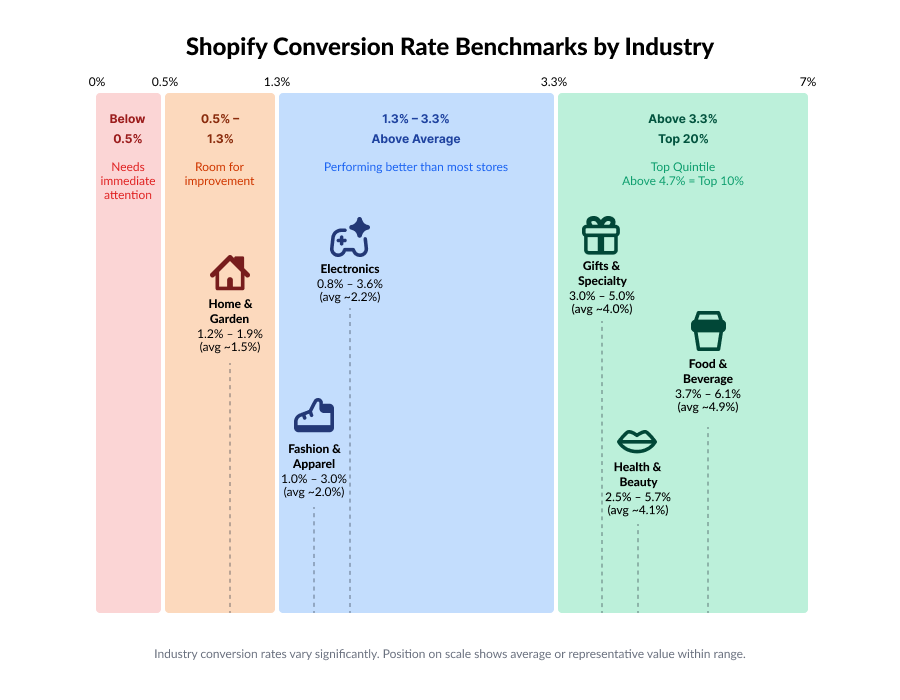
Benchmarks by industry
Conversion rates vary significantly across product categories.
Fashion & Apparel: 1.0% - 3.0% Fashion typically sees moderate conversion rates due to high consideration, frequent browsing behavior, and return concerns. The average stands at 3.0% - 4.1%, though this varies significantly by price point. Luxury apparel sees lower rates around 0.9%, while fast fashion can reach 2.2%.
Health & Beauty: 2.5% - 5.7% Health and beauty products often command higher conversion rates due to consumable nature, subscription potential, and strong brand loyalty.
Home & Garden: 1.2% - 1.9% Higher average order values but longer consideration periods. Detailed product specs and room visualization tools helping conversion.
Food & Beverage: 3.7% - 6.1% Consumables with repeat purchase potential typically convert well, especially with subscription options.
Electronics: 0.8% - 3.6% High consideration purchases with extensive research periods lead to varied conversion rates. Rates depend heavily on price point and product category.
Gifts & Specialty: 3.0% - 5.0% Impulse purchases and unique items often drive higher conversion rates. Seasonal spikes are common, particularly during holidays.
Conversion rates by traffic source
Not all traffic converts equally. Here's a summary of what to expect:
- Email Marketing: 2.6% - 10.3% (your warmest audience)
- Direct Traffic: 2.6% - 3.3% (brand searches and repeat visitors)
- Organic Search: 1.5% - 2.7% (intent-driven traffic)
- Paid Search: 1.5% - 3.2% (depends on keyword quality)
- Social Media: 0.9% - 2.4% (interruption-based, colder traffic)
- Referral Traffic: 2.9% (from other websites and partners)
If your email traffic converts below 2%, you likely have list quality or relevance issues. If organic search traffic converts below 1.5%, examine your keyword targeting and landing page alignment.
Mobile vs Desktop conversion rates
Mobile continues to gain ground, but desktop still converts better on average:
- Desktop: 1.9% - 3.9% average
- Mobile: 1.2% - 1.8% average
- Tablet: 1.5% - 3.1% average
However, this gap is narrowing. Stores with excellent mobile experiences often see mobile conversion rates match or exceed desktop. Mobile represents over 60% of ecommerce traffic, making mobile optimization non-negotiable.
Why benchmarks matter (and when they don't)
Benchmarks provide context and help you identify opportunities, but don't become obsessed with them. Here's why:
A store selling $20 impulse-buy items needs a 4% conversion rate to hit revenue goals, while a store selling $2,000 furniture pieces might thrive at 0.5%. Your conversion rate only matters in context with your average order value, customer acquisition cost, and profit margins.
Focus on improving your conversion rate over time rather than fixating on matching an industry average. A fashion store that moves from 0.9% to 1.4% has achieved more meaningful growth than worrying about why they're not at 2%.
Use benchmarks as diagnostic tools. If you're significantly below your industry average, investigate why. If you're at or above average, focus on continuous improvement rather than comparison.
How to track your Shopify conversion rate
Tracking your conversion rate accurately is the foundation of any successful optimization strategy. Without reliable data, you're essentially making changes in the dark. Fortunately, Shopify provides built-in analytics, and you can enhance your tracking capabilities with Google Analytics 4. Here's how to set up comprehensive conversion tracking for your store.
Using Shopify's built-in analytics
Shopify makes it easy to access your conversion rate data directly from your admin dashboard:
- Log in to your Shopify Admin
- Navigate to Analytics in the left sidebar
- Click on Reports
- Select Conversion rate breakdown from the report list
- Your online store conversion rate appears as a key metric card at the top of the dashboard
Alternatively, you can view more detailed conversion data by selecting "Conversion rate over time". This report shows your conversion rate graphed over your selected time period, making it easy to spot trends and the impact of changes you've made to your store.
While Shopify's built-in analytics are convenient, they have several limitations:
- Session-based tracking only: Doesn't track individual user journeys across multiple sessions
- Limited segmentation: You can't easily segment by custom audience characteristics
- Limited funnel visualization: Difficult to see exactly where visitors drop off in the buying process
- Basic attribution: Can't track complex multi-touch attribution models
- No behavioral data: Doesn't show heatmaps, scroll depth, or click patterns
These limitations are why most serious Shopify merchants also implement Google Analytics.
Setting up Google Analytics for Shopify
Google Analytics 4 (GA4) provides capabilities that Shopify Analytics doesn't:
- User-based tracking: Follow individual customer journeys across multiple sessions and devices
- Advanced segmentation: Create custom audiences based on behavior, demographics, and more
- Funnel analysis: Visualize exactly where customers drop off in your conversion funnel
- Cross-platform tracking: Track customers who browse on mobile and purchase on desktop
- Event-based data model: Track any custom action beyond just purchases
- Free forever: No cost regardless of your traffic volume
Here's how to connect GA4 to your Shopify store:
Step 1: Create Your GA4 Property
- Go to analytics.google.com
- Click Admin (gear icon in bottom left)
- Click Create Property
- Enter your property name (e.g., "Your Store Name")
- Set your time zone and currency
- Click Next and complete the setup wizard
Step 2: Add GA4 to Shopify
- In Shopify Admin, click Sales channels
- Install the Google & YouTube sales channel to your Shopify store.
- Follow the instructions to Connect your Google Analytics web stream
Step 3: Configure Ecommerce Tracking
With the basic setup complete, Shopify automatically sends ecommerce events to GA4, including:
view_item: When someone views a product pageadd_to_cart: When an item is added to cartbegin_checkout: When checkout is initiatedpurchase: When an order is completed
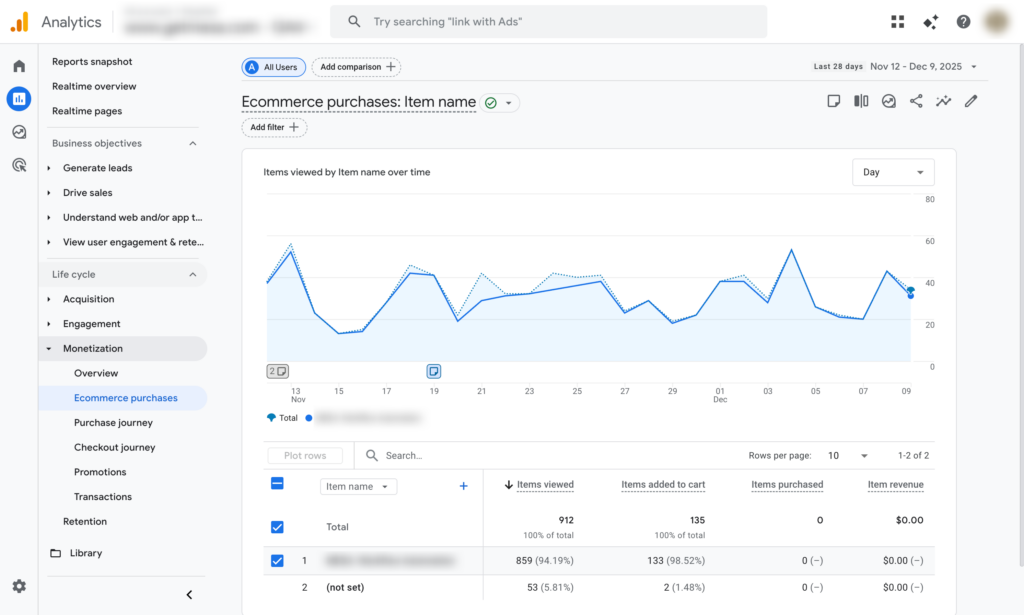
To verify ecommerce tracking is working:
- In GA4, go to Reports > Monetization > Ecommerce purchases
- You should see transaction data within 24-48 hours
Step 4: Setting up conversion Events and Goals
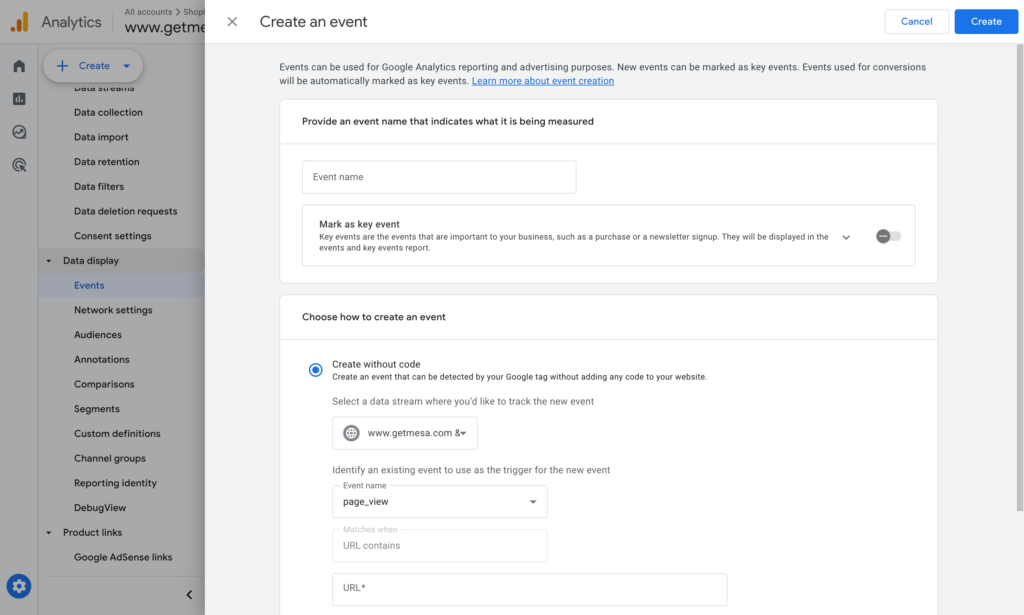
Mark key events as conversions in GA4:
- Go to Admin > Data Display > Events
- Click the button Create an event then add a unique name
- Toggle Mark as conversion
Create custom conversion goals by setting up custom events for actions like:
- Refunds
- Newsletter signups
- Account creations
- Wishlist additions
- Video views
Creating custom reports for Shopify CRO

View a Funnel Exploration report:
- Go to Explore in GA4
- Select Funnel exploration template
- Create steps: Page view → Product view → Add to cart → Begin checkout → Purchase
- Analyze where drop-offs occur
Other key metrics to monitor
Conversion rate is important, but tracking these additional metrics provides a complete picture of your store's health:
Average Order Value (AOV)
AOV = Total Revenue / Number of Orders
Your AOV shows how much customers spend per transaction. A store with a 1% conversion rate and $200 AOV generates the same revenue as a store with a 2% conversion rate and $100 AOV. Track AOV to ensure your optimization efforts don't inadvertently reduce the amount customers spend.
Cart Abandonment Rate
Cart Abandonment Rate = (1 - Orders / Carts Created) × 100
The average cart abandonment rate hovers around 70%. Track this metric to identify checkout friction. If your abandonment rate suddenly spikes, you may have introduced a problem in your checkout flow.
Time to Purchase
Also called "purchase latency," this metric shows how long it takes from a customer's first visit to their first purchase. Shorter times generally indicate stronger product-market fit and clearer messaging. Track this by cohort in GA4's User Acquisition reports.
Customer Lifetime Value (CLV)
CLV = Average Order Value × Purchase Frequency × Average Customer Lifespan
While conversion rate measures acquisition efficiency, CLV measures long-term customer value. A 2% conversion rate with high CLV is better than a 4% conversion rate with customers who never return.
Traffic Source Performance
Break down your conversion rate by source:
- Organic search: Should convert at 1.5-2.5%
- Email: Should convert at 3-5%
- Paid search: Should convert at 1-2%
- Social media: Should convert at 0.5-1.5%
If any source significantly underperforms these benchmarks, investigate the quality of that traffic or the alignment between your ads and landing pages.
Product-Level Conversion Rates
Not all products convert equally. Track which products:
- Have the highest view-to-cart rate
- Have the highest cart-to-purchase rate
- Generate the most revenue per visitor
- Have the highest return rates
Use product-level data to:
- Feature high-converting products more prominently
- Improve listings for products with high views but low conversions
- Create bundles with complementary high-converting items
- Remove or replace consistently poor performers
By tracking these metrics together, you create a comprehensive dashboard that tells you not just whether your store is converting, but why it is or isn't, and where to focus your optimization efforts for maximum impact.
Why your Shopify conversion rate is low
If your conversion rate is below industry benchmarks, something is holding visitors back from becoming customers. Understanding the root cause is essential before you can fix it. Here are the most common culprits that kill Shopify conversion rates.
Slow page load speed
Page speed is critical. Research shows that a one-second delay in load time can reduce conversions by 7%, and if your page takes longer than three seconds to load, 53% of mobile visitors will abandon it entirely.
Shopify-specific optimization tactics:
- Choose a fast theme: Test theme speed with Google PageSpeed Insights before committing
- Compress images: Use Shopify's built-in image optimization or apps like TinyIMG
- Limit app bloat: Each app adds code to your store. Audit your apps quarterly and remove unused ones
- Use Shopify's CDN effectively: Ensure your images are served through Shopify's content delivery network
- Optimize your product image sizes: Upload images at the exact dimensions your theme requires
- Minimize custom code: Review any custom JavaScript or CSS that might block page rendering
Test your store speed regularly at Google PageSpeed Insights and aim for scores above 70 on mobile.
Poor mobile experience
With mobile accounting for 60%+ of ecommerce traffic but converting at nearly half the rate of desktop, mobile optimization is non-negotiable. Common mobile issues include:
- Text too small to read without zooming
- Buttons too small to tap accurately
- Images not loading properly on cellular connections
- Horizontal scrolling required
- Pop-ups that block content and can't be dismissed
Your theme might look great on desktop but breaks on mobile. Use Shopify's mobile preview feature when customizing your theme, and regularly test your store on actual phones and tablets, not just desktop browser simulators.
Broken checkout process
Nothing kills conversions faster than a broken checkout. Test your checkout monthly by completing actual test purchases. Watch for:
- Discount codes that don't apply correctly
- Shipping calculations that fail for certain zip codes
- Error messages without clear instructions
Payment gateway problems
If customers can't use their preferred payment method, they'll abandon their cart. Ensure you offer:
- Major credit cards (Visa, Mastercard, Amex)
- Digital wallets (Shop Pay, Apple Pay, Google Pay)
- PayPal
- Buy Now, Pay Later options (Affirm, Klarna, Afterpay)
Theme conflicts
Sometimes apps conflict with your theme, breaking functionality. Signs of theme conflicts include:
- Features that work in one browser but not another
- Cart buttons that don't respond
- Images that don't display correctly
- Broken mobile navigation
Test your store across multiple browsers (Chrome, Safari, Firefox) and devices before launching any new theme or app.
Confusing navigation
Your navigation should be intuitive, not clever. Take Zara's website as a cautionary tale: their unconventional navigation structure and scroll hijacking forces shoppers to perform extra work just to browse products. Every additional click or moment of confusion increases the likelihood that visitors will leave.

Best practices for Shopify navigation:
- Use standard menu structures (Home, Shop, Collections, About, Contact)
- Limit main navigation to 5-7 items
- Create clear category hierarchies
- Include a search bar prominently
- Use breadcrumbs to help users track their location
Unprofessional or cluttered design
First impressions matter. A cluttered homepage with competing calls-to-action, clashing colors, and inconsistent fonts signals unprofessionalism and erodes trust. Keep your design clean, consistent, and focused on guiding visitors toward your products.
Unclear calls-to-action
Your CTAs should be obvious and compelling. Avoid generic buttons like "Click Here" or "Submit." Use action-oriented, benefit-driven text like:
- "Add to Cart" not "Buy"
- "Get My 20% Off" not "Subscribe"
- "Start My Free Trial" not "Sign Up"
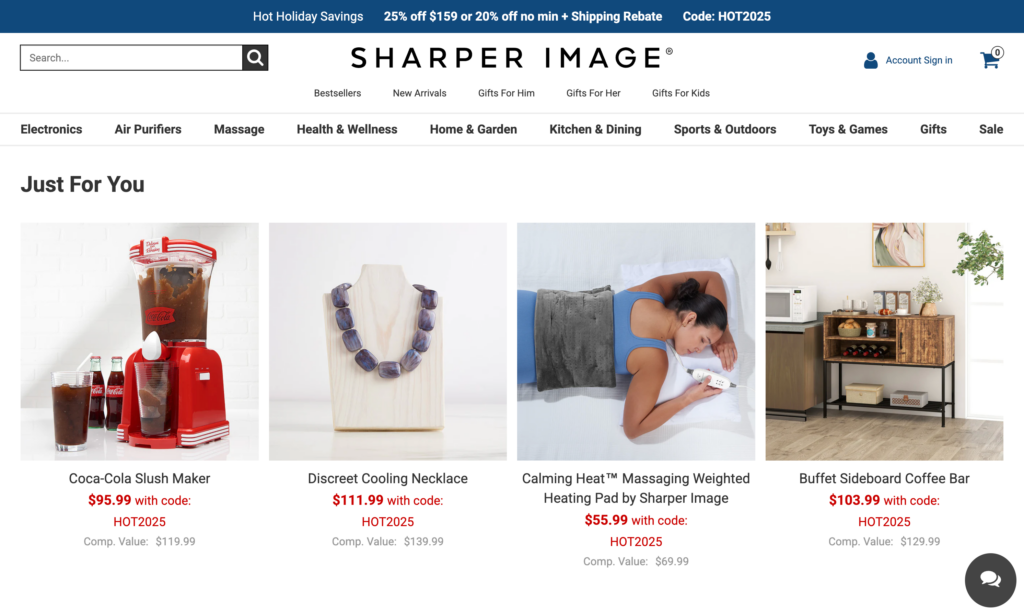
Too many choices/decision fatigue
The Sharper Image website illustrates this problem perfectly—when you sell everything from massage chairs to drones to kitchen gadgets, it's difficult to present clear messaging for new visitors. Too many options paralyze decision-making.
If you sell diverse products:
- Create focused landing pages for each category
- Use clear filters and search to help customers narrow options
- Highlight bestsellers and staff picks
- Create curated collections for different customer needs
Low-quality or insufficient images
Product images are your virtual showroom. Big5 Sporting Goods shows this mistake clearly—displaying only one product angle doesn't help customers understand the entire item. They can't assess size, detail, or how it looks from different perspectives.

Best practices:
- Show 5-8 high-resolution images per product
- Include multiple angles (front, back, side, detail shots)
- Add lifestyle images showing the product in use
- Use zoom functionality
- Consider 360-degree views for complex products
Weak product descriptions
Listing features isn't enough. Customers need to understand why they should buy. Your descriptions should:
- Lead with benefits, not features
- Address common objections
- Tell a story about the product
- Include technical specs for those who want them
- Use scannable formatting (short paragraphs, bullet points)
Customers have questions before buying. Missing information creates uncertainty, which kills conversions:
- Dimensions and weight
- Materials and care instructions
- Warranty information
- Shipping timeframes
- Return policy
No social proof/reviews
According to research, 90% of customers use reviews as part of their purchase decision. Products without reviews appear risky. If you're a new store without reviews yet, use:
- Customer testimonials about your service
- Industry certifications or awards
- "As seen in" media mentions
- Social media follower counts
Unclear pricing or shipping
Hidden costs are the #1 reason for cart abandonment. Be upfront about:
- Total price including any required fees
- Shipping costs (or free shipping thresholds)
- Estimated delivery timeframes
- International shipping availability
- Any potential duties or taxes
Limited payment options at checkout
If a customer's preferred payment method isn't available, they'll leave. Modern Shopify stores should support at least 5-6 payment methods.
Unexpected costs at checkout
Surprising customers with shipping fees or taxes at checkout is the fastest way to lose a sale. Display these costs earlier in the process, ideally on the product page or cart page.
Forced account creation
Requiring customers to create an account before they can complete their purchase is one of the biggest conversion killers. Always offer guest checkout prominently and make it the default option. You'll still collect the customer's email address and can encourage account creation post-purchase when trust has been established.
No clear return policy
A generous, clearly stated return policy actually increases conversions because it reduces perceived risk. Make your return policy easy to find and written in plain language.
Poor or no customer reviews
Beyond product reviews, showcase customer service reviews. Use apps like Judge.me or Yotpo to collect and display reviews systematically.
Unclear brand story
Customers want to know who they're buying from. Create an engaging "About Us" page that explains:
- Your company's mission and values
- Your story or founder's journey
- Why customers should trust you
- What makes you different
No contact information
Hidden or hard-to-find contact information signals that you're not willing to stand behind your products. Display:
- Email address
- Phone number (even if it's just for emergencies)
- Physical address (required by law in many jurisdictions)
- Live chat or chatbot
- Expected response times
Wrong traffic sources
High traffic with low conversions often indicates a traffic quality problem. Review your analytics:
- Are visitors coming from relevant keywords?
- Do your ad campaigns target the right demographics?
- Are influencer partnerships reaching your ideal customer?
Misaligned messaging
Your ads, social media, and landing pages should tell a consistent story. If your Instagram promotes premium luxury products but your website emphasizes budget pricing, you'll confuse visitors.
Product-market fit issues
Sometimes low conversion rates indicate a deeper problem: customers simply don't want what you're selling at your price point. Signs of product-market fit issues:
- High traffic but very low engagement (short session times)
- High cart abandonment even after offering discounts
- Lots of product views but few add-to-carts
- Negative or lukewarm customer feedback
If you suspect product-market fit issues, survey your visitors, analyze your best-selling products, and consider pivoting your product mix or repositioning your brand.
Diagnosing why your conversion rate is low requires looking at the full customer journey. Use analytics to identify where visitors drop off, then systematically address each issue starting with the most impactful problems: technical issues first, then design, then product pages, and finally checkout optimization.
Your 30-day CRO action plan: Where to start?
You've now got the strategic framework for Shopify conversion rate optimization. You understand the baseline metrics, the funnel drop-off points, and how to prioritize improvements based on impact and effort. But strategy without execution is just theory.
So here's your roadmap: a concrete 30-day action plan to start improving your conversion rate immediately.
Week 1: Establish your baseline
You can't improve what you don't measure. Before changing anything, you need to know exactly where you stand.
- Install or verify Google Analytics 4 is tracking properly
- Set up enhanced ecommerce tracking in GA4
- Document your current conversion rate (calculate: orders ÷ sessions × 100)
- Identify your top 5 traffic sources and their individual conversion rates
- Map out your funnel: homepage → collection → product → cart → checkout → purchase
- Calculate drop-off rates at each funnel stage
- Run a speed test on your homepage and top 3 product pages (GTmetrix or PageSpeed Insights)
Week 2: Identify your biggest opportunities
Now that you have data, it's time to find where small changes will have the biggest impact.
- Identify your highest-traffic, lowest-converting pages (use GA4 or Shopify Analytics)
- Review your cart abandonment rate (Shopify Analytics → Reports → Abandoned checkouts)
- Check mobile vs. desktop conversion rates (are mobile visitors converting?)
- List your top 10 products and their individual conversion rates
- Survey 10 recent customers: "What almost stopped you from completing your purchase?"
Week 3: Implement your first quick wins
Start with high-impact, low-effort changes that can move the needle immediately. Choose 2-3 from this list based on your specific situation:
If your cart abandonment rate is above 75%
- Set up Shopify's built-in abandoned cart email (Settings → Notifications)
- Display shipping costs earlier in the funnel (product pages or cart)
- Enable guest checkout if you're currently forcing account creation
If your product pages have high bounce rates
- Add or improve product reviews (install Judge.me or Loox)
- Add 2-3 additional product images showing different angles
- Rewrite your top 5 product descriptions to focus on benefits, not features
- Add a clear money-back guarantee near the Add to Cart button
If your site is slow (PageSpeed score below 70)
- Compress all product images using TinyPNG or TinyIMG app
- Remove unnecessary apps you're not actively using
- Switch to a faster Shopify theme if yours is bloated (Dawn is Shopify's fastest free theme)
If mobile conversion lags desktop by 30%+
- Test your checkout flow on an actual mobile device
- Increase button sizes on mobile product pages
- Simplify mobile navigation to 4-5 top categories maximum
Week 4: Measure, document, plan next steps
- Compare your Week 4 conversion rate to your Week 1 baseline
- Document what you changed and the impact (even if small or inconclusive)
- Identify what worked and what didn't
- Plan your next 2-3 optimizations for the following month
- Set a specific 90-day conversion rate goal based on early results
Choose your path: What to tackle next?
After your first 30 days, you'll have momentum and data. Here's how to decide what to focus on next based on your specific situation:
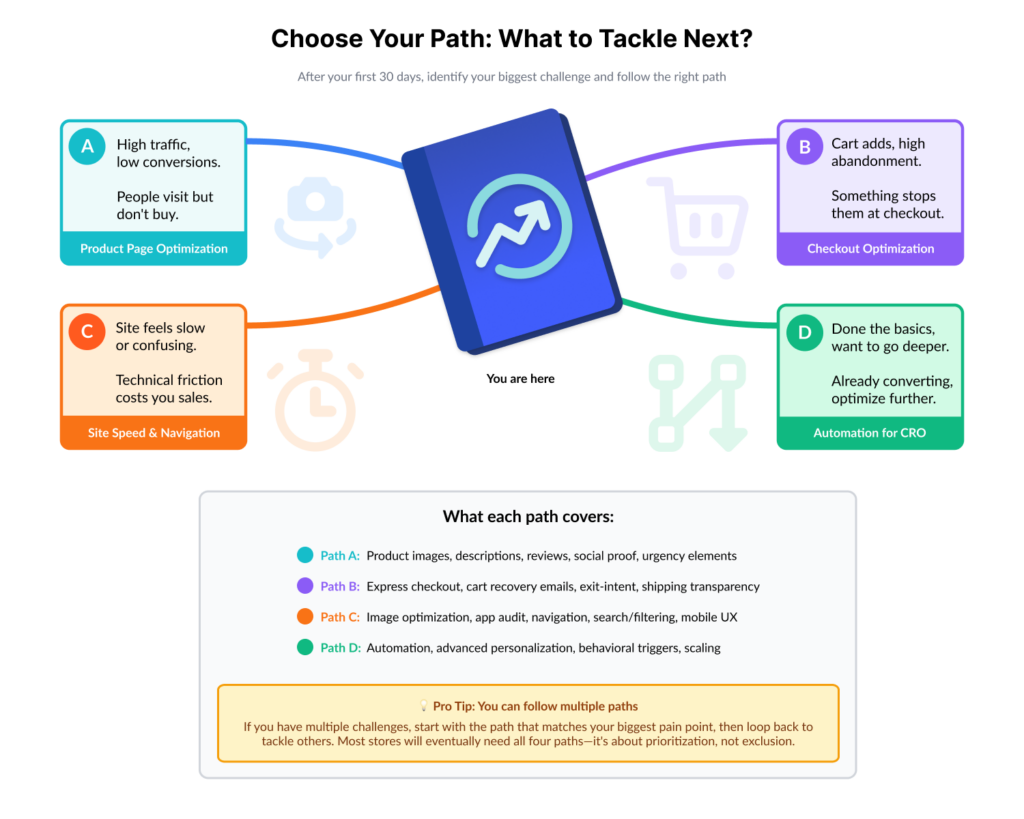
Path A: You're seeing high traffic, low conversions
Your problem: People are visiting but not buying.
Focus on: Product pages and trust signals
- Deep dive into product page optimization (images, descriptions, reviews, social proof)
- Add urgency and scarcity elements where authentic
- Improve product categorization and on-site search
- A/B test different product page layouts
Read next: Shopify Product Page Optimizations
Path B: You're seeing cart adds, but high abandonment
Your problem: People want to buy but something stops them at checkout.
Focus on: Checkout optimization and cart recovery
- Streamline your checkout process (enable express checkout, guest checkout)
- Set up a 3-email abandoned cart sequence
- Add exit-intent popups on cart/checkout pages
- Display shipping costs and delivery estimates earlier
- Implement SMS cart recovery if you have customer phone numbers
Read next: Shopify Checkout Optimizations
Path C: Your site feels slow or confusing
Your problem: Technical friction is costing you sales.
Focus on: Site speed and navigation improvements
- Aggressive image optimization
- App audit (remove what you don't need)
- Simplify navigation and implement faceted search/filtering
- Add breadcrumbs and recently viewed products
- Optimize for mobile experience
Read next: Shopify Site Speed & Navigation
Path D: You've done the basics, want to go deeper
Your problem: You're already converting decently but want to squeeze out more.
Focus on: A/B testing and psychological optimization
- Set up structured A/B tests (Shopify's native testing or Google Optimize)
- Implement advanced personalization
- Test pricing psychology tactics (.99 pricing, anchoring, bundles)
- Dive into conversion psychology and behavioral triggers
Read next: Shopify Automation for CRO
Final thoughts: CRO is ongoing, not a one-time project
The stores that win at conversion optimization don't treat it as a one-time project. They build a culture of continuous improvement:
- They measure everything. Every change, every campaign, every test gets tracked.
- They talk to customers. Surveys, reviews, support tickets—all are sources of conversion insights.
- They test assumptions. What works for other stores might not work for yours. Test it.
- They fix friction relentlessly. Every unnecessary click, confusing label, or slow-loading page is a conversion leak.
- They automate what they can. CRO isn't just about pages and design—it's about workflows, emails, and systems that convert while you sleep.
That last point is where MESA comes in. While you're optimizing your store's front-end experience, MESA handles the automation that makes your entire operation more efficient: abandoned cart sequences, post-purchase follow-ups, inventory alerts, customer segmentation, and hundreds of other workflows that support conversion and retention.
Start measuring, start testing, start improving. Your conversion rate—and your revenue—will thank you.
Want to automate your CRO workflows? Explore MESA's Shopify automation templates to handle abandoned carts, post-purchase engagement, and customer retention on autopilot.
Continue your Shopify CRO journey
Deep dive into specific tactics:
- Shopify Checkout Optimization: 14 Tactics to Reduce Cart Abandonment
- Shopify Product Page Optimization: Convert Browsers Into Buyers
- Shopify Site Speed & Navigation: Technical CRO Fundamentals
- Shopify Average Order Value: Proven Strategies to Increase AOV
After you've implemented the basics:
- Shopify Automation for CRO: Scale Your Optimization Without More Work
(Advanced: Automate your conversion optimization once you've built the foundation)
Frequently asked questions
What is conversion rate optimization for Shopify?
Conversion rate optimization (CRO) is the process of increasing the percentage of Shopify store visitors who complete a desired action, typically making a purchase. It involves analyzing user behavior, identifying friction points in the customer journey, and systematically testing improvements to your store's design, copy, navigation, and checkout process. The goal is to generate more revenue from existing traffic without spending more on advertising.
What is a good conversion rate for a Shopify store?
The average Shopify conversion rate is 1.4-2.0%, though this varies significantly by industry and traffic source. Fashion stores average 1-2%, while specialty stores can reach 3-4%. A conversion rate above 3% is considered excellent for most ecommerce stores. However, your specific "good" rate depends on your average order value, profit margins, and traffic sources—organic traffic typically converts better than cold paid traffic.
How do I calculate my Shopify conversion rate?
Calculate your conversion rate using this formula: (Total Orders ÷ Total Sessions) × 100. For example, if you had 100 orders from 5,000 sessions, your conversion rate is 2%. Find these numbers in Shopify under Analytics → Reports → Online Store Conversion Rate. Track this metric weekly to measure improvement over time and identify trends or sudden drops that need investigation.
What are quick wins for improving Shopify conversion rates?
The fastest CRO wins include: adding product reviews (can increase conversions 10-15%), compressing images to improve page speed, enabling guest checkout, displaying trust badges at checkout, setting up abandoned cart emails, showing shipping costs early, and adding high-quality product images from multiple angles. These changes require minimal technical skill but deliver measurable results within 2-4 weeks of implementation.
Where should I start with conversion rate optimization?
Start by establishing your baseline conversion rate and identifying your biggest drop-off points in the customer funnel. Use Google Analytics or Shopify Analytics to see where customers abandon (product pages, cart, or checkout). Then apply the Impact vs. Effort Matrix: prioritize high-impact, low-effort changes first. Most stores should begin with checkout optimization and page speed improvements before moving to advanced tactics like A/B testing.
How long does it take to see CRO results?
Basic optimizations like adding reviews, improving checkout flow, or fixing site speed can show results within 2-4 weeks with sufficient traffic. However, meaningful CRO is a 90-day minimum commitment. Expect 5-10% conversion rate improvement in the first month, another 3-5% in month two, and 2-5% in month three as you test and refine. Stores with lower traffic need longer testing periods to reach statistical significance.